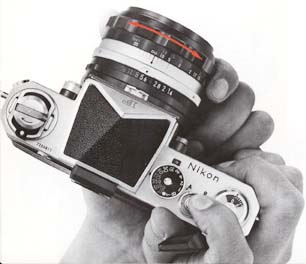
How to hold the camera
The camera must be held correctly for best results, since even the slightest camera
shake at the moment of exposure will result in an appreciable loss of sharpness.
Photos show the best way to hold the camera for rocksteady picture taking.
 Wrap the
fingers of the right hand around the camera body so that the index finger rests comfortably
on the shutter release button and the thumb fits between the body and film-advance
lever so it can stroke the lever without removing the eye from the viewfinder. Cradle
the camera in the left hand for additional support, with the left thumb and index
finger grasping the focusing ring. The camera may be switched from horizontal to
vertical format in this position. Wrap the
fingers of the right hand around the camera body so that the index finger rests comfortably
on the shutter release button and the thumb fits between the body and film-advance
lever so it can stroke the lever without removing the eye from the viewfinder. Cradle
the camera in the left hand for additional support, with the left thumb and index
finger grasping the focusing ring. The camera may be switched from horizontal to
vertical format in this position.
|
|
 The Nikon F is the camera which records on film exactly what you see through
the viewfinder. The eyepiece permits comfortable viewing of the entire screen even
for eyeglass wearers. There are seventeen different focusing screens to fit any combination
of lens and picture-takingrequirements (see pages 21-23). The Type A focusing screen
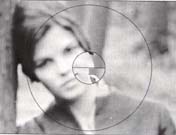
is furnished as standard equipment with the Nikon F. This screen has a 3mm¢-circular
split-image rangefinder in the center for quick and accurate focusing. If the image
seen in the circle is in focus it will appear continuous. When the subject is out
of focus, the rangefinder image will appear split into two parts. The Nikon F is the camera which records on film exactly what you see through
the viewfinder. The eyepiece permits comfortable viewing of the entire screen even
for eyeglass wearers. There are seventeen different focusing screens to fit any combination
of lens and picture-takingrequirements (see pages 21-23). The Type A focusing screen
is furnished as standard equipment with the Nikon F. This screen has a 3mm¢-circular
split-image rangefinder in the center for quick and accurate focusing. If the image
seen in the circle is in focus it will appear continuous. When the subject is out
of focus, the rangefinder image will appear split into two parts.
 Turn the
focusing ring until the two halves of the rangefinder image coincide to form a single,
sharp image. Focusing can also be done by setting the distance scale on the lens
barrel for the lensto-subject distance as measured or estimated. This is especially
useful when the camera must be prefocused to capture an elusive subject. Turn the
focusing ring until the two halves of the rangefinder image coincide to form a single,
sharp image. Focusing can also be done by setting the distance scale on the lens
barrel for the lensto-subject distance as measured or estimated. This is especially
useful when the camera must be prefocused to capture an elusive subject.
Focusing is always done at full aperture with Nikkor Auto lenses. This ensures a
bright, clear finder image for accurate focusing, viewing and framing. It also minimizes
depth of field so the image snaps in or out of focus distinctly.
|
|
|

|
| Out of focus |
|
In focus |
|
