Preliminary Preparation
![]() Installing the
Power Adapter
Installing the
Power Adapter
![]() Battery Installation
Battery Installation
![]() Mounting the Motor
Drive
Mounting the Motor
Drive
Installing the Power Adapter
When the Power Adapter is used, it also supplies power to the camera's electrical
circuitry, eliminating the need for a battery in the camera. It will even deliver
a full charge in subzero weather. Thus, make it a rule to use the Power Adapter with
the motor drive.

1) Unscrew the camera's battery compartment cover and remove the 6 V battery.
2) Screw in the power adapter clockwise, securing it by turning it as far as it will
go. Place the battery compartment cover and camera's battery in a safe place to prevent
loss.
When the power adapter is used, the camera's film advance lever will not function manually. Always advance the film with the motor drive mechanism or with a pressing of the camera's shutter release button (Single frame mode only). |
When not using the power adapter, with the camera's battery being used as a power source, advance the film by hand ONLY when the motor drive's interval dial is set to 'OFF'.
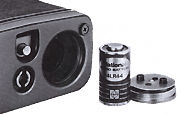
Battery Installation
The PMD Power Pack uses 12 (twelve)1.5 V AA-size penlight batteries or 1.2 V Ni-Cd batteries which are fitted into two battery cases of the power pack. High performance manganese alkaline batteries are recommended.
 |
 |
|
<Battery Check> Press the battery check button to see if batteries are functioning properly. If the needle jumps into the green band of the checker window, it indicates that voltage is adequate. When the needle points to the red band of the battery checker, it is an indicator that the batteries are weak and need to be replaced.
 |
If Ni-Cd penlight batteries are used, the checker will not point to the green band because the voltage rating of such batteries are of a slightly lower voltage than the other types. Although this does not affect performance, it would be advisable to check for any signs of change in condition from time to time. |
Use the battery checker button only when necessary, to avoid battery drain.
<Precautions with Batteries>
When changing batteries, replace all 12 batteries at the same time. A mixed set of old and new batteries will be incapable of delivering an adequate charge.
Batteries exposed to cold temperatures (subzero centigrade) will not always perform adequately and there will be times when the camera will fail to advance the film at the preset intervals, and could even result in malfunction of the system. To prevent this, disconnect the power pack from the motor drive unit and use it as a remote power source in conjunction with the PMD Power Pack Jacket and the PMD Control Cord to protect the batteries from the cold. When batteries temporarily weakened by cold temperatures are restored to normal surrounding temperatures they will recover their normal output and be acceptable for further satisfactory service.
When not using the power pack for long periods of time, remove the battery cases from the power pack and the batteries from the cases to prevent leakage that could damage the contacts.
Since staining of the battery contacts with grease or perspiration can cause poor electrical contact, make it a point to wipe the contacts clean with a dry cloth before placing the batteries into service.
Mounting the Motor Drive
 |
The PMD W-6 is mounted directly to the base of the camera, and the PMD Power Pack is normally mounted directly to the base of the motor drive. Since the power pack is fitted with its own re/ease button, it can be used with the PMD Control Cord for remote control photography. |
<Professional Motor Drive W-6> The Professional Motor Drive screw-mounts to the bottom of the camera.
 |
Align the motor drive's camera-mount screw with the camera's tripod socket (and see that the camera's motor drive mount guide studs are properly seated in the camera mount guide sockets on the PMD). Then, screw the motor drive firmly into the camera, turning the screw clockwise. Fold the mount screw handle in after mounting. |
<PMD Power Pack> The PMD Power Pack is mounted by first inserting the power pack PMD Connector into the Power Pack Connector at the base of the motor drive (and then simultaneously align the power pack s PMD-mount screw with the motor drive s power pack mount socket), and then stack the motor drive on top of the power pack.
 |
 |
Next, erect the PMD mount knob on the base of the power pack, and secure the power pack by turning the knob clockwise. Fold the mount-screw handle in after mounting. |
Note: Only mount the power pack when the motor Drive's Interval dial is set to the 'OFF' position. If the Power Pack is mounted without first setting the interval dial to 'OFF' position and the camera in the film-advanced position, the motor drive will be involuntarily activated. |
Operation and Shooting
 |
<Interval Dial> |
<Setting the Dial>
To set the dial, press the interval lock release button, and turn the dial until the desired setting aligns with the index (white line). In-between settings may not be used so be sure to set the dial on click stop positions only.
|
Setting |
Function |
|
|
OFF |
Current is disconnected and motor drive will not advance the film. Always keep the dial set to this position when not shooting or when connecting accessories. |
|
|
H |
5 fps |
High-speed operation at a maximum rate of 5 fps will be maintained as long as the release button on the motor drive or accessories is continuously held down. However, the actual rate of speed may vary depending upon shutter speed selection, battery condition, and surrounding temperature. |
|
Setting |
Function |
|
|
1/3 |
3 fps |
These speeds are maintained as long as the release button on the motor drive or accessories is pressed and held down. The time delay between each frame is given in seconds. |
|
1/2 |
2 fps |
|
|
1 |
1 fps |
|
|
2 |
2 sec. |
|
|
5 |
5 sec. |
|
|
10 |
10 sec. |
|
|
30 |
30 sec. |
|
|
S |
Shooting single frame, or at 60 sec. intervals |
For single-frame shooting with motor drive's release button. Also used for 60 sec. interval shooting by pressing and holding down the button. |
<Shutter Speeds at the Various Intervals>
 |
It is possible to shoot at all settings of the interval dial in the camera's Auto mode; however, the rate may vary depending on the shutter speed. The shutter speeds given in the following table may be used in conjunction with the respective settings of the interval dial. When shutter speeds not within the given range are used, advancing of the film will begin after activation of the shutter has been completed. |
|
Dial Setting |
Shutter Speed Range (Auto/Manual) |
|
|
H |
1/2000 - 1/60 sec. |
(Excluding B) |
|
1/3 |
1/2000 - 1/60 sec. |
|
|
1/2 |
1/2000 - 1/8 sec. |
|
|
1 |
1/2000 - 1/2 sec. |
|
|
2 |
1/2000 - 1 sec. |
|
|
5 |
1/2000 - 4 sec. |
|
|
10 |
||
|
30 |
||
|
S (60) |
||
Frame Counter
The frame counter featured on the PMD uses a countdown system that registers a declining balance to indicate the number of frames left on the film. When the counter registers "0", the PMD automatically turns itself off.
 |
Depress the countdown dial and turn it in direction of the arrow until the number of frames of the loaded film is aligned with the counter index. (Avoid turning the countdown dial in the opposite direction as it may cause damage.) When the end of the film has been reached, the index will point to "0" and the motor drive will automatically stop. |
The LED film-end indicator will simultaneously light to indicate that the end of the film has been reached. The LED film-end indicator goes off when you set the counter to any position other than "0" or when you set the interval dial to OFF. The countdown dial may also be set to stop film advance after a predetermined number of frames by setting the dial to the desired sequence (for a sequence of 10 shots, for example, set the dial to 10, etc.). Since the camera's exposure counter (sequential type) will also be operating, you can check it to see how many frames you have exposed.
 |
The counter can also be locked for times when you do not wish to use it, or when it is not necessary such as when shooting more than 36 frames in continuous sequence using the 250 Film Back (Optionally available). To lock the counter, set the dial to the "CL" (stands for counter lock) position. |
If the countdown dial is set higher than the number of frames on the loaded film,
the perforations on the film may be damaged during operation of the automatic film
stop.
| Previous | NEXT
| Film Loading, Shooting, rewinding, couple to
use with other system accessories and technical information on PMD/Power Pack 2/3
| Back | to Index Page of Contax
PMD Motor Drive
Instruction
Manuals:
Contax
PMD W-6
| Contax
RTW
W-3
| Back | to Index Page of Contax
RTS
| Back | to Index Page of Contax
RTS II Quartz
| Back | to Index Page of Contax
RTS III
| Back | to Main Index Page of
Contax RTS series models
Camera
Models: | Contax RTS |
RTS
II
| RTS III |
Shared
Resources:|
Motor
Drive-
PMD W6| Winder - RTW-W3 | Screens |
Flash | Macro | Remote | Databack | Accessories | Zeiss T* Optic | Instruction Manuals: Contax RTS HTML | PDF | Contax RTS II Quartz
HTML | PDF | Contax RTS III (3
parts PDF
by mike@butkus.org, M. Butkus, NJ. Part A | Part B | Part C |
OFF TOPIC:- Personal Note
| Message Board | for your favorite Contax RTS Series SLR Models
| Message Board | for your Contax optics
in a shared environment
| Message Board | Specifically for Dispose or Looking for Contax Photographic
Equipment
| Main Reference
Map: RTS - HTML | PDF (206k) RTS II - HTML | PDF(308k) RTS III - HTML | PDF |
Specification: RTS - HTML | PDF(159k) RTS II - HTML | PDF(66k) RTS III - HTML | PDF |
1975: RTS 1979: 139Q 1980: 137MD 1982: 137MA 1982: RTS II |
1985: 159MM 1987: 167MT 1990: RTS III 1992: S2 1992: S2b |
1992: ST 1994: RX 1996: AX 1998: Aria 2000~ |
| List of Carl Zeiss T* lenses for Contax SLR cameras | ||||
About this
photographic
site.
| Home - Photography in Malaysia |
![]()
Credit: Mr. Milan from Pacific Rim Camera <staff@pacificrimcamera.com> for his contribution of the Contax 250 Bulk film back;Mr. "dearaujo" <dearaujo1@mediaone.net> for his images of the Contax RTS and RTW; Mr. Pshea <pshea@nyc.rr.com> for this image of the RTW; Miss Kristina Hauzar-Proctor of www.henrys.com for the images of Contax RTW-W3; MClau, joint maintainer of the Contax RTS MB. Mr. Bodo Bause <bodobause@yahoo.de> for his image appeared in this site. Some of the content are extracts from: Cees De Groot, who maintains a Contax FAQ site and Tim Roger website on Contax SLR cameras, A few of the images on Zeiss lenses were downloaded from Contax US website. My buddy, Yeak & Rizal Yahya, for their cool programming with Contax RTS's Message Board, Note:certain contents and images appeared in this site were either scanned from official marketing leaflets, brochures, sales manuals or publications published by Kyocera over the years and/or contributions from surfers who claimed originality of their own work solely for educational purposes. The creator of the site will not be responsible for any discrepancies that may arise from such possible disputes except rectifying them after verification."Kyocera", "Yashica", "Contax" & "Carl Zeiss T*" are registered trade names of Kyocera Corporation Inc., Japan. A site made with an Apple IMac, dedicated to all fans of Contax cameras and Zeiss Optics.