(1) Automatic Exposure (AE) Control * The Aperture-Priority (Preferred) AE System:
The OM-2 utilizes an aperture-preferred automatic exposure control system which determines
the optimum shutter speed for proper exposure when you preselect the F stop. The
aperture-preferred system is the most convenient-and-easy-to-use method of automatic
operation, particularly outdoors when using standard or wideangle lenses, It is also
generally referred as the Mode of Depth of Field.
 |
 |
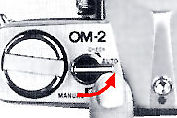
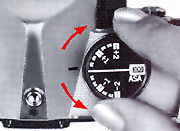
[1] Set the selector lever to the "AUTO" position making sure that the lever "clicks" into place. [2] Set the F stop you wish to use on the lens aperture ring. The F stop you use, for example, should be based on your depth of field requirements. [3] After the F stop has been set, the camera will automatically determine the shutter speed required for proper exposure and indicate that speed on the shutter speed scale display in the viewfinder. |
 |
[4] At shutter speeds slower than 1/30 second, the possibility of camera movement during exposure is increased, even with standard lenses. Since camera movement can result in blurred pictures, shutter speeds from 1/30 to 1 second on the shutter speed scale are marked in light blue. If the needle in the viewfinder indicates a shutter speed in this area, turn the aperture ring until the needle moves up to the black shutter speed scale or make sure your camera is being held steady on a tripod or other stable support to assure sharp, clear photographs. |
* The Shutter Speed-Preferred System Should you wish to select a shutter speed to meet a specific photographic situation (e.g., stopping fast action or eliminating camera movement), you may use a shutter speed-preferred method of automatic exposure control.
 |
It may not be that convenient as some of the shutter priority based AE camera like the Canon AE-1, multimode A-1 or the Minolta XD-7, but since the principle of exposure stays the same, whether your preference is aperture or shutter priority mode, just just twist and turn around between shutter speed ring on the camera body and aperture ring on the lens, similar result can be achieved. But the OM-2 is designed primarily as a aperture priority AE body. To' convert' this system to shutter priority AE camera: |
[1] Set the selector lever to
the "AUTO" position making sure that the lever "clicks"
in place. [2] Look through the
viewfinder and turn the aperture ring until the viewfinder needle points at the desired
shutter speed on the shutter speed scale. [3]
Release the shutter. Your OM-2 makes precise exposure adjustments automatically.
 |
Red Shutter Speed Warning Zone If the viewfinder needle enters the red zone at the top of the shutter speed scale, a shutter speed faster than 1/1000 second is required for proper exposure. Since this is beyond the range of your OM-2 and an overexposed photograph would result, turn the lens aperture ring to a higher F stop number until the meter needle drops down to a shutter speed of 1/1000 second or slower; |
Blue Shutter Speed Warning Zone
If the
viewfinder needle enters the blue "AUTO" zone, a shutter speed longer than
1 second is required for proper exposure. Since your OM-2 provides for automatic
exposures from 1 second to approximately 60 seconds (with ASA 100), make sure your
camera is on a tripod or other stable support.
* Shutter Speed Limitations
with Different Focal Length Lenses The
longer the focal length of a lens, the greater the possibility of camera shake at
a given shutter speed when hand-holding the camera. For the sharpest possible pictures,
use the table below to determine the minimum shutter speed requirement for handheld
photos: (1) Wide-angle and super
wide-angle lenses - 1/30 second or faster. (2)
Standard lenses - 1/60 second or faster. (3) Telephoto and Zoom
lenses to 100mm - 1/125 second or faster. (4)
Telephoto and Zoom lenses to 200mm - 1/125 second or faster. (5) Super telephoto lenses of 300mm and up-1/500
second or faster
* Your camera provides
automatic exposure control when using extension tubes or auto bellows. However, meter
readings must be taken with the camera lens stopped down to shooting aperture.
* If you wish to close
the shutter during a long time exposure under AUTO operation, turn the selector lever
to the OFF position, and the shutter closes. *
When the selector lever is set to the "AUTO" position, rotating the manual
shutter speed ring does not affect the shutter speed automatically set by the camera.
"AUTO" operation is interrupted only when the ring is set to the "B"
setting. * Do not advance the
film while the mirror is up during an automatic exposure. If this should occur, sometimes
the mirror will lockup and the camera will no longer operate. In that case the "RESET" procedure must
be used to unlock the mirror.
Exposure Compensation for Automatic Measurement
in Special or unusual lighting condition
 |
If I am not wrong, the OM2 was one of the early AE bodies that provides a dedicated exposure compensation dial on the camera. Well, at least the 1976 hugely successful Canon AE-1 didn't provide it. Most cameras would require you to utilize the ASA film speed setting to convert 'AE' exposure compensation (Of cause for mechanical bodies similar effect can be achieved simply by overriding metering with f-stop or shutter speed setting). |
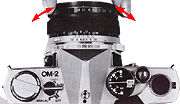
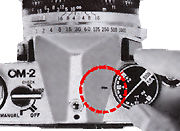
In the case of the OM-2 here, should you wish to alter the exposure setting automatically selected by the camera, to compensate for unusual lighting conditions or create special effects, use the exposure compensation dial located on top of your camera.
 |
 |
TO INTENTIONALLY OVEREXPOSE, turn the dial to the plus (+) side. The +1 and +2 engravings on the dial represent 1 and 2 full F stops of over-exposure. |
Over & underexposure compensations may be
necessary in the following situations: [1]
When the main subject is much darker than the general background or when strong light
strikes the subject from behind or from the side (Situation like the subject is standing
in front of the window indoor or in front of the white wall wearing a white gown
etc..), the meter has a tendency to read the brightest part of the picture resulting
in a slightly underexposed subject. To compensate for this, turn the exposure compensation
dial to the plus (+) side.
[1] Backlighting
and Side lighting When
the primary subject of your picture is much darker than the general background area,
move forward until the subject fills as much of the viewfinder picture area as possible.
(With a zoom lens, you may be able to do this by zooming in on the subject without
changing your position.) After noting the shutter speed indicated by the needle,
return to your original position, recompose your picture, and turn the compensation
dial until the shutter speed needle indicates the shutter speed obtained from the
close-up meter reading.
If this procedure is not possible, you can obtain approximately the same results
by simply turning the exposure compensation dial to the +1 position. It is always
a good idea to use a lens hood when there is strong backlighting or side lighting
to avoid unwanted glare.
 |
 |
[2] When taking a picture of a bright subject against a dark background (spotlighting, deep shadows, etc.) the meter has a tendency to read the darkest part of the picture resulting in a slightly overexposed subject. To compensate for this, turn the compensation dial to the minus ( - ) side. |
[2] Strong Contrast
or Deep Shadows in Background When
taking a picture of a bright subject against a dark background, the subject may often
be over-exposed. To compensate, move forward until I the subject fills as much of
the viewfinder picture area as possible. (With a zoom lens, you may be able to do
this by zooming in on the subject without changing your position.) After noting the
shutter speed indicated by the needle, return to your original position, recompose
the picture, and turn the exposure compensation dial until the shutter speed needle
indicates the shutter speed obtained from your close-up meter reading. If this procedure
is not possible, you can obtain approximately the same results by simply turning
the exposure compensation dial to the - 1 position. *
On the contrary, in spite of strong contrasts, if the subject is bright against a
dark background, it is necessary to turn the dial to the +1 position. It is always
a good idea to use a lens hood when there is strong backlighting or side lighting
to avoid unwanted glare.
|
(2) Manual Exposure Control
* Shutter Speed-Preferred Manual Exposure Control Should you wish to select a shutter speed (e.g., to stop fast action, eliminate camera shake, etc.}, or want to lock in a certain constant exposure for continuous shots, set the selector lever to the ''MANUAL" position.
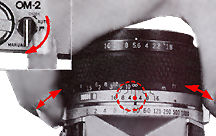 |
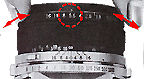
[1]Turn the shutter speed ring until the desired speed is opposite the red reference dot on the lens barrel. |
* Aperture-Preferred Manual
Exposure Control Should you wish to preselect the F stop (e.g., to control depth
of field):
|
[1] Turn the aperture ring until the desired F stop is opposite the white index mark at the front of the lens barrel. [2] Look through the viewfinder and rotate the shutter speed ring until the needle lines up as close as possible to the center of the index. Make sure that the shutter speed meets the other requirements of the situation, and that the shutter speed ring is set directly at a click-stop position and not in-between two settings. |
[3] Make the final exposure adjustment by turning the aperture ring until the needle aligns exactly in the center of the index.
Actually,
I was wondering for quite a while why Olympus has to explain the OM-2 this way, I
guess may be in the midst of intense competitions after 1976 where most of the top
five camera manufacturers have introduced a few AE cameras, these are for comforting
those who thinks the OM-2 still lacks multimode AE control. Well, personally, I think
features packed in both the OM1 & OM2 and their strength could have cause more
concern to others rather than worrying the other way around, ha!
| Once you have switch the mode selector lever to "manual' mode, the slightly colorful viewfinder information display in automatic mode will also switch to a very simple and conventional OM-1 style match-needle way of exposure data display. |  |
* Intentional Over- or underexposure If the meter needle points to the plus (+) side of the index, the camera is set for over-exposure. If the needle points to the minus ( - ) side of the index, the camera is set for under-exposure. NOTE: The shutter speed is not coupled with the exposure meter at the 'B' setting. These over- and underexposures can be used intentionally to meet special lighting conditions such as backlighting, side lighting, etc.
 |
 |
 |
 |
 |
Caution in Low Light Exposure: The following list summarizes the lowest measurable limit in dealing with extreme low light conditions:
* If the Exposure Needle Does Not Move: Point the camera towards a bright light source with the selector lever in the "MANUAL" position. If the needle does not move, the batteries may not be inserted, may be improperly inserted, or may be depleted. After checking the batteries reinsert them properly or replace them.
* If the Exposure Needle Does Not Center on the Index: If the exposure needle will not center on the index, adjust the shutter speed or F stop until the needle is centered. To obtain proper exposure, you may use an ND (neutral density) filter when the subject is too bright, or an electronic flash or flash bulb when the subject is too dark.
* Stop Down Exposure Readings: When using the OM-2 in conjunction with extension tubes, bellows, or the Zuiko Shift Lens (under development}, it is necessary to take meter readings with the lens stopped-down.
* Special Manual Exposure
Control Techniques [a] Backlighting and Side lighting:
When the
most important area of the picture is much darker than the general picture area (strong
light hitting the main subject from behind or from the side) the meter will have
a tendency to read the brightest part of the picture leaving the main subject under-exposed.
To compensate for this, move forward until the subject fills most of the viewfinder
picture area and set the F stop/ shutter speed combination which centers the meter
needle between the index marks. Return to your original position and take the picture
without changing this F stop/shutter speed combination even though the needle is
not centered. If this procedure cannot be followed, you can obtain approximately
the same results by simply setting an F stop/shutter speed combination which causes
the meter needle to indicate one full stop of over-exposure. (NOTE: With backlighting or side
lighting, it's always a good idea to use a lens hood to eliminate unwanted glare.)
[b]
Strong Front lighting and Deep Shadows: When
taking a picture of a bright subject against a dark background (spot lighting, deep
shadow areas, etc.) the meter has a tendency to read the darkest part of the picture
leaving the main subject over-exposed. To compensate for this use the same procedure
for setting exposure as outlined for backlighting. You can also approximate the proper
exposure by holding your position and setting an F stop/shutter speed combination
which causes the meter needle to indicate one full stop of under-exposure.
| previous | Next | 4/10
| Back | to Index Page of OM2(n) Instruction Manual
| Back |
to Index Page of OM2(n)
| Back |
to Main Index Page of OM1(n) & OM2(n)
Olympus
OM-2(n):
Camera
Operations
(9
Parts)
| Other
Issues
(5
Parts)
Specifications: HTML | PDF (48k) Main Reference
Map: HTML | PDF (203k)
Olympus
OM-2 SP:
Camera
Operations
| Other Issues
Specifications: HTML | PDF | Main Reference Map: HTML | PDF
Olympus
OM-1(n): Camera Operations (6 Parts) | Other
Issues
(5
Parts)
Specifications: HTML | PDF | Main Reference Map: HTML | PDF (217k)
Shared
Resources:
Supplementary
articles:
TTL
Metering,
Depth
of Field,
Shutter
Speed
& Aperture
Motor
Drive and Power Winder: Main Index Page (4 Parts)
Motor
Drive 1
| Motor
Drive 2
| Winder
1
| Winder
2
Flash Photography: Main
Index Page
(4
Parts)
T45 | T32 | T20 | F280 | S20 | Qucik AUTO 310 | QA300, 200, 200S
Macro-Photography: Main
Index Page
(3
Parts)
Macro Flash Units: T10 Ring Flash, T28 Twin, T28 Single,
T8 Ring Flash
Accessories: Databack
1-4
| Screens | Finder Accessory | Remote | Cases
Zuiko Lenses: UPLOADED !!
| Message Board | for
your favourite
Olympus
OM-1(n)
and OM-2(n)
series
SLR Camera models
| Message Board | for your Zuiko Optics in a shared environment
| Message Board |Specifically for Dispose or Looking for OM Photographic Equipment
Home - Photography in Malaysia |
Copyright © 2000. leofoo ®. MIR Web Development Team.
Site
& Message Board Maintainers:
Mr. Simon Evans <ruralwales@yahoo.com>; Mr. Rick Oleson
<rick_oleson@yahoo.com>; Mark Dapoz
<md@dementia.org>;Mr. Rick Oleson
<rick_oleson@yahoo.com>; Mr. Bruce
hamm <bhamm@magma,ca>
My
old time buddy, Ahmad
Ikram,
Dr of Rubber Research Institute (RRI), Malaysia
who shares the same passion with me and also left his collection of OM-1n, OM-4 bodies
alsong with a Motor Drive 1 preparing some images appeared in this site. Mr Poon
of Foto Poon, Ipoh, Mr Richard, Ampang Park, Mr Lim and Miss
Jenny of Foto Edar for their generosity for their OM1(n), OM2n camera and some
Zuiko lenses. Mr KKLow for some of his earlier images on the OM-1. Miss Wati and Mirza for helping me
to convert this Operation Manual into a HTML format. Mr MCLau for rectifying
some mistakes made on the earlier preview sites. Site created 'unfortunately' again
with a PowerMac
A
personal tribute to the creator of the OM system and also a site dedicated to all
the fans of Olympuses and Zuiko Optics worldwide. Olympus
is a registered tradename of Olympus Inc, Japan.