Flexible
Program To
change the shutter speed combination in Programmed Auto exposure mode, use the Flexible
Program function. Flexible Program lets you temporarily change an automatically set
shutter speed/aperture combination in 1/3 EV steps, while maintaining the same or
consistent exposure. Flexible Program function can also be used with any Nikon Speedlight.
Note that selectable shutter speeds are limited to those below the sync speed of
the Speedlight. When performing flash photography, however, you cannot shift to a
shutter speed faster than 1/250 sec. (Changeable to 1/300 sec. with Custom
Setting.)
 |
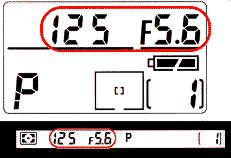 |
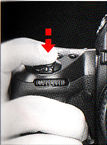
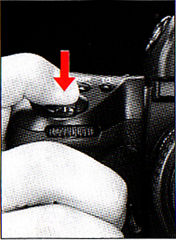
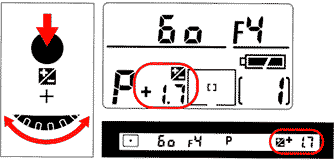
1. Make sure Programmed Auto exposure mode ( |
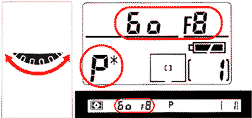 |
2. Rotate Main-Command Dial until desired shutter speed or aperture value appears in the viewfinder and top LCD panel. The Flexible Program indicator ( |
Note:
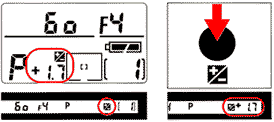
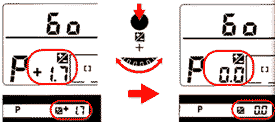
The shifted program is maintained unless you rotate the Main Command Dial to the
previous shutter speed/aperture. Flexible Program is canceled when you switch the
exposure mode to another mode, pressing ![]() buttons simultaneously to activate Two-Button Reset or
turn off the power switch.
buttons simultaneously to activate Two-Button Reset or
turn off the power switch.
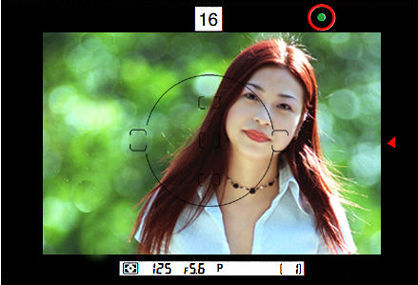
Focus
Lock -To take
off-center subjects In Single Servo AF mode, focus remains locked as long
as the shutter release button is kept lightly pressed. Focus can be locked from any
of the five focus areas selected. In Continuous Servo AF mode, lock focus
using AE-L/AF-L button. In this case, both exposure and focus are simultaneously
locked. Note: With a moving subject, focus cannot be locked
Both exposure and focus can be set to lock simultaneously when the shutter release button is lightly pressed using Custom Setting #7 |
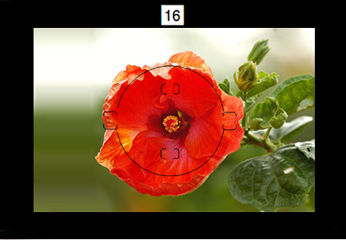
1. Position focus brackets on subject and lightly press shutter release button to start autofocus operation.
 |
 |
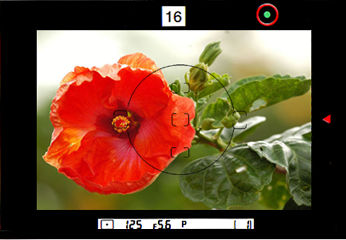
3. Keeping shutter release button lightly pressed, recompose, then fully depress shutter release button to take the picture.
Autofocus can be cleared ad and lens does not start focusing when the shutter release button is lightly pressed using Custom Setting #4. In this case, focus can be locked by keeping the AF start button pressed. |
Note: Provided a subject is covered by one of the five focus brackets, you can also shoot an off-center subject by shifting the focus to the relevant focus area without changing the composition.
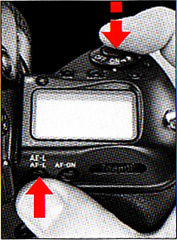
AE/AF Lock Pressing the AE-L/AF-L button will simultaneously lock both exposure and focus. This function can be used with both Single Area AF or Dynamic AF operation, and with all metering systems used for automatic exposure control functions.
* Using Single Servo AF, when Single Area AF mode and Spot Metering are selected, correct exposure can be achieved by choosing a focus area which corresponds to your picture composition.
* Aperture in Aperture-Priority Auto and shutter speed in Shutter-Priority Auto can be changed ever while pressing the AE-L/AF-L button.
* You cannot change the metering system while pressing the AE-L~AF-L button.
* To lock only focus in Single Servo AF, lightly press the shutter release button and recompose.
* Pressing the AE-L/AF-L button locks exposure only in manual focus mode.
About AE Lock In the auto exposure mode, when you want to control exposure based on the brightness of a specific area within the scene, use AE lock. With the F5, pressing the AE-L/AF-L button locks both exposure and focus, but it can be changed to lock only exposure (or focus) using the Custom Setting, Center-Weighted or Spot Metering is recommended when using AE lock.
AE-L/AF-L button can be set to lock only focus or exposure by using Custom Setting #21 |
 |
 |
 |
1. Position focus brackets
on subject and lightly press shut release button to start autofocus operation.
2. Keeping shutter release button
lightly pressed, confirm in focus indicator ![]() appears in viewfinder. Then press and hold
the AE-L/AF-L button to lock focus and exposure-and continue
holding until step #3 is complete.
appears in viewfinder. Then press and hold
the AE-L/AF-L button to lock focus and exposure-and continue
holding until step #3 is complete.
 |
 |
3. While holding AE-L/AF-L button in, recompose, then fully depress shutter release button to take picture. |
Exposure Compensation Exposure compensation is a photographic technique that enables you to vary the final exposure settings from those measured by the camera's light meter. Nikon's 3D Color Matrix Metering employs methods of exposure calculation that automatically apply exposure compensation, depending upon scene brightness, contrast, focused subject's distance and color distribution of the entire frame. As a result, your subject, whether it is centered in the viewfinder or not, is given corrected exposure in most lighting situations. We do not recommend using any manually or automatically applied exposure compensation when using 3D Color Matrix Metering. If you identify an extreme condition under which Matrix may have some difficulty, such as a severely backlit scene or one with extremes of contrast, we recommend using your camera's other built-in meters, Center-Weighted or Spot.
Ultimately, only you know what the subject or a part of it requires in terms of exposure measurement. That's why the F5 camera incorporates three meters plus a variety of exposure compensation systems. The photographer's creativity is always the final deciding and controlling factor. To use the various exposure compensation functions, please refer to the following:
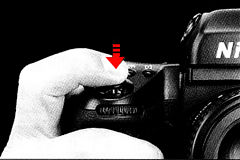
* Using AE-L/AF-L (Auto Exposure/Autofocus Lock) button
* To obtain meter reading for a particular subject In Manual exposure mode
* Using exposure compensation button -Auto Exposure/Flash Exposure Bracketing Results will vary, depending on conditions, so you will want to experiment with each method.
To Obtain Meter Reading for a Particular Subject in Manual Exposure Mode In Manual exposure mode, if you want to let an exposure for a specific brightness value within the scene, switch metering system to Center-Weighted or Spot and use the following method.
 |
 |
1. Center main subject inside viewfinder and/or move in closer until the reference circle for Center-Weighted Metering or Spot Metering is fully covered by the subject.2. Lightly press shutter release button. |
 |
 |
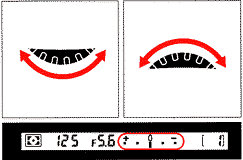
3. Adjust shutter speed and aperture by rotating the Main- and/or Sub-Command Dials until the electronic analog exposure display shows desired exposure. 4 Recompose the picture and shoot. |
Note: In Single Servo AF mode, if recomposing the picture could change subject-to camera distance, refocus by briefly removing your finger from shutter release button and lightly pressing it. Continuous Servo AF is not recommended if the subject becomes off centered after recomposing.
 |
Exposure Compensation Function To modify exposure control (from the ISO standard), use the exposure compensation button. Compensation can be applied tom -5 EV to +5 EV in 1/3 steps. After taking your photo, be sure to reset the control to "0" to resume normal operation. Note: Auto Exposure/Flash Exposure Bracketing is also set, exposure compensation will be combined compensation values. |
 |
 |
 |
 |
| Without compensation | With compensation |
1. Rotate Main-Command Dial while pressing
| previous | NEXT | 7/18 Auto Exposure Bracketing, Long Time exposure etc.
| Back to Index Page |
Instruction Manual for Nikon F5
|
Back | Main Index Page - Nikon F5
Professional SLR camera
The Camera - Background,
Issues & Summary
Basic
Features | Focusing | Metering Systems | Exposure Control | Reliability Issues | Nikkor lens Compatibility
Prisms/Finders - Index page
- 2 parts
Film Backs: Index
Page - 1 parts
Focusing Screens - Index
Page - 1 part
Flash System - Index
Page
- 3 parts
System Accessories: | Power Sources | Cases | Remote
Control | Miscellaneous
Macro
Photography
- Related info on Micro-Nikkor lenses
Technical Specification for Nikon F5
Main
Reference Map
/ Nomenclature
Resource Centre:
Instruction Manuals
Nikon
F5 Camera Body
- 18
parts
MF-28
Multi-Function Back
HTML - 8
parts
PC
Links - Photo Secretary
- 2
parts
AF-TTL Speedlights:
SB-28 / SB28DX | SB29(s) info | SB30 | SB50DX | SB80DX | SB600 info | SB800
Variants: F5 50th Anniversary Model | Nikon/Kodak DCS-620 | DCS-720 Digital Still SLR camera
| Nikon F | Nikon F2 | Nikon F3 | Nikon F4 | Nikon F5 | Nikon F6 | Nikkormat / Nikomat | Nikon FM | Nikon FE/ FA | Nikon EM/FG/FG20 | Nikon Digital SLRs | Nikon - Other models |
The Eyes of Nikon:-
Nikon Auto Focus Nikkor lenses:- Main
Index Page
Nikon Manual Focus Nikkor lenses:- Fisheye-Nikkor Lenses - Circular | Full Frame |
Ultrawides Lenses - 13mm15mm18mm20mm | Wideangle Lenses - 24mm28mm35mm | Standard Lenses - 45mm 50mm 58mm | Telephoto
Lenses - 85mm105mm135mm180mm & 200mm | Super-Telephoto Lenses - 300mm 400mm 500mm 600mm 800mm 1200mm |
 Index Page |
Special
Application lenses: Micro-Nikkor Lenses - 50mm~55mm -60mm 85mm -105mm 200mm Micro-Zoom 70-180mm Perspective Control (PC) - 28mm 35mm PC-Micro 85mm Dedicated Lenses for Nikon F3AF: AF 80mm f/2.8 | AF 200mm f/3.5 EDIF Depth of Field Control (DC): 105mm 135mm Medical Nikkor: 120mm 200mm Reflex-Nikkor Lenses - 500mm 1000mm 2000mm Others: Noct Nikkor | OP-Nikkor | UV Nikkor 55mm 105mm | Focusing Units | Bellows-Nikkor 105mm 135mm Nikon Series E Lenses: 28mm35mm50mm100mm135mm | E-Series Zoom lenses: 36~72mm75~150mm70~210mm |
MF Zoom-Nikkor Lenses: 25~50mm | 28~45mm | 28~50mm | 28~85mm | 35~70mm | 36~72mm E | 35~85mm | 35~105mm | 35~135mm | 35~200mm | 43~86mm | 50~135mm | 50~300mm | 70~210mm E | 75~150mm E | 80~200mm | 85~250mm | 100~300mm | 180~600mm | 200~400mm | 200~600mm | 360~1200mm | 1200~1700mm
Tele-Converters: TC-1 | TC-2 | TC-200 | TC-201 | TC-300 | TC-301 | TC-14 | TC-14A | TC-14B | TC-14C | TC-14E | TC-16 | TC-16A | TC-20E
Recommended links to understand more technical details
related to the Nikkor F-mount and production Serial Number:
http://rick_oleson.tripod.com/index-153.html by: my
friend, Rick Oleson
http://www.zi.ku.dk/personal/lhhansen/photo/fmount.htm by: Hansen,
Lars Holst
http://www.mir.com.my/rb/photography/hardwares/nikonfmount/lens2.htm
http://www.photosynthesis.co.nz/nikon/serialno.html
| Back | Index Page of Digital
Nikon SLR cameras
|
Back | Main Index Page of Pictorial
History of Nikon SLR cameras
![]()
 |
| Message Board | for Nikon F5 Series SLR model(s) | |
HOME - Photography in Malaysia |
![]()
A resource dedicated to my kids, Alvin Foo & Esther Foo- one day,
BOTH might need to use all these information for his/her Nikon F5A camera.
Volunteered Maintainer(s) for the Nikon F5 Message Board: Tony Davies-Patrick, UK; Rick Oleson, US; Koh Kho King, Malaysia.
Credit: Mr. Chuck Hester, US for his text re-editing skill for this site; Our staff, HowKiat® who created the 3D-Nikon F5 logo. Mr. Lew Chee Wai of YL camera for lending his F5 for me to take some shots appeared in this site. All those nice folks who have contributed their images, in particular Mr. Mike Long, Edwin leong, Palmi Einarsson, Sergio Pessolano, Fred Kamphues, Harry Eggens, Curtis Forrester, Nick (Natures Moments), Sandra Bartocha; fellow countrymen, Vincent Thian, Koh Kho King, Philip Chong, CY Leow etc. and contributions from a few nice folks from Photo Malaysia Forum. Disclaimers & acknowledgments: Certain content and images appeared in this site were either scanned from official marketing leaflets, brochures published by Nikon and/or contribution from surfers who claimed originality of their own work for public publishing in this website, where majority of the extracted information are used basing on educational merits. The creator of this site will not be responsible for any discrepancies that may arise from any possible dispute except rectifying them after verification from respective source. Neither Nikon or its associates has granted any permission(s) in using their public information nor has any interest in the creation of this site. "Nikon", "Nikkormat", "Nippon Kokagu KK" "Silent Wave", "Focus Tracking Lock-on", "Nikkor" & other applicable technical/business terms are registered trade name(s) of Nikon Corporation Inc., Japan. Site made with an Apple G5 IMac.