Relationship between
Shutter Speed and Aperture
The amount of light reaching the film plane is determined by a combination of
the shutter speed and the lens aperture. A shutter speed of 1/125 sec. lets in twice
as much light as a setting of 1/250 sec. and only half as much light as 1/60 sec..
An aperture setting of f/11 lets in twice as much light as f/16, half as much as
f/8. Thus, if the correct exposure for a particular picture-taking situation is 1/125
at f/11, then 1/125 at f/8 or 1/60 at f/16 will give the same exposure. The table
above illustrates the interrelationship between shutter speed and aperture. The best
combination will depend on the results you want. Use fast shutter speeds to freeze
motion; use slow shutter speeds to produce deliberate blur. Also, small apertures
give greater depth of field, while large apertures restrict the zone of sharp focus
to the main subject. A good rule to follow in preventing camera shake is to select
a minimum shutter speed which is the reciprocal of the focal length of the lens in
use. For example, when using a normal 50mm lens, select a speed no slower than 1/60
sec. (the closest number to 1/50). For a 200mm super-telephoto, use no less than
1/250 sec. and so forth. Refer
to this section
for more information on Shutter Speed, Aperture, Exposure and Depth
of Field.
Depth
of Field
 |
When you shoot at a certain
aperture and focusing distance, you will find that not only the main subject but
objects in a certain distance range in front of and behind it will be sharp in the
final photograph. Objects beyond this range become increasingly out of focus. This
'in-focus zone' is known as depth of field. When this zone of sharpness is large,
the depth of field is said to be deep; when it is small, the depth of field is said
to be shallow. Note: Certain Zoom Nikkor and special purpose lenses
do not have a depth-of-field scale.
|
The following information may be helpful to help you understand more in relation
to depth of field:
- The smaller the shooting aperture (i.e. the larger the numerical
f-number), the deeper the depth of field; the larger the aperture, the shallower
the depth of field.
- The farther away the subject is from the lens, the deeper
the depth of field becomes; the closer to the lens, the shallower the depth of field.
- The longer the focal length of a lens, the shallower the depth of field at each
f/stop; the shorter the focal length, the deeper the depth of field.
- There is
greater depth of field behind the main subject than in front of it. The depth of
field at each aperture is indicated on the lens by a set of colour-coded lines
(corresponding to the colours of the f-numbers on the aperture ring) which is
used in conjunction with the distance scale. The range is indicated by the distance
between the lines.
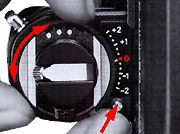
Depth-of-field
preview button When a lens with an automatic diaphragm is used, the image in
the viewfinder is viewed with the lens at the maximum aperture. However, by depressing
the depth-of field preview button, the lens will be stopped down to the aperture set,
enabling you to examine the depth of field before shooting. The image in the viewfinder
darkens according to the selected f-number: the smaller the aperture (i.e. the larger
f-number), the darker the image.
 |
Components of the picture
that appear in focus when the button is depressed will be in the zone of sharp focus.
Note that the button should be depressed all the way.
|
Note: When
shooting in the automatic exposure mode with an AI lens, do not release the shutter
while depressing the preview button; improper exposure may result.
Exposure
Compensation
 |

In the
vast majority of cases, the F3AF provides the correct exposure on Automatic. However,
certain situations require a deviation from the automatic exposure setting. For this
purpose, the F3AF features both an exposure compensation dial and a memory lock.
|
Exposure
compensation dial
This dial adjust the exposure by increasing or decreasing the automatic selected
shutter speed. When the scene is usually light or dark in tone (e.g. a snow scene),
exposure compensation must be made to prevent over or under-exposure. Or under normal
shooting conditions, you can intentionally over or under-expose the shot to create
special "high-key" or "low-key" effects. To make exposure compensation,
push the locking button (63) as you rotate the exposure compensation dial. It is
graduated in one-third stop increments: -1 and -2 indicate one and two stops less
exposure, whereas +1 and +2 indicate one and two stops additional exposure. At ASA/ISO
6400, the compensation extends to only -1; at ASA/ISO 12, up to +1. After use, make
sure to reset the dial to "0". The recommended exposure compensation settings
for various subjects and picture-taking situations are shown above.
Note: Because the LCD shows only discrete shutter speeds, a slight
adjustment of the exposure compensation dial, such as +1/3, may not be reflected
in a change in shutter speed.
Memory
lock button Another way of making exposure compensation with the F3AF on automatic
is to use the exposure memory lock button. When there is a substantial difference
in brightness between the main subject and the background, such as a strongly backbit
subject, the camera's exposure meter is likely to be fooled, resulting in under-
or over exposure.
 |
To compensate for this,
centrer the main subject in the viewfinder or move in close to the subject, depress
the memory lock button and hold it; then recompose and shoot .
|
Note: In autofocus operation, you must also depress the focus lock button when recomposing
with the subject off-centrer to keep it in sharp focus.
Stop
Down Exposure Measurement When using a non-AI lens or certain close-up accessories,
you must push the meter coupling lever release button and lock the meter coupling
lever in the "up" position before mounting a lens or attaching an accessory.
In this case, the diaphragm in the lens does not link with the meter coupling lever
on the camera body.
 |
 |
Therefore, you must perform
stop-down metering. The procedure is as follows.
|
For non-AI lenses
with automatic diaphragms
(Skip this
section
IF all your Nikkor lenses have a minimum of an AI-Spec)
On auto: Push
the depth of field preview button all the way in and hold it as you trip the shutter.
Caution: If the depth of field preview button is not depressed all the way,
the mirror may remain in the "up" position. On manual: Select
a shutter speed. Then hold the preview button and turn the lens aperture ring (68)
until the -+ symbol appears in the viewfinder. Release the preview button and take
the shot.
For non-AI lenses
or accessories without automatic diaphragms On auto: Stop the lens down manually
until the desired shutter speed appears in the viewfinder. Then take the picture.
On manual: Adjust the shutter speed or aperture until the -+ sign appears.
For Fixed-aperture
lenses, photomicrography or astrophotography On auto: No control is necessary;
just take the picture. On manual: Adjust the shutter speed dial until the
-+ appears. If correct exposure is unobtainable, use an ND (neutral density) filter
or change the illumination to adjust the exposure.
Other
Controls
Shutter
Release Button Depressing
the button halfway switches on the exposure meter and autofocus
function and activates the viewfinder LED and LCD display for
focus/exposure information. Both displays stay on for approx. 16 sec.,
even after taking your finger off the button, then turns themselves off
automatically to conserve battery power. Depressing the button all the
way down releases the shutter.
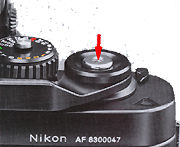 |
The shutter release button
is threaded in its centrer to accept a standard cable release for tripping the shutter
with the camera mounted on a tripod.
|
Notes:
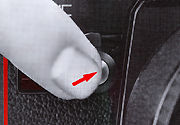
Backup
Mechanical Release Lever
This lever
is provided as an alternative method of releasing the shutter in case the camera's
batteries become weak or completely exhausted. To operate the lever, first use your
fingernail to pull it down to the ready position. Then push it down to trip the shutter.
 |
The shutter operates at
a mechanical speed of approx. 1/60 sec. at any setting on the shutter speed dial,
except T. At T, push down the backup mechanical release lever with the power switch
off.
|
Caution: If you advance the
film while holding down the backup mechanical release lever, the shutter will fire
immediately at the completion of the film advance stroke, thus wasting a frame. Also,
if you fail to advance the film completely and then use the lever to trip the shutter,
the mirror will remain in the "up" position; when the additional stroke
is made to complete the film winding, the shutter will fire, also wasting a frame.
Film Advance Lever
The film advance lever is coaxial with the shutter release button and is specially
contoured to fit the thumb. To advance the film, wind the lever to the right all
the way until it stops. It automatically returns to the standoff position the moment
you take your thumb off it.
 |
One complete stroke or
a series of shorter ones advances the film by a single frame and simultaneously cocks
the shutter. At the end of the film roll, the lever stops working. Do not attempt
to wind the lever further, just rewind the film.
|
Note: If
the lever becomes difficult to operate at the beginning of the roll, this means that
the film is not winding onto the take-up spool properly. In this case, rewind the
film immediately and load the film again.
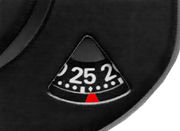
Frame
Counter
To keep track of the number of exposed frames, the frame counter is graduated
from two frames below ) up to 40. Blue numerals appear every 5 frames (0, 5, 10 etc.),
with dots in between. White marks at 12, 24 and 36 indicate the number of frames
available on most film cartridges.
 |
When making blank shots
with the shutter speed dial set to "A", the shutter will fire at 1/80 sec.
until the frame counter reaches the first frame. In addition, the LCD shows 80 in
the finder. Or, if you set the dial manually between 1/125 sec. and 1/2000 sec., the
shutter will still fire at 1/80 sec. In the finder, an M 80 is displayed. However,
if the speed is manually set to 1/80 sec. (X) or below, the shutter will fire at
the speed set with the LCD indicating that speed. Therefore, to speed up film loading,
set the dial to A or 1/125 sec. or above. When the camera back is opened, the frame
counter automatically resets to two frames below zero.
|
| Previous | NEXT |
Basic Operations 7/12
|
Back to Main
Index Page of Nikon
F3
Site
|
 |
Home - Photography in Malaysia |