Modern Classic SLRs Series :
Nikon F3 - Basic Camera Operations - Part IV

Viewinfo.jpg (6k)

1. LCD exposure information
2. ADR f/number
3. Fine matte/Fresnel outer field
4. Microprism collar
5. Split-image rangefinder spot
6. 12mm reference circle

The outline that you see inside a viewfinder (Illustrated at the left) is provided in a focusing screen. A total of 22 types standard screens is supplied as optional accessories. It can be changed to suit your own photography. The K focusing screen used to illustrate here comes with the camera as standard equipment.

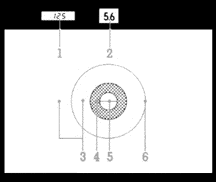
With the split-image rangefinder, turn the ring until the split image becomes whole. With the microprism grid, turn the ring until the shimmering image appears sharp. With the matte outer field, turn the ring until the image appears sharp. The split-image rangefinder works well for subjects having definite lines or boundaries. The microprism collar is for fast-moving subjects or ones with indistinct lines, while the matte outer field is suitable for close-ups. In fast-moving or candid shooting situations, you can measure or estimate the distance between you and the subject and preset it on the lens using the distance scale engraved both in feet and meters.

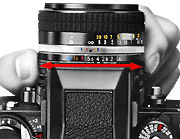
Note: The meter reads the light over the entire focusing screen but is distinctly biased toward the central 12mm area, also known as Nikon's centre-weighted average metering method. The Nikon F3 uses a 80/20 distribution ratio, where the 12mm area dictates 80% of preference for metering sensitivity while the rest of the area only takes in the balance of 20% into consideration. You can say the F3's metering is heavy centre-weighted average metering.

Adjust Aperture.jpg (9k)
Set the lens aperture.

Turn the lens aperture ring until the desired f/number is opposite the index mark on the lens. The selected f/number appears in the viewfinder for convenient reference. Aperture value, in this case dictates the degree of depth of field in the eventual photograph. However, varying the aperture values also shifts the shutter speed set by the camera's electronic metering circuit, thus, even though Nikon F3 is an aperture priority automatic exposure camera, by varying the aperture you can change the shutter speed, thus, you can also achieve user implemented shutter speed priority using the reverse manner.

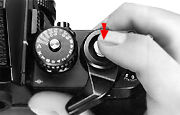
i.e. Assuming if a shutter speed of 1/500 sec is desired for a given scene, just shift the aperture to a larger number (f1.4, f1.8, f2 etc.) on your lens should affect the metering circuit of the camera to select a higher shutter speed setting to match your selected aperture value, when 1/500 sec is obtained, just shoot. Nevertheless, other than those involved in action photography, it is so much easier and fun to play around with aperture priority AE. i.e. you select the aperture and the camera will provide a matching shutter speed electronically to ensure a proper exposure is formed. Note: Aperture is one of the key elements that affects depth of field - where smaller lens diaphragm opening will increase depth of field (Zone of sharpness) while larger lens opening of the lens diaphragm will decrease the degree of zone sharpness, front to back of your subject of interest.
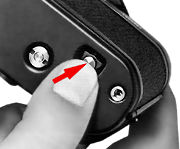
Light Touch.jpg (6k)


Advance.jpg (7k)
20. Take the picture

Look through the viewfinder and press the shutter release button lightly to turn on the exposure meter. The shutter speed display indicates the shutter speed selected by the camera. As long as neither + 2000 or - 8 - appears in the shutter speed display, the camera should give a 'theoretical' correct exposure. If either indication should appear, adjust the aperture ring on the lens until a desirable shutter speed is indicated. Should either indication appear even after all possible lens apertures have been tried, then the available light is too bright or too dim for the meter's range. Use either artificial light source such as a flash unit to increase the subject's brightness or a neutral density filter to reduce the amount of light reaching the film.

21. Advance the film.

Stroke the film advance lever to transport the film to the next frame and get the camera ready for the next shot. This is not necessary if you are using an automatic film advance device such as the dedicated motor drive designed for the Nikon F3, the MD-4, where it will advance the film automatically to the next frame and ready for the next exposure.

22. Push in the rewind button

After the last exposure has been made, the film advance lever will stop working. You must then rewind the exposed film back into its cartridge. To do this, first turn the camera upside down and depress the rewind button to disengage the film sprocket drive. Without performing this process, the film cannot be rewound. With the motor drive MD-4, the film rewind process is automatic (and high speed of 4.5 sec for 36 exposure film is possible if using Ni-Cd cells) after pushing the two interlocking film rewind slides (Another being a safety slide) on the motor drive to avoid unintentional film rewinding.
Rewind Btn.jpg (7k)

Rewind.jpg (4k)
23. Rewind the film.

With the F3, manual film rewind is required. First lift the film rewind crank and turn it in the direction of the arrow to rewind the film. When you feel the tension lessen, continue winding one or two more turns until the film leader is rewound completely back into the cartridge. How to ensure the film has been thoroughly rewound into the film canister ? Firstly, when the end of the film is reached, you can hear or feel the tension of the film is lessen or heard. To ensure it has been done, just turn the film rewind knob for a couple of more times and sense there is no tension at all before you attempt to open the camera film back to remove the exposed film roll within.

Remove.jpg (6k)
24. Remove the film cartridge.

Open the camera back and take out the film cartridge. You have to pull the rewind knob up so as to disengage the film rewind fork for easier removal of the film cartridge. Avoid unloading the film in direct sunlight. If there is no shade available, turn your back on the sun and use your own shadow to shield the camera while unloading film. * The film rewind fork is for securing the film cartridge when it is in the film chamber (And aided by the spring film cartridge stabilizer of the film back). After inserting the film roll, you have to reverse the sequence here by pushing the film rewind knob down to lock the film cartridge in the film chamber.

Turn Off.jpg (6k)
25. Turn the camera off.

Turn the power switch off (Just slide the lever to the left and cover the red dot) while the camera is not in use. This prevents inadvertent battery drain in case the shutter release button is accidentally depressed. This completes the basic set up operation for Nikon F3. Next few sections will go into detailed explanation of the various controls available in the Nikon F3 and outline their respective usage or possible application to assist you in your photography.

NavBar
  |  |  |
  Back to Index of Nikon F3 Models
  Back to Pictorial History of Nikon SLRs
About this photographic site
Contributions and Credits
  Home - Photography in Malaysia
| Previous | Back to Index Page | Next - Controls in detail


| Back | Index Page of F3 Camera Manual
| Back | Main Index Page of Nikon F3 models

About this photographic site Contributions and Credits

  Home - Photography in Malaysia

Modern Classic SLRs Series :
Nikon F3 - Basic Camera Operations - Part IV
Copyright © 1999. leofoo ®. MIR Web Development Team.