Olympus has also designed a special dedicated group of system accessories such as Varimagni Finder, Eye coupler, and optric Correction Lens in 8 diopter corrections: +2, + 1, 0 (for hypermetropia); -1, -2, -3, -4, -5 (for myopia) to match the photographer's vision, and essential in fine focusing for high magnification. You can refer to Viewfinder Group for more info.
Film advance is by conventional lever with a ratcheted action allowing operation by a single stroke or by several short strokes. The action also tensions the shutter, operates the frame counter and sets the double exposure prevention device.
The frame counter, is an automatic reset, progressive type, situated next to the film advance lever for easy visual cross reference of the remaining exposures you have. The dial is calibrated from S (Start) to E (End) as follows: "S.. 2 . 4 . 6. ......... and all even numbered frames to ..34 . 36 . E". The counter will reset once the camera back is opened. Numbers 12, 20, 24 and 36 as well as "S" and "E" are all painted in bright yellow for commonly used film length and indicators for start and end of film roll.
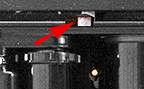 |
<<- -- The counter indicates the number of frames exposed and returns to zero when the camera back is opened. The tiny spring plate (See red arrow) hidden in the railing for camera back does the trick, it will mate with the protruding portion at the edge on the camera back) |
Film Advance Lever. Both OM-1 and OM2 provide single or multiple stroke film advance with a 150° winding angle. The 30° play before advance allows comfortable and efficient lever operation with the thumb left in place for quick picture taking. Both of the later OM-1n and OM2n have a redesigned film advance (and rewind release levers).
 |
The self timer lever is rather oversized in its ratio to height of the camera body. It permits mechanical self-timer operations which allows a 4-12 sec delay on the shutter release, depending on the degree of rotation you pre-defined. A slight designing flaw is, the mirror will not flip up upon tripping of the shutter release button, but since the OM-1(n) is equipped with a mirror lock up feature, you can still make use to minimize movement caused by reflex mirror action. |
The self timer mechanism works with a lever system with a rotation of 180 degree counterclockwise with approx. 4-12 sec delay. The action is activated via a tiny white "start-lever" hidden behind the self timer lever - a popular design for older mechanical cameras during those days. What if you wish to canceled the self timer during count down ?
 |
It is still possible ! The self-timer can be stopped during operation or reset. Merely by twisting the tiny start lever to the left hand side will immediately stop the timer and it may still be reset then. |
A few extra points where it relates: During operation, if the start lever is pushed to the left, it should stop the operation. When it is returned to its original position again, the timer should resume operation accurately. If the timer is started without the shutter fully charged, it will stop in the middle of its run but it will start again when the film advance lever is completed; in such case, it will then release the shutter. After the shutter release, there should be a leeway in the run for less than 5 seconds. |
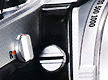
It is rather surprising to find out many new OM users do not even realize all OM-1(n) series models have a Mirror Lock Up feature ! This was strangely omitted by Olympus from their second SLR, OM2 onwards. The subsequent higher end models such as OM-3, OM-4 and OM-2SP has that little button found on the OM-1series model for Mirror Lockup changed to Viewfinder Illumination button.
Turn 90° counterclockwise will lock the mirror in the "UP" position. This setting can be made before or after film advance.
 |
The button cum lever looks and designed similar to the film rewind button which in fact is just next to it at the front plate of the camera. It is very easy to operate and very much convenient than those found on camera such as those found on the Nikons or older Canon F1. |
|
The mirror lock-up
capability is useful for photo copying, photo reproduction and a wide range of photographic
situations such as photomicrography, high speed sequence photography utilizing the
motor drive and wherever vibration should be reduced to a minimum. Those who are
using Olympus system to handle macro, photomicrography and astrophotography will
definitely missed this feature on electronic OM2 and OM4 series models but strangely,
Olympus never seriously reconsiders to re-include it after all these years and making
OM-1 series models the sole model that still offering this unique feature. Other
than this, once would notice the OM models lack a body integrated Depth of Filed
Preview button or lever. This is another unusual design of the OM system: The depth
of field preview is built in the lens ! Located on the lower right side of the lens.
Pressing this button closes down the diaphragm to the preselected aperture for viewing
depth of field.
Another very original idea from OM-1 was the camera has its film rewind button moved
from the usually camera base position to the front of the camera. If you think it
carefully, it is a very logical design especially in situation you had your camera
mounted onto tripod. Next advantage is, like most camera during the sixties and seventies;
most camera manufacturers would rather avoid to discuss multiple exposure operations
(Frankly, camera models such as Nikon early F2s and in particular the Nikkormat models do not even mentioned it how can it be done
in their literature or in their instruction manuals !).
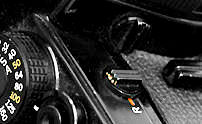 |
Moved from the bottom of the camera to the front. Ideal for film changing when the motor drive unit or a tripod is attached to the camera base. To rewind the film, turn the lever 90° counterclockwise to "R" Automatically resets when the film advance lever is operated. |
The OM-1, in this case, provide a more positive answer to such request. The film rewind button, also required to disengage the film advance mechanism, helps greatly to provide a level of added convenience for setup and visual confirmation without the need to locate the button under the camera body. Strangely, not too many other camera models followed the design, I remember Canon 2nd professional model, New Canon F-1 of 1981 eventually moved the film rewind button onto top panel of the camera body, so did with Olympus's own OM-3 and OM4 series models, that was followed by Nikon in their fourth professional model, Nikon F4 in 1988. Well, you will still have to respect Olympus foreword thinking design concept.
We mentioned Multiple Exposures operation earlier. How does multiple exposure works in OM-1models ? Quite conventional, but I would think it still have some room for improvement* but again, naturally, we cannot use technologies introduced in later stage by others as a yardstick to compare the OM1or OM2's method. Overall, I would still rate it among the best in its class during the era from its debut to late seventies. To operate, firstly, all you need to do is just take a blank exposure and advance the film, before you attempt to proceed further, take a peep at the frame number and memorize it; then use the rewind knob to take up any slack and take the first exposure. Now here it may require some attention, while you depressing the rewind release button, wind the film advance lever, this should cocks the shutter but does not advance the film (Check again with the frame number and see if it has moved). Then, you can take the second exposure. But you still have to remember, just on the safe side, advance the film and shoot a blank after the double exposure.
* By far, among all brands of older series of SLR cameras, Nikon's midrange models such as Nikon FM (1977) & Nikon FE (1978) have the BEST DESIGN and ease of operations with a tiny lever placed beside the film advance lever which permits single hand operation. You can combine it with a Motor Drive to take unlimited multiple exposures in rapid sequences.
The shutter release button is located in the position naturally adopted by the index finger. The design provides for the outer ring to act as a support for the finger, ensuring soft release action.
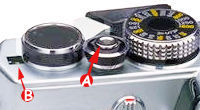 |
The shutter release button (A) is threaded in the middle (JIS approved screw-in type) to accept standard cable release which may be required in situation where you need absolute stillness for long time exposures. If exposure time is exceeding more than a few seconds, it is always encouraged to get a cable release with a lock feature. |
If you are worrying about movement caused by reflex action of main reflex mirror, use the mirror lockup of the OM-1 to minimize such chances. The shutter release button is quite sensitive, require only around 200-300g force to trip the shutter release. None of the OM-1 bodies were provided with any shutter release lock. However, once the shutter has been release, it will not be able to trip further. Upon completion of the film advance action, the shutter can be released (Or via shutter release button on top of the hand grip of the Motor Drive). Other than that, the shutter release button may be pressed in only about 0.05-0.15mm but not for the full stroke. The film advance lever on the other hand, should return to its original position regardless of whether the film is loaded or not. As a guide, In its still position, the lever should be in contact with the ASA dial or within 0.8mm from the dial. On the left hand side of the pentaprism is the large and easy to use Meter ON/OFF switch lever. Basically, switching it to ON initiates the flow of current from battery and activates the meter needle inside the viewfinder.
 |
The shutter release was not designed double as a popular modern Meter ON/OFF switch (I am not too sure which OM model was the first..but it should be the OM4 of 1983). Unlike the better featured OM-2(n) meter activating lever, OM-1's switch is much straight forward because it has only a "ON" and "OFF" position. To use the meter, just push the lever to "ON". Turn it "OFF" while it is not being used because it will drain and deplete pretty rapidly if left un-attended. |
Well, provided you are confident enough or you are using an external meter, you need not have to turn on the meter to take a picture.
| Back |
to Index Page of OM1(n)
| Back |
to Main Index Page of OM1(n) & OM2(n)
Olympus
OM-1(n): Main Index Page (5 Parts) | Camera Operations (6 Parts)
Specifications: HTML | PDF | Main Reference Map:
HTML | PDF (217k)
Olympus OM-2(n):
Main
Index Page
(6
Parts)
| Camera Operations (9 Parts)
Specifications: HTML | PDF (48k) Main Reference Map: HTML | PDF (203k)
Olympus
OM-2SP: Camera Operations | Other Issues
Specifications | Main Reference Map / nomenclatureF
Shared Resources: Supplementary articles: TTL
Metering,
Depth
of Field,
Shutter
Speed
& Aperture
Motor
Drive and Power Winder: Main Index Page (4 Parts)
Motor Drive 1 | Motor Drive
2
| Winder 1 | Winder 2
Flash Photography: Main Index Page (4 Parts)
T45 | T32 | T20 | F280 | S20 | Qucik AUTO 310 | QA300, 200,
200S
Macro-Photography: Main Index Page (3 Parts)
Macro Flash Units: T10 Ring Flash, T28 Twin, T28 Single,
T8 Ring Flash
Accessories: Databack 1-4 | Screens | Finder Accessory | Remote | Cases
Zuiko
Lenses: Slowly developing..
Glossary of Photography
A good external source for used Instruction
Manuals
for various OM SLRs and Accessories.
| Message Board | for
your favourite Olympus
OM-1(n)
and OM-2(n)
series models
| Message Board | for your Zuiko Optics in a shared environment
| Message Board | Specifically for Dispose or Looking for OM Photographic
Equipment
About this photographic site.
Home - Photography in Malaysia |
Copyright © 2000. leofoo ®. MIR Web Development Team.
Maintainers
for OM Site & Message Board:
Mr. Rick Oleson <rick_oleson@yahoo.com>; Mr. Bruce hamm
<bhamm@magma,ca>; Mr. Simon
Evans <sje@lrc.ruralwales.org>; Mark Dapoz
<md@dementia.org>;
Credit: My old time buddy,
Ahmad
Ikram,
Dr of Rubber Research Institute (RRI), Malaysia
who shares the same passion with me and also lending his OM-1n, OM-4 and the Motor
Drive 1 to me for preparing some images in this site; Mark Dapoz <md@dementia.org>for reminding
some broken links;
Mr Poon of Foto Poon, Ipoh, Mr Richard, Ampang Park, Mr Lim
and Miss Jenny of Foto Edar for their generosity for their OM1(n), OM2n camera
and some Zuiko lenses. Mr Hans van Veluwen for mistakenly using
some content earlier from his OM website; J Sorensen
for providing some useful images to rectify some technical "flaws"; Mr
Gen Holst for helping during the early stages of development of this OM site;
Mr KKLow for some of his earlier images on the OM-1appeared in this website;
Miss Wati and Mirza for helping me
to convert this Operation Manual into a HTML format. Mr MCLau for rectifying
some mistakes made on the earlier preview sites. Site created 'unfortunately' again
with a PowerMac. A personal tribute to the
creator of the OM system and also a site dedicated to all the fans of Olympuses and
Zuiko Optics worldwide. Some of the content
and images appeared in this site were scanned from OM official marketing leaflets,
brochures and instruction manual(s) for educational purposes. Olympus is a registered
tradename of Olympus Optical Inc., Japan.