|
Information
Library on Canon T60
Instruction Manual - Part I
|
File Size: HTML Page (31k) Loading ..
1.
Loading the Batteries
This camera uses two LR44 alkaline batteries or two SR44 silver batteries.
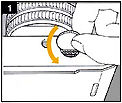
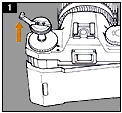
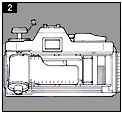
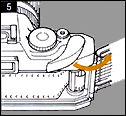
1. Remove the battery holder by turning it counterclockwise with a coin of similar
object.
 |
 |
 |
2. As shown on the diagram on the outside of the battery
holder, insert two batteries into the holder with the + side of each battery facing
up.
|
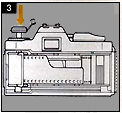
3. Replace the battery holder and turn it clockwise
using a coin or similar object to secure it in place.
Caution: When changing the batteries, be sure to replace both batteries with
new ones of the same brand. Remove the batteries if the camera is not to be use for
an extended period of time.
2.
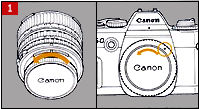
Lens Attachment
 |
 |
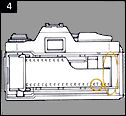
1. Remove the rear lens cap and body cap by turning
counterclockwise.
2. Align the red dots on the lens and the camera, and then turn the lens clockwise
until it stops and locks in place
3. Remove the lens cap and focus.
|
 |
Warning:
The T60 CANNOT accept any of the current autofocus EF lenses. The correct lens type
was the older FD/FDn mount lenses which you may NOT able to find them in regular
camera shop other than at the used item section. There is a fairly well compiled
listing in the MIR site for all those FD lenses and you | may use it as a buying reference. |. If you have no idea of where to get hold
of these lenses, you can make use of 1. FreeTradeZone (FTZ) here in MIR or 2. use Ebay auction.
|
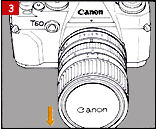
3.
Checking the Batteries
 |
 |
 |
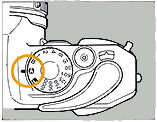
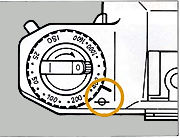
1. Set the selector dial to "A". 2. Turn the
film advance lever until it stops.
3. While looking through the viewfinder, press the shutter button halfway.
|
- If at least two of the red LEDs inside the viewfinder
are lit or blinking, the batteries are okay.
- If none of the LEDs light up, either the batteries
were inserted upside down or the batteries are exhausted and need to be replaced.
- Battery life is approximately 1 year under normal
use.
Note: When
the camera is not being used, be sure to set the selector dial to "L" (Lock)
to prevent unnecessary battery drain.
4.
Viewfinder Information
The LEDs in the viewfinder light up or blink when necessary to inform you of various
exposure information. The information provided in the viewfinder is shown in the
illustration at the left.
 |
|
 : :
|
These LEDs light or blink to indicate camera settings
and conditions |
|
AUTO :
|
This LED lights when the selector dial is set to A (Automatic
exposure) |
|
M :
|
This LED lights when the selector dial is set to a manual
exposure position ( any position other than "A" or "L"). |
|
OVER :
|
This LED lights to warn of over-exposure. |
|
1000-1 :
|
The LED corresponding to the set shutter speed lights.
All shutter speeds are actually the reciprocal of the numerals displayed. For example,
"125" indicates a shutter speed of 1/125 sec. |
|
 : :
|
This is the fastest shutter speed that can be used with
a flash. Flash is synchronized at all shutter speeds 1/60 sec or slower. |
|
LT :
|
This LED lights when a Long Time shutter speed of 2-8
seconds is set. |
|
B :
|
This LED lights when the camera is set to Bulb mode.
When the selector dial is set to "B" (Bulb), the shutter will remain open
for as long as the shutter button is help pressed. |
|
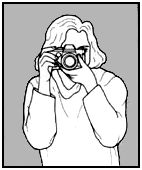
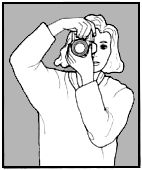
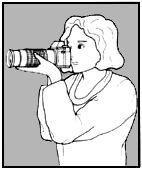
5.
Holding the Camera
If the camera moves while
a picture is being taken, the resulting picture may be unclear. Sharp pictures require
that the camera b be held very still when the shutter button is pressed. Try the
following camera-holding technique to avoid disappointments.
|
1)
|
Grasp the camera grip securely with the right hand. |
|
2)
|
Use your left hand to support both the camera body and
the lens, and keep your left elbow close to your body. |
|
3)
|
Lightly hold the camera against your nose and look into
the viewfinder. |
|
4)
|
With your feet spread slightly apart, place on effort
in front of the other to stabilize your stance. |
|
Note::
|
There is no absolute camera holding technique which
is right for every individuals. Practice holding the camera in different ways to
determine which is the best technique for you. Practicing in front of a mirrors helpful. |
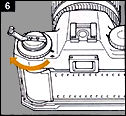
6.
Focusing and Shutter Button Action
 |
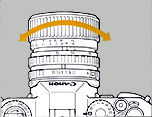 |
By rotating the lens' focusing
ring, you can focus on objects located in any part of the viewfinder image area.
1. Set the selector dial to "A".
2. While looking through the viewfinder, rotate the lens' focusing ring until the
viewfinder image appears sharp.
|
3. Check the focus. Three focusing aids are provided
inside the viewfinder: a split-image rangefinder, which is the horizontal line located
in the center of the viewfinder, a microprism ring, which surrounds the split-image
rangefinder, and a surrounding matte screen.
- With the split-image rangefinder, you can tell the
subject is in focus when the upper and lower images align (merge) to form a complete
image.
- The microprism ring, which shows a broken, unclear
image when the subject is out of focus, shows a clear image when in focus.
- The surrounding matte screen shows a misty image
when the subject is out of focus but becomes clear when in focus.
 |
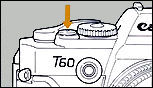 |
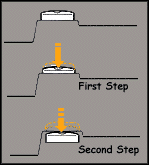
4. Press the shutter button. The shutter button has
a 2-step pressing action. When lightly pressed halfway (to the first step), the red
LEDs in the viewfinder light up to indicate the current camera status. When pressed
completely (to the second step), the shutter is released and a picture is taken In
order to prevent camera shake, start with the ball of your index finger resting on
the shutter button and the gently press the shutter button.
|
 |
7.
Setting the Film Speed
Before loading film. set the film seed on the film speed dial. The proper film speed
is indicated on the film box and on the outside of the film cartridge.
 |
|
1)
|
Turn the film speed dial until the proper film speed
setting is aligned with the film speed setting mark. The
film speed dial has click stops for each setting on the scale. when setting the film
speed, be sure the dial is set to the appropriate click stop position, not between
click stops. |
|
-
|
Available film speed settings are shown below. The points
between the numbers represent the film speeds shown in parentheses ( ). |
ISO 25 .(32)
.(40) 50 .(64) .(80) 100 .(125)
.(160) 200 .(250) .(320) 400 .(500)
.(640) .(800) 1000 .(1200) 1600
|
8.
Loading the Film
 |
 |
Avoid direct sunlight when
loading or unloading film, and take care not to touch the shutter curtain, the film
guide rails, or the pressure plate.
|
 |
 |
 |
1. Pull up the rewind crank knob to open the back cover.
2. Insert the film cartridge into the film chamber as shown in the illustration.
|
3. Lower
the rewind crank knob to its original position to secure the film cartridge in place.
NOTE: If the rewind crank knob cannot be lowered all the way, turn the
knob slightly while gently pressing down until the rewind shaft slides easily into
the cartridge.
 |
 |
 |
4. Pull
the film leader across and insert the tip of the film leader into one of the slots
in the take-up spool.
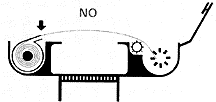
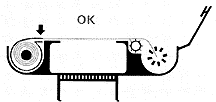
5. Slowly wind the film advance lever to advance the film once, taking care that
the film perforations engage with the sprockets.
|
 |
 |
6. Slowly turn the rewind crank clockwise
to take up the film slack.
7. Close the back cover and make sure that it closes securely with a click. Press
the shutter button completely to take a blank shot.
8. Advance the film one frame by slowly winding the film advance lever until it stops.
|
NOTE: The film crank knob also serves as a film load confirmation. It rotates
when the film advance lever is wound to confirm proper film load.
 |
 |
9. Press the shutter button completely
to take a blank shot. NOTE: When the selector dial is set to "A", shutter
release is slightly slow due to the aperture-priority AE function. Set the dial to
"1000" when loading the film.
10. Continue advancing the film in this manner until ''1" appears in the frame
counter.
|
The frame counter numbers areas follows:
S - - 1 - - 4 - 6 - 8 - 10 - 12 - 14 - 16 - 18 - 20 - 22 - 24 - 26 - 28 - 30 - 32
- 34 - 36 -
NOTE: S, 12, 20, 24, and 36 appear in red.
| Previous | Next | 2 / 4 Automatic Exposure, Manual Exposure, Bulb
mode, Over and Under-exposure indicator
| Back | Main Index Page of Canon A & T Series
SLR Models
| Back | Main Index Page for Canon FD Lenses
| Message Board |
for your Canon
A-Series SLR camera(s)
| Message Board | for your Canon optics
in a shared environment
| Message Board | Specifically for Dispose or Looking for Canon Photographic
Equipment
Shared Resources:
Winder A, Winder A2, Focusing Screens, Motor Drive MA, Databack A,
Speedlites & Macro photography.
Canon FD Resources
A Series:
AE-1
| AT-1
| A-1 | AV-1
| AE-1 Program | AL-1
T- Series: T50
| T60
| T70
| T80
| T90
F-1
| New F-1
Canon FL
Resources
Pellix
| FTQL
FL | Canon
FDn lenses.
| Early versions of FD lenses
Highly
suggestive useful external links/resources
created by Mr.Christian
Rollinger:
Essentials: - Canon T60 Instruction Manual | Determine Years of Made of your
Canon
Canon Flash models:- Canon 300TL flash(1.5MB); Macrolite ML-1(HTML); Macrolite ML-2;
Macrolite ML-3; Speedlite 133a; Speedlite 155a(HTML); Speedlite 177a; Speedlite 188a(HTML); Speedlite 199a; Speedlite 244t; Speedlite 277t (HTML); Speedlite
533; Speedlite 577
Others:- Canon Auto Bellow Unit Manual; Canon Macro Photography Guide, Canon Slide Duplicator Manual, Canon Angle Finder User's Manual

 |
Home - Photography in Malaysia |
Copyright
© 2000. leofoo ®. MIR Web Development Team. Credit: KaiPin who has been spending
quite sometime to locate a copy of the camera Instruction Manual. Mr Richard Yeow,
General Manager of Canon Marketing for his kind permission
to reproduce content in that manual; my staffs, Ms Mai, Wati and Mirza for helping me with all
those scanning work of the manual. Made with a PowerMac, broadcast with a Redhat Linux
powered server.