Interchangeable Focusing Screens
The XK remains as the only distinctive Minolta camera model that can accept interchangeable
finder/Prism and has the option for focusing screens as well. But it was such a long
time ago and most Minolta users might not even have heard of that. That is essentially
the true essence of why I am creating this site here - even if there is not much
of a web traffic. Sometimes, that is not a priority to a web developer who so happens
to be a photographer (Still a lousy one for both medium).
Changing Focusing Screens
To Install
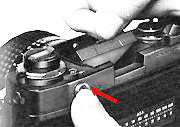 |
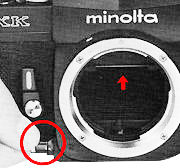
1. With the finder removed from the camera, grasp the small projecting bracket on one side of the screen frame with thumb and forefinger and hold it so that the bracket is on the upper side of the frame and toward the back of the camera over the corresponding curved recess in the camera's screen receptacle. |
2. Keeping the finder release button pushed all the way in, hold the screen at an angle, insert the side toward the front or the end toward the shutter release first, and let the screen drop into place. Then release the button.
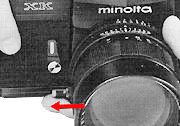
To Remove
Holding the finder release button pushed in as far as it will go, use the small bracket
protruding toward back of camera to lift the screen out back side or rewind-crank
side first.
Note: Care
should be taken not to scratch the surfaces or damage the microprism or split-field
prisms of focusing screens.
| Liquid/Agent | Remarks |
| Freon (CCl2F2) | Excellent |
| Lens cleaner (on the market) | Excellent |
| Ethyl Alcohol (C2H50H) | Acceptable |
| Methyl Alcohol (CH3OH) | Unacceptable |
| Ethy1 Ether ( (C2H5)2O) | Unacceptable |
| Thinner ( on the market) | Unacceptable |
Compensation Factor Selector
 |
A few combinations of focusing screens and lenses require metering compensation for accurate exposure. In addition to showing recommendable combinations of lenses and screens and the metering method to be used with each, the table on earlier focusing screen section indicates any such compensation factors necessary. |
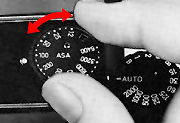
With the Auto Electro Finder, if
the lens screen combination you are using requires compensation, lift up on the outer
ring of the film-speed selector and turn the ring until the applicable factor designation
appears in the compensation factor window in the selector dial.
Caution: When no compensation is needed, the dot
should appear in the window for proper metering.
 |
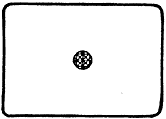
Type P: Matte Fresnel field with |
 |
Type M: Matte Fresnel field with |
 |
Type PM: Matte Fresnel field with |
 |
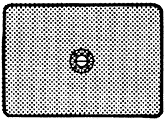
Type G: Matte Fresnel field only with no spot; for general photography. |
 |
Type C1: Clear Fresnel field with 6mm microprism spot; for general photography with certain lenses; |
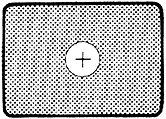 |
Type H: Matte Fresnel field with central |
 |
Type S: Clear Fresnel field with central cross as above plus etched measuring scales; for dioptric and parallax focusing in dim light, close-ups, photomicrography and other high-magnification applications plus making actual image measurements. |
MC-Lens-Screens Combination Chart
| Full-aperture metering, best combination: Uniformly bright screen image provides excellent viewing. | |
| Full-aperture metering, satisfactory combination: Viewing is acceptably good, though there may be some darkening near the edges of the viewfield. (This does not of course affect the image on the film.) | |
| Stop-down metering, best combination: Excellent viewing with a uniformly illuminated viewfield image. | |
| Stop-down metering, satisfactory combination: Though some darkening may appear at the edges of the screen, viewing is acceptably good (and the image on the film is of course not affected) * Focusing must be done on the screen mat area, since the central spot cannot be used to focus with this combination. Numbers indicate necessary meter compensation factors; if no figure appears,the compensation factor for the combination is zero. | |
| Finder can be used only for focusing; metering cannot be done. | |
| White spaces indicate unusable combinations. |
 PDF
File (265k)
PDF
File (265k)Changing Lenses
 |
To Install |
 |
To Remove |
Using lenses other than MC-Rokkor/MD Lenses
Metering and exposure with RF Rokkor-X, Auto Rokkor, and Manual-Preset Rokkor Lenses is by the stop-down method as follows:
Auto Rokkor Lenses
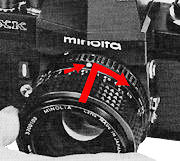
1. After focusing, push the stop-down/Lock-up button to release it to its outer stop-down position.
 |
2. Use automatic or match-needle/manual mode as explained earlier, respectively. The viewfinder field will darken as the lens is stopped down, and the split-field and microprism spot may become unusable due to darkening |
RF (Mirror-Type)
and Manual-Preset Lenses
Proceed as for Auto Rokkors above, except that the stop-down/Lock-up button need
not be pushed, as metering and exposure may be done with it in either inner or outer
position.
Manual Mirror Control (Mirror Lock-up)
The mirror must be locked in its upper position when the old Rokkor 21 mm F4 or F4.5
ultra-wideangle lenses are used, It may also be locked up at other times if desired.
But in specific photography such as duplicating works, high magnification macro,
astrophotography that may require absolute vibration free environment, this may also
comes in handy. Of coz', just like any camera that has mirror lock up feature, you
have to meter before you lock the mirror up.
 |
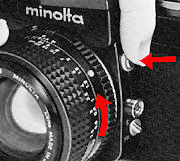
To Lock the Mirror Up |
To Lower the Mirror after Lock-up
Push the stop-down/Lock-up button to its inner full-aperture-metering position.
System accessories:

User Interchangeable Finders: Metered Prism (Auto
Electro Finder), High
magnification finder & Waist-level finder and plain finder. A dedicated 250
bulk film back and film loader. A separate battery pack. Battery
Grip. Remote Control Cords S & L : "S" Cord - 1 meter (3.3
feet) "L" Cord - 5 meters (16.8 feet).
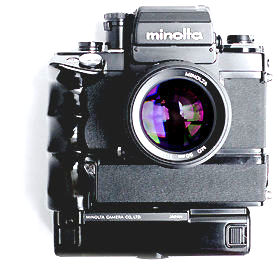 |
Intravalometer: Operates at intervals from 0.5 sec to 60 seconds. Connecting Cords S (50 cm) & "L" (2.5 meters): For connecting Intravalometer PM and other devices. 9 interchangeable Focusing Screens: mat fresnel center split image standard. Leather strap, cases and share many accessories with the SR-T series SLR models. |
Credit: The XK | XM
Motor Front view, courtesy of
Satosh
Oka.
For a view on the system map and
illustration: Download
a PDF file (95k)
Note: Any contribution of images, data etc...
on various system accessories mentioned here in this section will be greatly appreciated.
Appropriate credit will be given.
General Guideline on Care
and Maintenance
As with all high-precision instruments, no part of the XK camera body, or any lens,
finder, or screen should ever be forced at any time. If operation is not as you think
it should be, never attempt to disassemble the camera yourself. Call a friend or
use the message board
I prepared for you here to seek help from similar users to exchange view and opinion
or the best way is to consult an authorized Minolta service representative (I doubt
Minolta's young technician can help much...screeze before you get attention, old
trick works at times, hehe...).
Always keep your camera in its case when not in use.
* Never subject your camera to shock, high heat
and/or humidity, water, or harmful chemicals or gases.
* Never lubricate any part of the body, finder,
lens, or screen.
Always use a body cap or top cap when a lens or finder is not installed on the body.
Keep lenses, properly capped front and rear; finders, also properly capped; and screens
in their cases when not in use.
* Never
touch the shutter curtains
or anything inside the front of the body with the fingers, These parts and the inside
of the back should be dusted with a soft brush from time to time as necessary, with
particular care never to
exert pressure on the shutter curtains - this applies when you are loading the film.
* Never
touch glass lens or prism surfaces with the fingers. If necessary, remove loose matter
from these glass surfaces with a blower lens brush. Use special photographic lens
tissue or a soft clean cloth to remove smudges or fingerprints with a gentle circular
motion. Only if absolutely necessary, the tissue may be moistened very slightly with
not more than one drop of a satisfactory quick evaporating fluid cleaner specially
compounded for photographic lenses, Such fluids must never
be dropped directly on the glass surface.
Smudges or fingerprints on the mirror may be removed with lens tissue slightly moistened
with lens cleaning fluid as above.
No liquid should be used on focusing screens, but surfaces may be dusted with a soft
brush and cleaned of smudges with lens tissue or a soft dry clean cloth if necessary.
* External camera, finder, and lens barrel
- but not glass - surfaces may be wiped with a soft, silicon-treated cloth.
* Make sure the finder power switch (on Auto
Electro Finder) is turned off when the camera is not in use.
* Avoid leave the shutter or self-timer cocked
when the camera is to be stored overnight or I onger.
Last reminder: If the camera is to be stored for a long
per of time, its components should be packed and kept in a cool, place away from
dust or chemicals, preferably in an airtight container with a drying agent, such
as silica gel.
|
Previous | Spec Sheet | 7/7
| Back | to Index Page of
Minolta XK
Basic
Camera
Operations
XK/XM/X-1: 5
Parts
Specification for XK/XM/X-1: HTML | PDF
Main Reference Map for XK/XM/X-1: HTML | PDF (250k)
Additional info on
XK
| XM Motor
- by Satosh
Oka
More
images
on XK Motor By : Stephen Schwartz (New)
1974-1975 XK
USA fold-out Product
brochure
in HTML files
and a huge PDF (1.3MB) copy. Contributed by
: Mark
Wasmer
Some fabulous
views
of the Internal Structures that made up of a Minolta XM by Gino Mancini (New);Three great images of a Minolta XM/XM
Motor scanned by Hervé
Prigent of France (New)
| Minolta XD7 / XD-11 | Minolta
X-700 | Minolta Maxxum 7000 |
| Message Board | for your favourite Minolta X1/XK/XM SLR camera(s)
| Message Board | for your Minolta Optics in a shared
environment
| Message Board | Specifically tor Dispose or Looking for Minolta Photographic equipment
About this photographic site.
Sections of this site are produced in PDF format, you may need Adobe's Acrobat Reader's plug in or application to view them, you can download a copy for free at adobe.com. |
Home - Photography in Malaysia |
Copyright
© 1999. leofoo ®. MIR Web Development Team.
Credit: Satosh
Oka for his
superp imagery of the XK Motor and XD-7; ® Stephen
Schwartz,
for his images of the XK Motor appearing in this site. Mark
Wasmer, for
his collection of the original marketing brochure. Oleg
Volk, who
has given me some help;
Dick
Sullivan
whom I had used some references in his site; Hervé Prigent <hprigent@mac.com>of France for his great scanned images
from brochure of Minolta XM/XM
Motor;
Gino
Mancini <Gino@mancini99.freeserve.co.uk> for his images of the internal
structure of the XM; CYLeow ® , photo editor of the Star
newspaper, Malaysia, Mr
Poon
from Poon photo for their input on Minolta older SLR bodies. Minolta, XD-7, XK, XM,
X1, Rokkor, MC lenses are either registered tradenames or trade mark of Milnolta
Optical Co. Ltd, Japan. A site dedicted to all Minolta fans worldwide. Made with
an Imac.