Exposure Control Fundamentals
The two camera exposure-control settings are lens opening (aperture) and shutter
speed. The size of the aperture determines the amount or volume of light reaching
the film from a given subject and lighting. The shutter speed determines the length
of time this light acts upon the film. Apertures arc expressed in F-numbers, which
are larger for small openings and vice versa (e.g., F16 represents a small opening,
F2 a large one). Shutter speeds are expressed in seconds or fractions thereof, which
are the reciprocals of the numbers on the shutter-speed scales. At usual apertures,
each F-number setting (e.g., F8) lets in twice as much light as the next numerically
larger one (F11) and half as much as the next smaller (F5.6). Similarly, each shutter
speed (e.g., 1/60 sec.) allows light to strike the film twice as long as the next
higher speed ( 1 /125) and half as long as the next lower one (1/30). Total exposure
on the film is determined by the combination of aperture and speed. Other things
being equal, using the next smaller F-number will balance using the next higher shutter
speed, and so on. A great range of combinations (e.g., F5.6 at 1/30, F4 at 1/60,
F2.8 at 1/125, F2 at 1/250, etc.) will thus yield the same total exposure. The specific
combination you choose under given lighting conditions will depend upon how much
you want the greater depth of field of smaller apertures and the greater movement-blur
preventing ability of faster speeds.
Exposure is determined by the combination of shutter speed and aperture. As the numbers on either the aperture ring or shutter speed dial increase by one increment, the amount of light striking the film is reduced by approximately one half. For example, the amount of light at 1/125 sec. is one half that at 1/60 sec., and the amount of light at f/16 is one half that at f/11. Brighter scenes require either faster speeds or smaller apertures or a combination of both which will give the same amount of exposure; darker scenes require the reverse. For example 1/1000 sec. at f/5.6 is the same as either 1/4000 sec. at f/2.8 or 1/125 sec. at f/16.
| Shutter speed (sec.) |
1/4000 |
1/2000 |
1/1000 |
1/500 |
1/250 |
1/125 |
| Aperture (f/number) |
2.8 |
4 |
5.6 |
8 |
11 |
16 |
These simple combinations
(and other factors relates) have made photography so exciting. As apertures and shutter
speeds have their respective effect projects in the final image. With the camera's
metering as a guide for an theoretical good exposure, you can alter the combinations
to suit the effect that you like it to be. Basically, apertures varies the depth
of field and shutter speed spells action or projects movement. Refer here for a separate article as this site will have too many
duplicated /repetitive resources.
Note: the XK's maximum shutter speed scale is
1/2000 sec. Table above is merely reference.
 |
AUTO ELECTRO FINDER |
AUTO ELECTRO FINDER - Specifications
Type: Eye-level pentaprism with built-in meter and automatic electronic and match-needle/manual exposure-control apparatus
Circuits: Incorporate monolithic and hybrid IC's with 41 transistors.
Magnification: 0.8X with 50mm lens
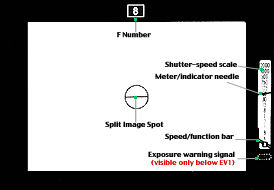
Visible in finder: F-number, shutter-speed/function scale, meter/indicator needle, speed/function bar, light-emitting diode exposure warning signal.
Measuring range: Built-in TTL CLC with 2 CdS cells for full-aperture metering with MC Rokkor Lenses, stop down metering with other Rokkor Lenses
Film-speed range: EV 1 to EV 17 (e.g., 1 sec. at F1.4 to 1/2000 at f/8) with f/1.2 lens at ASA 12 to 6400
Shutter-speed/function dial: AUTO, X, B, 1, 2, 4, 8, 15, 30, 60, 125, 250, 500, 1000 and 2000
Auto-exposure override: - 2 EV to +2 EV stepless manual control
Compensation scale: - 0.5 EV to +3.5 EV in half-step graduations
Power source: 2 silver-oxide batteries for shutter control in camera base (shared use)
Dimensions: 50mm x 76mm x 65mm (1-15/16" x 3" x 2-9/16")
Weight: 225 g (8-1/8 oz.)
Other: Power switch for use in lieu of body Auto "Senswitch".
Metering Methods
Full-aperture metering with the stop-down/Lock-up button in its inner position is employed when MC Rokkor-X and MD Lenses are used with this finder, Stop-down metering is used with other than MC Lenses (e.g. close up attachment etc.).
Setting Film Speed
 |
For correct exposure, the meter must be set for the effective exposure index of the film in use. To do this, turn the film-speed selector until the proper ASA value indication appears opposite its index dot. Dots between numbered graduations indicate ASA numbers as shown: |
ASA/DIN Conversion Scale
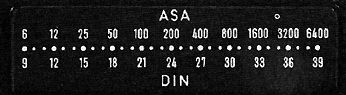 |
A convenient scale for converting DIN to ASA film-speed ratings is located on the back cover of the camera. |
A. Automatic Exposure Control
Automatic Operation
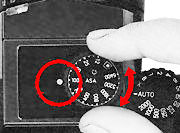
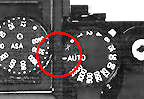 1. Turn the shutter-speed/function selector dial to align "AUTO" with the index. The speed/function bar will move to "A" on the scale in the finder. |
|
2. Turn on power by touching and keeping your hand on the Auto "Senswitch" or using the switch on the finder.
3. Set the desired lens opening by turning the aperture ring on the lens barrel. The F-Number will appear above the frame in the finder, and the shutter speed indicated by the needle at the right of frame will vary automatically and steplessly to give proper exposure for the aperture and other settings with the light being being metered.
4. It is then only necessary to focus, compose your picture, and release the shutter.
5. The accurate range of shutter operation on automatic mode is 1/2000 to 4 sec. 1/2000 is indicated by the upper end of the indented area on the left side of the finder scale. For exposures longer than 1 sec., the needle will move progressively farther outside the indented area down to a point between "B" and "X." To determine whether the speed is longer than 4 sec., depress the auto-exposure override control radially and move it as far as it will go to the left. If the finder scale needle moves back to the figure "1 " or higher when this is done, the speed is within 4 sec. If the needle remains outside the indented area at any point below "1," the exposure set is longer than 4 sec.
Whenever a speed outside the proper auto exposure range is indicated, adjust the aperture or other conditions to yield a speed within it.
Note: If the shutter release button is pushed while power is off (i.e., when the Auto Senswitch is not being touched or the finder switch is not on) with the camera on automatic mode, the mirror will stay up and the shutter will remain open temporarily. Turning the shutter-speed selector dial to 'X' will return the mirror to its lower position and close the shutter at once. Even if this is not done, the electronic circuitry will reset the mirror and shutter automatically after about 30 sec. Toward not spoiling adjacent frames under certain conditions, however, it is advisable to reset the camera as quickly as Possible.
Exposure Warning Signal
Red blinking of the exposure warning signal below the scale in the finder indicates that light level has fallen below the lower limit of the meter's accurate sensitivity range on either automatic or match-needle/manual mode. |
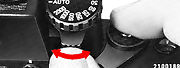
Auto-Exposure Override Control
To manually adjust exposure above or below the automatically set value, push in on the auto-exposure override control and rotate it to the right or left (for respectively more or less exposure) until the needle in the finder indicates the desired shutter-speed adjustment.
 |
(For example, to give one stop more, i e. double, the exposure when the automatically set speed is "125," move the override control to the right until the needle points to "60." |
To give 1/2 stop less exposure,
i.e. 3/4 of the "125" auto setting, turn the control to the left so that
the needle indicates a point halfway between "125" and "250.")
Hold the control in the desired position while releasing the shutter, since it will
otherwise automatically return to its neutral center position.
Eyepiece Shutter
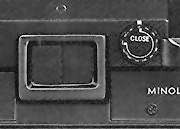 |
Before I was exposed to the XK, I always thought the Canon A-1 was the first to incorporate this feature. For remote or unmanned operation or when the camera is set on a support and used without viewing on automatic mode, be sure to rotate the control at the right rear of the finder to close the eyepiece shutter. |
This will prevent unwanted light
from entering through the eyepiece and affecting the meter reading and exposure when
the eyepiece is not being shielded by the photographer's head, as it normally would
be.
EV Chart - Automatic Exposure Range with MC Rokkor 58mm f1.2
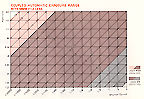 PDF file (288k)
From AUTO to Match-Needle / Manual Exposure Control
Operation:
1. Turn the shutter-speed/function selector dial to align any step speed from 1/2000
through 1 sec. with the index. The speed/function bar in the finder will move to
and remain fixed over the same scale number as that at which the selector is set,
and the system is automatically switched over to match-needle/manual mode.
2. Turn on meter power by keeping your hand on the Auto Senswitch or using the switch
on the finder. (This is not necessary if meter is not needed for manual exposure
setting.)
3. To set proper exposure for light as metered the black needle is made to move and
align with the fixed bar by adjusting the lens F-stop.
Note: Correct exposure cannot
be obtained by needle alignment with shutter settings of "B", "X"
and with speeds longer than 1 sec.
4. Needle alignment can of course be disregarded and any shutter speed (including
those longer than 1 sec.) and aperture combination set for full-manual operation.
|
Previous | Next | 4/7
| Back | to Index Page of
Minolta XK
Basic
Camera
Operations
XK/XM/X-1: 5
Parts
Specification for XK/XM/X-1: HTML | PDF
Main Reference Map for XK/XM/X-1: HTML | PDF (250k)
Additional info on
XK
| XM Motor
- by Satosh
Oka
More
images
on XK Motor By : Stephen Schwartz (New)
1974-1975 XK
USA fold-out Product
brochure
in HTML files
and a huge PDF (1.3MB) copy. Contributed by
: Mark
Wasmer
Some fabulous
views
of the Internal Structures that made up of a Minolta XM by Gino Mancini (New);Three great images of a Minolta XM/XM
Motor scanned by Hervé
Prigent of France (New)
| Minolta XD7 / XD-11 | Minolta
X-700 | Minolta Maxxum 7000 |
| Message Board | for your favourite Minolta X1/XK/XM SLR camera(s)
| Message Board | for your Minolta Optics in a shared
environment
| Message Board | Specifically tor Dispose or Looking for Minolta Photographic equipment
About this photographic site.
Sections of this site are produced in PDF format, you may need Adobe's Acrobat Reader's plug in or application to view them, you can download a copy for free at adobe.com. |
Home - Photography in Malaysia |
Copyright
© 1999. leofoo ®. MIR Web Development Team.
Credit: Satosh
Oka for his
superp imagery of the XK Motor and XD-7; ® Stephen
Schwartz,
for his images of the XK Motor appearing in this site. Mark
Wasmer, for
his collection of the original marketing brochure. Oleg
Volk, who
has given me some help;
Dick
Sullivan
whom I had used some references in his site; Hervé Prigent <hprigent@mac.com>of France for his great scanned images
from brochure of Minolta XM/XM
Motor;
Gino
Mancini <Gino@mancini99.freeserve.co.uk> for his images of the internal
structure of the XM; CYLeow ® , photo editor of the Star
newspaper, Malaysia, Mr
Poon
from Poon photo for their input on Minolta older SLR bodies. Minolta, XD-7, XK, XM,
X1, Rokkor, MC lenses are either registered tradenames or trade mark of Milnolta
Optical Co. Ltd, Japan. A site dedicted to all Minolta fans worldwide. Made with
an Imac.