 |
a) AE Lock (" |
In an AE mode, the auto exposure
setting can be locked temporarily in one
of two methods detailed below:
 |
 |
1. With the One-Shot AF mode and evaluative metering set, press the shutter button halfway. When focus is achieved and the shutter button is still in the halfway position, the point of focus and auto exposure are locked simultaneously. The exposure reading is thereby set for the point of focus. 2. You can also use the AE lock button ( |
 |
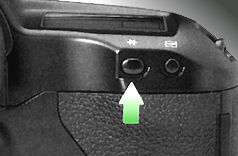
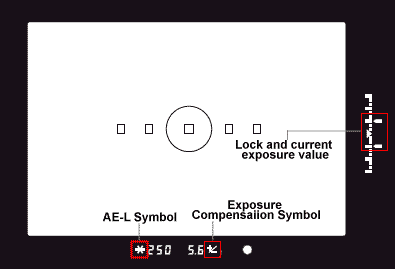
Pressing the button locks the exposure regardless of the shutter button operation. The AE lock button can be used with any metering mode. After locking the exposure, you can still refocus. When the AE is activated or exposure is locked, an asterisk ( |
|
|
|
|---|
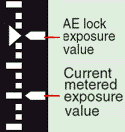 |
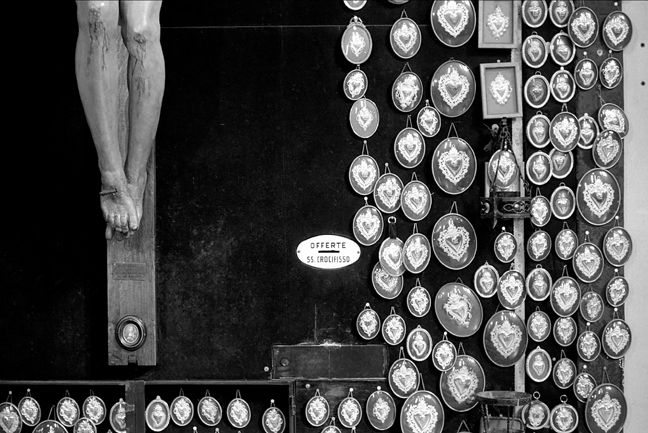
If you want to determine the exposure independently from the focusing operation, use AE lock is the most simplest form in locking the exposure. Use it when you also want to change the composition of the picture after determining the exposure. The viewfinder display will have a symbol (*) as well as status bar on the LED scale at the right hand side to show current and locked values. AE lock is effective for backlit subjects and other situations where there is extremely strong contrast between the subject and background. However, using AE-L or exposure compensation usually will have the expense of slightly wash out the background to lighter tone, it is convenient but personally, in most cases, I would think balance fill flash can give a better photographic effect. |
Operation:
First, focus the subject that you want to measure with the cameras metering system.
The exposure values are displayed in the viewfinder and LCD panel. Next, press the
AE lock button (![]() ). The symbol lights in the viewfinder to indicate
that the AE lock is set. When you release the AE lock button (*), the metering
timer is activated and the exposure remains locked for six seconds. Pressing the
AE lock button (
). The symbol lights in the viewfinder to indicate
that the AE lock is set. When you release the AE lock button (*), the metering
timer is activated and the exposure remains locked for six seconds. Pressing the
AE lock button (![]() ) again renews the locked exposure setting.
AE lock is canceled six seconds after the AE lock indicator (
) again renews the locked exposure setting.
AE lock is canceled six seconds after the AE lock indicator (![]() ) lights
in the view finder display, or whenever you press the AF mode selector, metering
mode selector, shooting mode selector or focusing point selector. To accurately meter
a specific subject area with the AE lock function, using partial metering or fine
spot metering will has the best effect or accuracy. Place the subject in the center
of the viewfinder when activating AE lock. After this, refocus the subject, change
the composition as desired, and take the picture. When you change the scene composition,
the difference between the locked exposure value and the continuously metered exposure
value is displayed in the viewfinder in real-time.
) lights
in the view finder display, or whenever you press the AF mode selector, metering
mode selector, shooting mode selector or focusing point selector. To accurately meter
a specific subject area with the AE lock function, using partial metering or fine
spot metering will has the best effect or accuracy. Place the subject in the center
of the viewfinder when activating AE lock. After this, refocus the subject, change
the composition as desired, and take the picture. When you change the scene composition,
the difference between the locked exposure value and the continuously metered exposure
value is displayed in the viewfinder in real-time.
 |
If you use AE lock to register a shadow reading of your subject and then change the scene composition to read a highlight area (or vice versa), you can then use exposure compensation (see next section) to adjust the exposure level based on the brightness range of the scene. |
b) Exposure Compensation (
When taking pictures in an AE shooting mode, you can compensate the exposure according to the subject conditions. Other than the AE-L that mentioned earlier. Exposure Compensation is another popular mean in altering the camera set exposure recommendation. The EOS-IN is equipped with AEB (auto exposure bracketing) and manual exposure compensation functions, both of which allow the exposure to be compensated in 1/3-stop increments within a range of ±3 stops. Moreover, by setting CF-No. 6-2, exposure compensation can be carried out in 1/2-stop increments within a range of ±3 stops.
 |
The AEB function automatically makes three exposures either one frame at a time or three frames continuously, according to the winding mode. However, if the self-timer is used, three frames are taken automatically after the self-timer delay period regardless of the winding mode. In consideration of the various situations in which AEB might be utilized, CF-No. 9 can be used to configure the mode in four different ways according to the user's preference of exposure sequence, cancellation conditions and external setting capability. For details, refer to the "Custom Functions" section. Manual exposure compensation operation can be carried out in any AE mode by A) combined operation of the exposure compensation button and the main dial and is also possible by B) independent operation of the quick control dial. |
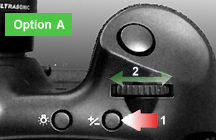 |
Operation:- A) Using the Exposure Compensation Button Exposure compensation can also be carried out using the exposure compensation button ( |
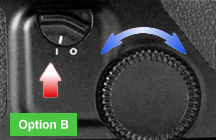 |
B) Using the Quick Control Dial 1. Set the quick control dial switch to "I". 2. Focus the subject and confirm the exposure. 3. Turn the quick control dial to set the desired exposure compensation amount. The quick control dial is active only when the shutter button is half pressed or while the six-second timer is operating. Note: The exposure level indicator and exposure compensation symbol are displayed in the viewfinder, and the compensation amount is displayed in the LCD panel's exposure level indicator. Also, in the LCD panel, + indicates overexposure and - indicates underexposure relative to the cameras meter reading. In the viewfinder display, overexposure and underexposure are indicated respectively by exposure compensation amounts above and below the triangle index at the center of the scale. |
 |
 |
After setting the desired compensation amount, it is recommended to set the quick control dial switch to |
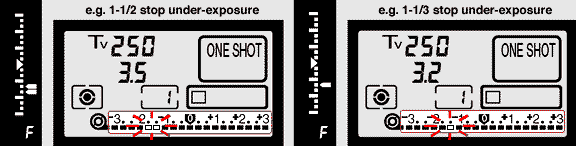 |
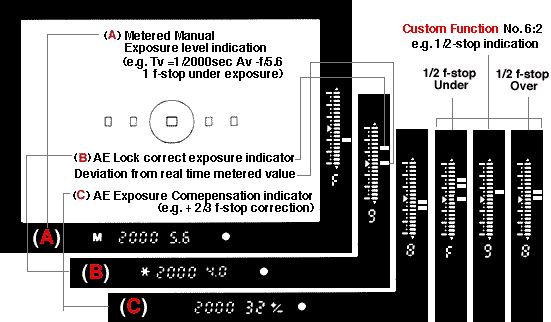
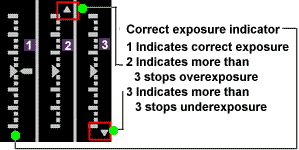
If CF No. 6 is used to set the exposure compensation amount in 1/2-stop or 1/3-stop increments, the exposure level indicator in the viewfinder display and in the LCD panel appear as shown here. |
Flash exposure compensation is different from ambient light exposure compensation. It is grouped under Flash Photography section.
Previous | Next | Auto exposures Bracketing and Other methods
Part 1 | 2
| 3 | 4
| 5 |
| Questions, Issues
& Answers
| Canon
EOS-1 Series Message
Board
|
Canon
EF lens Board
| in
a shared environment
|
Free Trade Zone |
shared
environment
| Back | Index Page The Canon EOS-1N
Series Professional SLR camera
|
Back | Main Index Page The Canon EOS-1
Series Professional SLR camera
Background and Various Issues
| The Basic
Features &
various Setup
Manual &
Auto Focusing |
Metering Systems | Exposure Control | Viewfinder
Optical
System Flash Photography (with Speedlite 540EZ extension & Selective info on Canon TTL Flash Models:-160E | 200E
| 300EZ | 300TL
| 420EZ | 430 EZ | 480EG | Macrolite
| Other non-TTL Canon flash model
Reliability Issues:- Body Chassis | Shutter Unit | Electronic Circuitry | Film Transport & film handling Secondary Functions:- Custom Function Part One | Part Two | System Accessories:- Film Back Options - instruction for Command Back E1 | Macro/Close Up Part one | Part two and Part III Flash for Macro-Photography | Power Sources -BP-E1 | PDB-E1 | Focusing Screens | Remote Control with Wireless Remote Set LC-3 | System compatibility
Variants of Canon EOS-1N:- Canon EOS-1N RS | Canon/Kodak Digital DCS-1, 3 -5 & 520/560 Series | Full Technical Specification | Main
Reference Map / Nomenclature
| Resource Centre:- Comparative Charts between EOS-1 &
EOS-1N / or with
its active Competition(s) (Nikon); Quick Operational Reference Card (278k Gif File);
Listings of 7-segment
digital numbers/letters
appeared on LCD display panel/viewfinders (HTML page); External Link:-Instruction Manual (3.3MB
PDF file applicable for both Canon
EOS-1N (RS). | Using EOS system for your photography | Bots & Nuts of EOS System - by Philip Chong |
The Eyes of EOS -
EF Lenses
A little OFF-TOPIC SOME Personal Thought
HOME - Photography in Malaysia |
![]()
Volunteered Maintainer(s) for the Canon EOS-1N Series Message Board: Philip Chong, Editor, Digital Camera Magazine; Vincent Thian, Photo Editor, Malaysian Bureau, Associated Press "AP", CYleow, Ex-photo Editor of local daily, The Star; Gary Rowan Higgins, Australia and other nice folks on the web.
Special Credit:- :Mr. Richard Yeow & Mr. Simon Wong from camera division of ![]() Marketing Malaysia, for their continual effort in
supporting development of this EOS/EF website. Others: All the nice people on earth who have contributed
their photos and pictures of personal works or product shots for the creation of
this site. Certain content and images appeared in this site were either scanned
from official marketing leaflets, brochures published by Nikon and/or contribution
from surfers who claimed originality of their own work for public publishing in this
website, where majority of the extracted information are used basing on educational
merits. The creator of this site will not be responsible for any discrepancies that
may arise from any possible dispute except rectifying them after verification from
respective source. Neither Nikon or its associates has granted any permission(s)
in using their public information nor has any interest in the creation of this site.
"Canon", "EOS",
"EF" "RT", "EOS-1n RS", "Booster
", "Macrolite", "fluorite", "Image Stabilizer"
& other applicable technical/business terms are registered trade name(s) of Canon
Inc., Japan. Site made with an Apple G5 IMac.
Marketing Malaysia, for their continual effort in
supporting development of this EOS/EF website. Others: All the nice people on earth who have contributed
their photos and pictures of personal works or product shots for the creation of
this site. Certain content and images appeared in this site were either scanned
from official marketing leaflets, brochures published by Nikon and/or contribution
from surfers who claimed originality of their own work for public publishing in this
website, where majority of the extracted information are used basing on educational
merits. The creator of this site will not be responsible for any discrepancies that
may arise from any possible dispute except rectifying them after verification from
respective source. Neither Nikon or its associates has granted any permission(s)
in using their public information nor has any interest in the creation of this site.
"Canon", "EOS",
"EF" "RT", "EOS-1n RS", "Booster
", "Macrolite", "fluorite", "Image Stabilizer"
& other applicable technical/business terms are registered trade name(s) of Canon
Inc., Japan. Site made with an Apple G5 IMac.