Setting
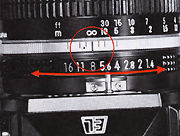
the aperture ring
| When shooting with the camera set at A (Auto), once the film speed (ASA) dial is set, the only exposure control you must do is set the lens aperture. Turn the aperture ring on the lens barrel until the desired f/number is opposite the black line (aperture indicator). The aperture diaphragm can be set at intermediate openings between click-stop settings for more precise exposures. |
|
|
||||||||||||||||||||||||||||||||
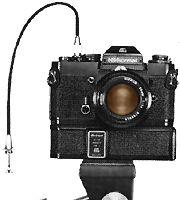
Holding the camera Steady camera holding is important since even the slightest camera shake at the moment of exposure can result in an appreciable loss of sharpness , especially at slow shutter speeds (Unless in cases you are performing an intentional blur to project a sense of movement). Wrap the fingers of the right hand around the camera body so that the index finger rests comfortably on the shutterrelease button and the thumb fits between the body and film-advance lever, and press the camera against your forehead.
| This way
when winding the film manually you can strok.e the film-advance lever without removing
your eye from the viewfinder. Cradle the camera in the left hand for additional support,
with the left thumb and index finger grasping the focusing ring. The camera may be
switched from the horizontal to the vertical format in this position. The center portion of the shutter release button has a standard thread to accept a cable release which is very useful for vibration free photography (Buy a cheap tripod and cable release that has a lock feature for time exposure). |
 |
Focusing
Focusing is always done at full aperture with Nikkor lenses (auto). This gives the
brightest possible image on the focusing screen and also minimizes the depth of field
so that the image snaps in or out of focus distinctly. The Nikkormat ELW's focusing
screen consists of a matte Fresnel field with a central 3mm split-image rangefinder
spot surrounded by a doughnut-shaped 1 mm-wide microprism. It makes for fast, accurate
focusing. Look through the viewfinder and turn the focusing ring until the two halves
of the central rangefinder image coincide to form a single, sharp image - or until
the image in the microprism appears sharp and crisp. The focusing screen is suitable
for subjects with straight outlines or ill-defined contours. In close-up photography,
the rangefinder spot is likely to darken. This is also true when you're using a lens
with a maximum aperture smaller than f/4.5. You should then focus on the surrounding
matte field. Since none of the Nikkormat models permit user changeable focusing screen
feature (Other than the professional level F bodies (AF or MF), the Nikon FE, FM2 (1982), FM2n (NOT the old Nikon
FM or the latest FM10/FE10) and the Nikon FA are the MF bodies that has interchangeable
focusing screen features incorporated), you have to settle for the standard K screen
which is a standard focusing aid in the viewfinder (Other information relative to
focusing screen).
Prefocusing
The lens can also be prefocused using the distance scale engraved in both feet and
meters on the lens barrel. Line up the black indicator line on top of the lens opposite
the camera-to-subject distance as measured or estimated. This technique is useful
for candid shots of elusive subjects when time does not permit through-the-lens focusing.
Depending on the lens type, actually if you are using a mid-aperture value with a
wideangle lens more than 28mm, this can be a very useful technique when combine with
the depth of field scale engraved on the lens (But sadly, the newer autofocus lenses
hardly provide this useful feature).
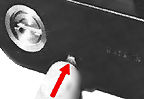
The film plane indicator mark on the top deck shows the exact position of the film
plane. This is an aid when measuring the film-to-subject distance in closeups and
macrophotography.
Viewfinder frame coverage The ratio of the area seen through the viewfinder
to the actual area of the printed picture (viewfinder frame coverage) is approx.
92%. In planning a shot, you can include more than actually appears in the viewfinder.
But if you are preparing the film to be developed by an one hour lab, well, the cropping
done should matches closely with the picture coverage in the viewfinder.
Eyepiece correction lenses eyepiece correction lenses are available for near-sighted
and far-sighted users to assist in sharper focusing. I am not a eye-glass wearer
and thus, I cannot provide more info relating to this section.
Releasing the shutter When the shutter button is released, an exposure is
made on the film. It is important when snapping the shutter not to cause the camera
to shake. Press gently with the finger tip. When the shutter is released while looking
through the viewfinder, the field of view is momentarily blocked since the mirror
is raised.
At shutter speeds slower than 1/30 sec., the image tends to blur if it is hand held.
In such a situation, it is best to secure the camera on a tripod, or against a solid
surface. The soft shutter release AR-1 is available for
your delicate shutter releasing operation. Well, since it has standard thread at
the center of the shutter release button, it can use any of the standard accessory
design for such use.
However, the shutter cannot be tripped in
the following cases: (1) When the film is not advanced. (2) When both the film-advance
lever and shutter button lock are placed at their locked positions. (Of course, the
shutter can be released if the shutter button lock is set so that the red dot is
visible, even if the film-advance lever is locked. This is how the AW-1 is operated.)
Cautions: 1. When using
a tripod, a cable release should be used. The cable release should be pressed gently.
2 When mounting the camera on a tripod, do not over-screw the tripod thread into
the camera tripod socket or use a tripod screw longer than the depth of the socket,
as it may damage the camera baseplate. The depth of the tripod socket of Nikkormat
ELW is 5.7 mm.
Rewinding and Unloading film
When the frame counter indicates that the last exposure has been made or when the
film-advance lever can no longer be stroked*, the roll of film has been completely
exposed and should be removed. Press the rewind button on the camera baseplate, and
the film is ready for rewinding into the magazine.
Note: Press the rewind
button securely on the bottom of the Auto Winder AW-1 when it is used. The button|
will spring back after it is pressed, but this is normal.
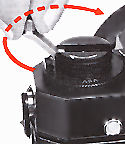
Unfold the rewind crank and turn it with a constant, gentle pressure in the direction
of the arrow until you feel an increased tension. Give it a few more turns until
the tension has gone and the crank turns freely. The film has now left the take-up
spool and the camera may be opened.
Slide the back cover lock backward and pull the rewind knob as far as it will go.
The comera back will pop open and the film magazine may be removed. When the film-advance
lever is stroked, the rewind button will pop out and the film-advance mechanism is
restored back to normal.
CAUTION: DO NOT attempt to force
the flim advance levertnis action will result in tearing the film out of the cartridge.
Before you start shooting, double-check to make sure you have done the following:
1) Installed the battery in the battery chamber correctly.
2) Checked the battery checker to see that the lamp glows with a bright orange light.
3) Returned the mirror to the original viewing position.
4) Loaded the film and made two blank exposures while watching the rewind knob to
see if the film is loaded correctly.
5) Set the ASA film-speed dial for the correct speed of the film loaded in the camera.
6) Mounted the lens correctly and adjusted the meter for the maximum aperturet of
the lens (check the maximum aperture indicator).
7) Set the shutter speed dial to A (in case of automatic exposure control).
8) When using the AW-1, both the shutter button lock of the ELW and the power switch
of the AW-1 must be turned to the ON position. The film-advance lever should be in
locked position.
| Previous | General Steps of Picturing taking, adjust
ASA, the frame counter
| Next | Exposure Control, TTL metering
& EV chart (5/8)
Back
to Main
Index Page
of Nikkormat
EL-W
| Back |
to Main Index
Page of Nikkormats EL Series
| Back |
to Main Index
Page of Nikkormats
History
& Background
of Nikkormat Cameras
"Nikomat" Picture Library
of Japanese local version
Outline
the
major
key features and differences
of various models
The
Camera Bodies
| FT | FS | FTn | EL | FT2 | ELW | FT3 | EL2
| Main Reference
Map
|
HTML Format: FT | FS | FTn | EL | FT2 | ELW | FT3 | EL2 | AW-1 Motor Winder
PDF Format: FT
| FS | FTn | EL | FT2 | ELW | FT3 | EL2 | AW-1 Motor Winder
| Specifications |
FT
| FS | FTn | EL | FT2 | ELW | FT3 | EL2
| Message
Board
| for your favourite Nikkormats
| Message Board |
for your Nikon Optics in a shared environment
| Message Board |
Specifically for Dispose or Looking for Nikon/Nikkor Photographic
Equipment
 |
The Eyes of Nikon:- |
Fisheye-Nikkor Lenses - Circular | Full Frame | Ultrawides Lenses - 13mm15mm18mm20mm | Wideangle Lenses - 24mm28mm35mm |
Standard Lenses - 45mm 50mm 58mm | Telephoto Lenses - 85mm105mm135mm180mm & 200mm |
Super-Telephoto Lenses - 300mm 400mm 500mm 600mm 800mm 1200mm |
Special Application lenses:
Micro-Nikkor Lenses - 50mm~55mm -60mm 85mm -105mm 200mm Micro-Zoom 70-180mm
Perspective Control (PC) - 28mm 35mm PC-Micro 85mm
Dedicated Lenses for Nikon F3AF: AF 80mm f/2.8 | AF 200mm f/3.5 EDIF
Depth of Field Control (DC): 105mm 135mm
Medical Nikkor: 120mm 200mm
Reflex-Nikkor Lenses - 500mm 1000mm 2000mm
Others: Noct Nikkor | OP-Nikkor | UV Nikkor 55mm 105mm | Focusing Units | Bellows-Nikkor 105mm 135mm
Nikon Series E Lenses: 28mm35mm50mm100mm135mm | E-Series Zoom lenses: 36~72mm75~150mm70~210mm
MF Zoom-Nikkor Lenses: 25~50mm | 28~45mm | 28~50mm | 28~85mm | 35~70mm | 36~72mm E | 35~85mm | 35~105mm | 35~135mm |
35~200mm | 43~86mm | 50~135mm | 50~300mm | 70~210mm E | 75~150mm E | 80~200mm | 85~250mm |
100~300mm | 180~600mm | 200~400mm | 200~600mm | 360~1200mm | 1200~1700mm
Tele-Converters: TC-1 | TC-2 | TC-200 | TC-201 | TC-300 | TC-301 | TC-14 | TC-14A | TC-14B | TC-14C | TC-14E | TC-16 | TC-16A | TC-20E
![]()
Nikon F
| Nikon F2 |
Nikon
F3
| Nikon F4 |
Nikon
F5
| Nikon F6 |
Nikkormat / Nikomat |
Nikon FM
| Nikon FE/ FA | Nikon EM/FG/FG20 | Nikon Digital SLRs | Nikon - Other models
MIR Supports for Photographic Community: Various Message Boards/Community
Forums
Nikon
F-series|
Nikon
F2-series|
Nikon
F3-series|
Nikon F4-series| Nikon
F5-series|Nikkormat/Nikomat-series
Nikon FM-series|Nikon
FE-series|Nikon
FA|Nikon
Digital
SLR
series|Various
Nikon
Models|Nikkor
Optic
-shared
Others:- Free Trade Zone - Photography| Free Trade Zone - Business Community |Free To Zouk - Photographic Community
Apple's Mac Public Community Message Board | Windows based PC &
Apple/Mac
Public Community Trade Exchange Centre
Recommended links to understand
more technical details related to the Nikkor F-mount and production Serial Number:
http://rick_oleson.tripod.com/index-153.html by: my friend, Rick Oleson
http://www.zi.ku.dk/personal/lhhansen/photo/fmount.htm by: Hansen, Lars Holst
http://www.mir.com.my/rb/photography/hardwares/nikonfmount/lens2.htm
http://www.photosynthesis.co.nz/nikon/serialno.html
About
this photographic
site.
Home - Photography
In Malaysia
![]()
Copyright
© 1998.
HIURA Shinsaku ® ; Nikomat ML, Japan,
in collaboration with leofoo ®. MIR Web Development Team.
* Credit: A
Great thanks to Mr Denis Pleic for his volunteering
effort to reedit content and and patching some grammatical mistakes found in this
section of the PIM site. Miss
Rissa (Marketing) & Edward
(Techical) of Shriro Malaysia, distributor of Nikon cameras in Malaysia, in providing
so many useful inputs to make this site possible. Mr Hong,
Ipoh for lending me his FT2 to take some of the images used in this site. This site
is created for his eldest son, Yuen who has picked up his father's hobby and
the FT-2. My friend, John Walls from Florida, US for his images of the FTn
body and the Zoom Nikkor
43-86mm.
[Left Brain][Right brain][Home-MIR] [Invention][Art & Design][Clubs]
[Portfolios][On assignments] [Trading room][Knowledge & Resources] [Free-trade-zone][Thoughts & opinions][Links]