Why this Nikon FE site is constructed this way ? Because, it is not created to please a current Nikon FE user. Chances are pretty high that you are surfing into this site undecided whether you should buy a used body or probably other reasons to look at the Nikon FE. But a seasoned user should know the FE is very much better in build quality and more flexible system compatibility than a latest manual focus cameras like the FM10 or the Nikon FE-10 (Other than the maximum shutter speed of 1/2000 sec and a newer shell made in the '90, I cannot find any reasons why a mint condition but a equivalent price FE should not be considered). Thus, I have to start from scratch for you to digest. | BEFORE you begin, make sure you have the right battery cells installed in your camera body, the Nikon FE is an automatic camera and needs battery to power most of its functions |
Loading and unloading Film First, the FE series has no auto DX coding recognition feature, meaning you have to set the film speed yourself. Buy and loading the type of film you intend to use by first open the camera back. BUT caution: After the back is open, you must be extremely careful NOT to touch the exposed shutter blades/curtain especially with the film running across and cover the curtain, the curling film leader when first pull out from the film cartridge also may easily scratch across the thin layer of shutter blades, I have seen too many careful handling resulting in damaged or deformed shutter curtain, this applies on any cameras. Although the auto DX coding make this a lesser unintended experience. NEVER attempt to use by force if you load the film unsuccessfully.
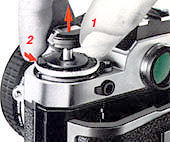 |
It may sounds very complicated in the text form here, but it is a simple process by by sliding its safety lock (2) to the rear and lifting the film rewind knob (1) as far as it will go. This allows the rewind knob to be raised completely and will cause the camera back to spring open. Position the film cartridge or cassette in the film chamber, which is located on the left-hand side, with the film leader aligned along the film guide rails; then, push the rewind knob down to hold the cartridge in place. |
Pull the film leader out sufficiently for feeding into the film take-up spool, and insert its end into any of the spool's slots. Rotate the take-up spool as shown in the illustration so that the film passes under the spool with its emulsion side (dull side) facing out (Bottom picture).
Make sure that the perforations along the edges of the film mesh with the sprockets. If necessary, release the shutter by pushing the shutter release button, and stroke the film-advance lever slowly to make sure that the leader winds smoothly on the spool and that the film edge perforations engage the film sprocket roller. When you are certain that the film is being fed properly onto the spool and traveling correctly along the film guide rails, close the camera back by pressing it until it snaps into place.
 |
There is no other way to test for proper film advancement. After loading, you should also take the film advance to confirm if the film has been taken up for proper film advancing to avoid unnecessary "embarrassment" of realizing after finishing your photo session at frame 37+ or worst still, presenting blank and unexposed roll later after processing. |
To confirm, just fold out the rewind crank and turn it in the direction of the engraved arrow indicates until some resistance is felt. Now, if the the film is properly advanced by take a look at the rewind lever will rotate when you advancing a frame or two before setting on course to the frame number "1".
 |
I always thought the Nikkormat FT series came with a very considerate exposure counter. It is in fact magnifying the center information contained pertaining to key info relates to expose frames. Works great and easy to check. But the EL omitted this nice feature, so does the later Nikons. |
The frame counter, located just in front of the film advance lever, must be advanced to "1" by alternately winding and wasting a few frames (Film manufacturers have provision for this length, don't argue with them...). Caution: For normal shooting: The shutter speed dial on the FE should be set to a position other than "AUTO" setting on the shutter speed dial. This is especially true if you have your lens cap mounting in front of your lens or in a dark or unfavorable location.
|
The automatic exposure system to will read and thought a low light reading and keep the shutter open for a long period of time. This applies when you have a a non dedicated flash as well.Should this happen and if you are in a hurry, just rotate the shutter speed dial to M90 will release the shutter. Just finished the few initial frames to number one other than to the AUTO setting. Of cause, after a few "sessions", you will remember to perform this task. The FE2 has cleverly avoid this by setting the initial few frames to manual mode of 1/250 sec before reaching frame one, regardless of with a flash or not. The FM series, being a mechanical camera in nature, has no such inconvenience |
 |
As you advance the film, confirm that the rewind crank on the other end of the camera body turns in the direction opposite the arrow. This indicates that the film has been loaded properly and is being advanced. |
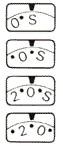
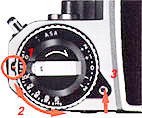
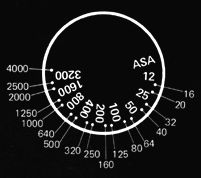
Setting the Film Speed As film sensitivity to light (called "film speed") varies with film type, adjustment of the camera's metering circuit is essential to ensure uniform exposures under all conditions (Caution: Wrongly set film speed setting with the corresponding film in use will result in wrong or uneven exposure, NONE of the FE/FM/FA series models provide any auto DX coding). Thus, a film-speed dial is provided for this purpose, the FE film speed dial has only ASA values, as opposing to the FE-2's ASA/ISO, there is no cause for concern as both ASA and ISO have the same numerical values to film speeds, you won't notice this minor difference, as most film manufacturer provides equivalent values imprinted on their products, like ASA 100/Din 21 etc.. The Nikon FE has ASA/ISO imprinted on the film speed dial though. The Nikon FE comes with a safety lock mechanism built in to prevent accidental shifting of the dial during shooting. To set the film speed, hold in the film speed dial lock (3) and turn (2) the ASA film - speed dial until the ASA number is aligned with the red index (1). After setting the dial, release the lock and test the dial to ensure that it is set firmly at the desired ASA value. The meter is sensitive from ASA 12 to ASA 4000. The film-speed dial has two graduations between each pair of numbers for intermediate settings such as 64, 80, 125, etc. The illustration below indicates all intermediate settings.
Before the Auto DX coding, virtually all cameras provide this special holder at the camera back. This is intended for a reminder on the camera back for convenient storage of any relevant information, especially with the film in use inside the camera bodies - IF you are working with multiple bodies and various films in combinations, this could be a handy feature, as the holder is sized at exactly to house a tear-out end flap of a film carton to act as a reminder. for key information of the type of film loaded in the camera, the ASA film speed and the total number of exposures available.
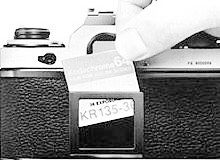 |
Of cause, with the new auto DX film speed coding, many of these inconvenience of wrong films speed setting has reduced to much lower scale. And the memo holder has reduced its significant role. |
Nevertheless, since all the Nikon prior to the Nikon F301 were manual, user's defined film speed setting, this memo holder does came in handy in many photographic situations.
Unloading Film There are possibly two situations when you need to get the film out from your camera. Firstly, when you have all exposures taken in a roll, or if you wish to remove the film in mid-roll (Whatever the reasons, unlike medium format cameras like the Hasselblad or Mamiyas, which permits mid roll film backs changing, to unload film in mid roll or change film types, all SLRs doesn't have the provision for this, and you may need to handle this task manually - but again, a word of caution: Unless you are seasoned enough to perform this kind of task, DON'T attempted to do it as it involves many complicated process to preserve the exposed frames earlier. (Third situation is, of cause, your camera having a malfunction, but highly unlikely, as the Nikon FE series is a very reliable camera in its operation). For this purpose, as the FE/FM/FA series model(s) has no integral motor within its 'barebone' body to allow auto film rewinding, you need to perform it manually in film rewind.
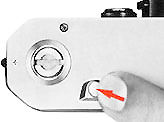 |
First, by depress the rewind button once which is located at the camera base. The rewind button will remain depressed after depressed once (there is no need to hold on to it). The rewind button will be released to engage the film-advance mechanism once again. |
Although highly unlikely you will be
pressing the button other than if you lay your camera on an very uneven ground in
the wild etc., you should not push the rewind button during film advance operation;
otherwise, film advance will temporarily stop and frame-overlap may result, this
is the old ways of performing multiple exposures as in the Nikkormat manual bodies.
Note, too, that the camera back can be removed from the body by depressing the locking
catch on the hinge.
It is a good practice to rewind the film by turning the film rewind crank smoothly
and with a gentle, moderate speed to avoid film static or break in frames (Seldom
happened, unless it is in extreme cold climate, but hopefully they have no other
foreign particles inside,
 |
(You probably think I might be Joking ... This may happen near sea sides with careless attending film loading, this reduce chances of more spoilt exposed frames), but you should know if there is any scratches that run across the film later, ha!). When the leader becomes detached from the take-up spool, it can be both heard and felt as the rewind stroke action become loose-free, you can tell when the film leader has left the take up spool, because the rewind crank becomes much easier to turn.. If the roll has been shot completely, it is advisable to rewind further, until the leader has disappeared inside the cassette to avoid mixing up with other unexposed films. When the film has been rewound, open the camera back by sliding its safety lock and pulling up the rewind knob as far as it will go, the camera back spring opened and for safe film removal from the chamber. |
This section covers:
Film Loading
| Film Speed Setting | Memo Holder | Film Unloading
Earlier section covers: Basic
Instruction on Battery
and related Issues
| Next |
Section covers: Mount
and removing a lens | Lens Compatibility Issues | Shutter Speed Settings
Additional supplements: Technical Information relating to Nikon FE(7 parts)
The AI-S Nikkor | Interchangeable Focusing Screens | The MD-12/MD-11 Motor Drives | Databack |
 |
| Back to Nikon FE Main Index Page | |
| Nikon FM series | Nikon FE series | Nikon FA |
| Message
Board
| for your favourite Nikon FE Series
SLR camera(s)
| Message Board | for your Nikon Optics
in a shared environment
| Message Board | Specifically for Dispose or Looking for Nikon / Nikkor
Photographic Equipment
|
Back | to Pictorial
History of Nikon Rangefinder/SLR/Digital cameras
Shared Resources:
MD-11 | MD-12 | 3rd Party Power Winder Only for FM2(n)/FE2/FA
| Focusing Screens | Titanium Shutter | Flash Units -
| SB-15 | SB-10 | SB-16B & Other Options | Databack | Nikkor lens mount (related
info)
Others:- Nikon AF-TTL Speedlights | SB-20 (1986) | SB-22 (1987) | SB-23 | SB-24 (1988) | SB-25 (1991/2) | SB-26 (1994) | SB-27(1997) | SB-28 (1997) | Nikon SB-29(s) (2000) | Nikon SB-30 (2003) | Nikon SB-600 (2004) | Nikon SB-800 (2003) Nikon AF-TTL Speedlight DX-Series: Nikon SB-28DX (1999) | SB-50DX (2001) | SB-80DX (2002)
Nikon
BC-flash Series |
Original
Nikon Speedlight
SB-2
| SB-3 | SB-4
| SB-5
| SB-6 | SB-7E
| SB-8E
| SB-9 | SB-E
| SB-10
SB-11
| SB-12 | SB-14 | SB-140 UV-IR| SB-15 | SB16A | SB-17 | SB-18, SB-19 | SB-21A (SB-29) Macro flash | Flash Accesories | SF-1
Pilot Lamp
| Nikon F | Nikon F2 | Nikon F3 | Nikon F4 | Nikon F5 | Nikon F6 | Nikkormat / Nikomat | Nikon FM | Nikon FE/ FA | Nikon EM/FG/FG20 | Nikon Digital SLRs | Nikon - Other models |
Nikon Auto Focus Nikkor lenses:- Main
Index Page
Nikon Manual Focus Nikkor lenses:- Fisheye-Nikkor Lenses - Circular | Full Frame |
Ultrawides Lenses - 13mm15mm18mm20mm | Wideangle Lenses - 24mm28mm35mm | Standard Lenses - 45mm 50mm 58mm | Telephoto
Lenses - 85mm105mm135mm180mm & 200mm | Super-Telephoto Lenses - 300mm 400mm 500mm 600mm 800mm 1200mm |
 Index Page |
Special
Application lenses: Micro-Nikkor Lenses - 50mm~55mm -60mm 85mm -105mm 200mm Micro-Zoom 70-180mm Perspective Control (PC) - 28mm 35mm PC-Micro 85mm Dedicated Lenses for Nikon F3AF: AF 80mm f/2.8 | AF 200mm f/3.5 EDIF Depth of Field Control (DC): 105mm 135mm Medical Nikkor: 120mm 200mm Reflex-Nikkor Lenses - 500mm 1000mm 2000mm Others: Noct Nikkor | OP-Nikkor | UV Nikkor 55mm 105mm | Focusing Units | Bellows-Nikkor 105mm 135mm Nikon Series E Lenses: 28mm35mm50mm100mm135mm | E-Series Zoom lenses: 36~72mm75~150mm70~210mm |
MF Zoom-Nikkor Lenses: 25~50mm | 28~45mm | 28~50mm | 28~85mm | 35~70mm | 36~72mm E | 35~85mm | 35~105mm | 35~135mm | 35~200mm | 43~86mm | 50~135mm | 50~300mm | 70~210mm E | 75~150mm E | 80~200mm | 85~250mm | 100~300mm | 180~600mm | 200~400mm | 200~600mm | 360~1200mm | 1200~1700mm
Tele-Converters: TC-1 | TC-2 | TC-200 | TC-201 | TC-300 | TC-301 | TC-14 | TC-14A | TC-14B | TC-14C | TC-14E | TC-16 | TC-16A | TC-20E
Recommended links to understand more technical details
related to the Nikkor F-mount and production Serial Number:
http://rick_oleson.tripod.com/index-153.html by: my
friend, Rick Oleson
http://www.zi.ku.dk/personal/lhhansen/photo/fmount.htm by: Hansen,
Lars Holst
http://www.mir.com.my/rb/photography/hardwares/nikonfmount/lens2.htm
http://www.photosynthesis.co.nz/nikon/serialno.html
W A R N I N G: The New G-SERIES Nikkor lenses have no aperture ring on the lens, they CANNOT ADJUST APERTURES with any of these manual focus Nikon FE series SLR camera models; please ignore some portion of the content contained herein this site where it relates.
|
Back | Main Index Page of Nikkor Resources
|
Back | Main Index Page of Pictorial
History of Nikon SLRs
| Message Board | for your Nikkor optics ("shared" because I do wish some of you to expose to other's perspective as well. Isn't it a sad sate to see photography has to be segmented into different camps from the use of various labels)
about this photographic web site
Home - Photography in Malaysia |
![]()
A contributing effort to Michael C Liu's Classic Nikon Site.
Credit: Chuck Hester for some of his beautiful images used in this site; Ted Wengelaar®, Holland for his continuous flow of input; Lars Holst Hansen, Danish 'Hawkeye' who shares the same passion; Mr Poon from Poon photo for their input; Ms Miss Rissa (Sales Manager) & members of the Technical Service dept. of Shriro Malaysia, local distributor of Nikon cameras in Malaysia & Singapore, in providing so many useful input to make this site possible. Special thanks to Mr MC Lau, who has helped with his images of the MF-12 databack. Michael Tan, Pertama Photo (603-2926505) for lending his original Titanium Shutter Display Unit. Dave Hoyt who has prepared the introductory page and offer some images of his FE2 in this site.. Hiura Shinsaku, Nikomat ML, Japan for his contribution on all the various images; A contributing site to a long lost friend on the Net. Note: Certain content and images appeared in this site were either scanned from official marketing leaflets, brochures published by Nikon and/or contribution from surfers who claimed originality of their own work to publish in this site based on educational merits. The creator of this site will not be responsible for any discrepancies that may arise from such possible dispute except rectifying them after verification."Nikon", "Nikkormat", "Nippon Kokagu KK" & "Nikkor" are registered tradename of Nikon Corporation Inc., Japan. Made witha PowerMac.