 |
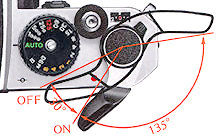
Film-Advance Lever Nikon FE's film-advance lever simultaneously advances the film, cocks the shutter and operates the frame counter. It also doubles as the Nikon FE's meter on/off switch and shutter release button lock. |
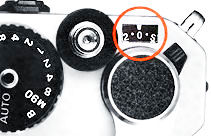
Yes, most new users who has never exposed to the FE/FE2 before may struggle to make it works without realizing the three functions film advance lever is also the shutter release lock lever. To advance the film, stroke the lever with your right thumb as far as it will go. A 135° complete stroke will advance the film to the next frame (Or in multiple of strokes, the shutter will not trip unless the lever is fully advanced). The film will be advanced a full frame. The lever automatically returns to its 30° standoff position when released upon the completion of film advance. Nikon has many configurations in terms of its film advance stand off position with a throw of winding stroke, like a 136° to 15° in the Nikon F to the smoothest of them all, the Nikon F3's 30° standoff and 140° throw. Incidentally, the FE, FE2 FM, FM2 and the FA are adopting 135° and 30° combinations. Anyway, 98% of the users will not be bother and feel the differences. The newer bodies have no film advance lever and heavy duty users would presumably came equipped with a motor driven accessories like the MD-11 or the MD-12. The film-advance lever switches the meter on and activates the camera's electronics when moved to its standoff position, you will notice the red button after you after you move the lever to the standoff position; it switches the meter off when moved back flush with the camera body. With the lever set flush against the camera body, it serves also as a lock to prevent accidental tripping when the shutter is cocked. In this position (when the meter is off), the meter needle in the viewfinder rests below "B" on the shutter-speed scale.
Frame Counter Each time the film is advanced one frame by a full stroke of the film-advance lever, the frame counter operates to show how many frames have been exposed. It is automatically reset to S (start), two frames before 0, when the camera back is opened to remove an exposed film cartridge and/or to load a new roll of film. The frame counter has indications for up to a maximum of 36 frames.
 |
(Although most seasoned photographers know the trick of squeezing a frame, two or three extra frames out of this, well with the newer FE2, since the camera will automatically switches to 1/250 mechanical speed, you have to guess the exposures for that little extra benefits), with all odd numbers calibrated in dots and all even numbers in figures.The figures are in white, except for 12, 20 and 36 which appear in red to indicate the maximum number of exposures available, respectively, with standard film cartridges. This may not be true, especially with the number 20, as the more popular is 12, 24 and 36 exposures. |
Self-Timer You might thought you are very familiar with the FE, huh ? The built-in self-timer can be used to trip the shutter after a delay of approximately 8-14 seconds. To take a picture using the self-timer, first set the aperture and shutter speed controls, advance the film, and cock the self-timer by turning the self-timer lever downwards. Then, depress the shutter release button and the timer will start (Note that the mirror will rise as the shutter button is depressed and return at the end of the cycle). A unique feature of the FE's self-timer lever is that its setting is "cancelable" In other words, should you decide not to use the self - timer after setting it, you simply turn it back upwards and push it towards the lens mount. Then you can resume normal shutter tripping operation. The self-timer works at all shutter speed settings, except "B." For critical close-up photography, the sell-timer, in combination with a tripod, is particularly useful in preventing vibration, why ? Because to compensate the removal of the mirror-lock-up feature as available in the EL series. Nikon designed the FE/FE2 to flip the mirror upward first when the it is activated, thus, there will be NO reflex mirror mechanism involves, ONLY the shutter will open and close during the image capture process. This reduces the vibration to the absolute minimal level. Note (a): Although the timer can be canceled if you change your mind, but when you have activated the timer and it started to travel, if the lever is pushed up manually, the shutter will trip when the lever reaches the vertical position. Why ? Intentionally designed to "behave" this way ? I don't know, but since we are here, this may be effective if you intend to speed up the process to fire the shutter). Note (b): However, since none of the Nikkormat, FE/FM series models equipped with a eyepiece blind as with the Nikon FA/F3, when using the self-timer with the camera on automatic, cover the eyepiece with your hand only at the instant you release the shutter; this will prevent light from entering into the eyepiece and adversely affecting exposure measurement because the SPDs are located around the pentaprism. Of cause, for a more precise exposure measurement will be do your reading first in auto if you like and lock the values in the manual mode during self timer operations.
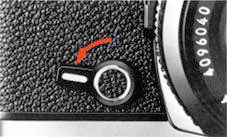 |
The FE's self time lever is shaped differently from the newer FE2 and it is also a dual functions lever. Where it was designed to make the FE less complicated in control, it is also a auto exposure memory lock. |
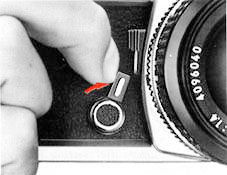
Just slide inward will lock a AE setting/metering. But it doesn't indicate in the match needle, even though it functions normally. This flaw was eventually patched with the newer FE2.
Memory Lock In a automatic camera, memory lock is the fastest and most convenient, exacting and responsive way in actual picture taking situation when you are in the auto mode. The convenient location of the self-timer lever in the Nikon FE, making for ready finger access, proves advantageous when using the built-in memory lock. Memory lock enables the photographer to "lock in" a close-up reading of the subject. To operate the memory lock, view through the finder and meter on the selected area; then, simply push the lever toward the lens to hold the reading until the completion of the exposure. The reading will be retained as long as the control is held in this position. Even though the meter needle continues to move while the memory lock is activated, the shutter speed is still "locked in" electronically. Thus, several frames can be exposed using the same locked reading. Also, the aperture can be adjusted without affecting the locked-in shutter speed. There are few ways in which the FE series or even the more advance FA handle exposure measurement. other means are the exposure compensation or adjusting the ASA/Film speed settings. But memory lock provides a more accurate reading as the exposure compensation adjustments may require tons of experience to correctly compensate for some highly unfavorable and complex lighting condition. Noting the FE's exposure compensation has only 1/2 stop increments as oppose to the more refined 1/3 stop increments in the FE2. This is especially true when you are working with lesser tolerance forgiving films like color slides. Anyway, seasoned photographers will appreciate the convenience of what this lock provides.
 |
Note: Both AE lock and exposure compensation adjustments sometimes may wash out details on the background info after compensation. More ideally, of cause is to use fill-in flash to compensate for more natural rendered effect if effective working distance permits. The FE fairly high 1/125 sec. (Or the more effective FE2's 1/250 sec sync to reduce chances of ghost images) maximum sync speed is adequate for normal backlit situation, as long as you don't let the direct light to drop onto the lens by shielding it with a lens hood or hands etc... |
This section covers: Film-Advance Lever | Frame Counter | Self-Timer | Memory Lock
Earlier section covers:
Film
Loading | Film Speed Setting | Memo Holder | Film Unloading
| Next |
Section covers: Depth
of Field Preview | Shutter Release Operation
| Multiple Exposures Lever
| Related Multiple exposure info on the EL
Additional supplements: Technical Information relating to Nikon FE(7 parts)
 |
| Back to Nikon FE Main Index Page | |
| Nikon FM series | Nikon FE series | Nikon FA |
| Message
Board
| for your favourite Nikon FE Series SLR camera(s)
| Message Board | for your Nikon Optics
in a shared environment
| Message Board | Specifically for Dispose or Looking for Nikon / Nikkor
Photographic Equipment
|
Back | to Pictorial
History of Nikon Rangefinder/SLR/Digital cameras
Shared
Resources: MD-11 | MD-12 | 3rd Party Power Winder Only for FM2(n)/FE2/FA
| Focusing Screens | Titanium Shutter | Flash Units -
| SB-15 | SB-10 | SB-16B & Other Options | Databack | Nikkor lens mount (related
info)
Others:- Nikon AF-TTL Speedlights | SB-20 (1986) | SB-22 (1987) | SB-23 | SB-24 (1988) | SB-25 (1991/2) | SB-26 (1994) | SB-27(1997) | SB-28 (1997) | Nikon SB-29(s) (2000) | Nikon SB-30 (2003) | Nikon SB-600 (2004) | Nikon SB-800 (2003) Nikon AF-TTL Speedlight DX-Series: Nikon SB-28DX (1999) | SB-50DX (2001) | SB-80DX (2002)
Nikon
BC-flash Series |
Original
Nikon Speedlight
SB-2
| SB-3 | SB-4
| SB-5
| SB-6 | SB-7E
| SB-8E
| SB-9 | SB-E
| SB-10
SB-11
| SB-12 | SB-14 | SB-140 UV-IR| SB-15 | SB16A | SB-17 | SB-18, SB-19 | SB-21A (SB-29) Macro flash | Flash Accesories | SF-1
Pilot Lamp
| Nikon F | Nikon F2 | Nikon F3 | Nikon F4 | Nikon F5 | Nikon F6 | Nikkormat / Nikomat | Nikon FM | Nikon FE/ FA | Nikon EM/FG/FG20 | Nikon Digital SLRs | Nikon - Other models |
Nikon Auto Focus Nikkor lenses:- Main
Index Page
Nikon Manual Focus Nikkor lenses:- Fisheye-Nikkor Lenses - Circular | Full Frame |
Ultrawides Lenses - 13mm15mm18mm20mm | Wideangle Lenses - 24mm28mm35mm | Standard Lenses - 45mm 50mm 58mm | Telephoto
Lenses - 85mm105mm135mm180mm & 200mm | Super-Telephoto Lenses - 300mm 400mm 500mm 600mm 800mm 1200mm |
 Index Page |
Special
Application lenses: Micro-Nikkor Lenses - 50mm~55mm -60mm 85mm -105mm 200mm Micro-Zoom 70-180mm Perspective Control (PC) - 28mm 35mm PC-Micro 85mm Dedicated Lenses for Nikon F3AF: AF 80mm f/2.8 | AF 200mm f/3.5 EDIF Depth of Field Control (DC): 105mm 135mm Medical Nikkor: 120mm 200mm Reflex-Nikkor Lenses - 500mm 1000mm 2000mm Others: Noct Nikkor | OP-Nikkor | UV Nikkor 55mm 105mm | Focusing Units | Bellows-Nikkor 105mm 135mm Nikon Series E Lenses: 28mm35mm50mm100mm135mm | E-Series Zoom lenses: 36~72mm75~150mm70~210mm |
MF Zoom-Nikkor Lenses: 25~50mm | 28~45mm | 28~50mm | 28~85mm | 35~70mm | 36~72mm E | 35~85mm | 35~105mm | 35~135mm | 35~200mm | 43~86mm | 50~135mm | 50~300mm | 70~210mm E | 75~150mm E | 80~200mm | 85~250mm | 100~300mm | 180~600mm | 200~400mm | 200~600mm | 360~1200mm | 1200~1700mm
Tele-Converters: TC-1 | TC-2 | TC-200 | TC-201 | TC-300 | TC-301 | TC-14 | TC-14A | TC-14B | TC-14C | TC-14E | TC-16 | TC-16A | TC-20E
Recommended links to understand more technical details
related to the Nikkor F-mount and production Serial Number:
http://rick_oleson.tripod.com/index-153.html by: my
friend, Rick Oleson
http://www.zi.ku.dk/personal/lhhansen/photo/fmount.htm by: Hansen,
Lars Holst
http://www.mir.com.my/rb/photography/hardwares/nikonfmount/lens2.htm
http://www.photosynthesis.co.nz/nikon/serialno.html
W A R N I N G: The New G-SERIES Nikkor lenses have no aperture ring on the lens, they CANNOT ADJUST APERTURES with any of these manual focus Nikon FE series SLR camera models; please ignore some portion of the content contained herein this site where it relates.
|
Back | Main Index Page of Nikkor Resources
|
Back | Main Index Page of Pictorial
History of Nikon SLRs
| Message Board | for your Nikkor optics ("shared" because I do wish some of you to expose to other's perspective as well. Isn't it a sad sate to see photography has to be segmented into different camps from the use of various labels)
about this photographic web site
Home - Photography in Malaysia |
![]()
A contributing effort to Michael C Liu's Classic Nikon Site.
Credit: Chuck Hester for some of his beautiful images used in this site; Ted Wengelaar®, Holland for his continuous flow of input; Lars Holst Hansen, Danish 'Hawkeye' who shares the same passion; Mr Poon from Poon photo for their input; Ms Miss Rissa (Sales Manager) & members of the Technical Service dept. of Shriro Malaysia, local distributor of Nikon cameras in Malaysia & Singapore, in providing so many useful input to make this site possible. Special thanks to Mr MC Lau, who has helped with his images of the MF-12 databack. Michael Tan, Pertama Photo (603-2926505) for lending his original Titanium Shutter Display Unit. Dave Hoyt who has prepared the introductory page and offer some images of his FE2 in this site.. Hiura Shinsaku, Nikomat ML, Japan for his contribution on all the various images; A contributing site to a long lost friend on the Net. Note: Certain content and images appeared in this site were either scanned from official marketing leaflets, brochures published by Nikon and/or contribution from surfers who claimed originality of their own work to publish in this site based on educational merits. The creator of this site will not be responsible for any discrepancies that may arise from such possible dispute except rectifying them after verification."Nikon", "Nikkormat", "Nippon Kokagu KK" & "Nikkor" are registered tradename of Nikon Corporation Inc., Japan. Made witha PowerMac.