Automatic Shutter Speed Selection (Aperture Priority AE) When you set the shutter speed dial to the green AUTO setting, the FE will be transformed to a automatic camera, aperture priority automatic exposure will be there ready to serve.
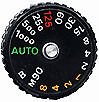 |
The viewfinder will react to your selection, first you will notice the green pointer in the viewfinder points will rest to the "A" and the black point scale will aim to the shutter speed the camera's metering computation has selected to match your aperture value you select. Should you change the aperture value on your lens, the shutter speed indicator will change accordingly to match your new setting on the lens. |
This process is continuous as long
as the meter is turned on (Where ? Forgetful fellow, the film advance lever !). This
means you don't have to move away from the viewfinder while you are focusing and
composing and the camera will keep relaying updated information to you through the
finder even if lighting conditions or you change the aperture value through your
left hand. Just make sure that the needle indicates a shutter speed appropriate for
the subject; if the indicated speed is too fast or too slow, simply adjust the aperture
ring on the lens until the desired shutter speed is indicated. Then, press the shutter
release button to take the shot. Note that as long as the needle remains within the
scale, provided the EV range of the metering system is not exceeded, the FE center
weighted metering should yield satisfactory results. The best combination in the
shutter speed/aperture combination will depend on the desired results you wish to
achieve Use fast shutter speeds to freeze motion, or slow speeds to produce deliberate
and creative blur. Small apertures give greater depth of field, while large apertures
restrict sharp focus to the main subject. The creative selection of both speeds and
apertures will greatly enhance your photography. Since the FE series is an aperture
priority based AE camera, the depth of field principle is very easy to picked up
and has a wider applications and comforting eventual results (As long as you are
NOT heavily engaging in action related photography.
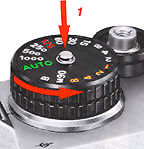 |
Manual Shutter Speed Selection (Manual Mode) First, you can unlock the shutter release dial by pressing the middle button (1) and while doing so, turn the shutter dial to any setting in the manual speeds. When the shutter-speed dial is set to other than the AUTO setting, manual shutter speed selection is provided, with exposure determination via the so called 'match-needle' method. To determine the correct exposure using manual speed selection, perform the following: Switch on the meter by moving the advance lever to its standoff position. |
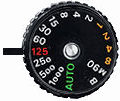 |
Adjust the shutter-speed dial until the green needle is aligned with the desired speed; then, simply adjust the aperture setting of the lens until the black needle moves to overlap the green needle. Turn the FE's shutter speed dial to any position except B, M90, or AUTO (B, M250, or A on the FE2 if you want to know), and the camera will be in Manual exposure mode. M90 and B are mechanical timed shutter in which the camera's built-in light meter will not function. |
If deliberate under- or overexposure is desired, adjust the control so that the green needle overlaps the next higher number (one-stop underexposure) or the next lower number (one-stop overexposure). (Just in case, the left is under and the right is over exposure setting. The black needle is the camera's suggested metering. If the black meter needle fails to leave the A or M/B positions during auto (or fails to match the green needle in manual), even after all possible lens-aperture/shutter-speed combinations have been tried, then the available light is too bright or too dim for the meter's range. To correct this situation, several measures may be taken as follows: Mount a neutral density filter on the lens to decrease the light reaching the film plane, change to a lower speed film, in case you haven't load the film or use artificial lighting (i.e., an electronic flash unit) to increase subject illumination if it is too dark. |
High-Contrast Lighting Situations When there are substantial brightness differences between the main subject and the background, unimportant or unrelated bright spots or dark spots in your composition can adversely influence the meter reading. This is especially true when most photographers are influenced by the main subject of interest and often omitting what lays in the background. Mistake ? Subjective. But if situation permits (Where sometimes, what photographers termed it, photographs are "made"). But at times, you might not have a choice or intentional results are preferred, you may have to deal with these situations. To use the FE (Or any equivalent auto SLR, other than those which equip with multi segments metering), to prevent under-or overexposure of the main subject under these shooting conditions, some corrective action must be taken to ensure proper exposure of the main subject. Although, the finder's center-weighted TTL metering (and the memory lock function) simplify adjustments and often produce acceptable results, making for quicker camera operation and more accurate final results. To compensate for an excessively bright or dark background, place the main subject in the center of the focusing screen while performing metering; this action ensures that the main emphasis of the meter reading will be on the chosen subject. Then, after completing aperture and shutter speed adjustments (and depressing the memory lock to retain the shutter speed, if set to auto), recompose to the desired picture composition and make the exposure without readjusting the camera controls. For example, when shooting landscapes, it is often advisable to aim the camera slightly downward during exposure measurement to eliminate the effects of a bright expanse of sky; without such compensation, the landscape may appear underexposed in the final print. Also, for backlit subjects, it may be necessary to move closer to the subject to ensure a proper reading (Just use your memory lock..).
|
For more info
on the F-mount, |
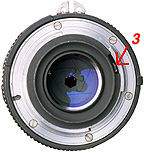
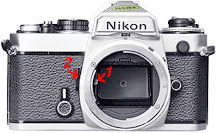
Stop-Down Exposure Measurement The term 'Stop-Down' sounds very technical or confuse to many new SLR users. What it meant was just close down the iris of the lens to the indicated/selected aperture value that you set in your lens (Often by the Depth of field (DOF) preview lever (2) just next to the lens mount, with the exception of Nikkormat FT series, where their DOF button is at the top panel). The Nikkormat EL is the first mid compact Nikon body that shifted the DOF button to the front as with the professional F series models. The illustration shown is with a newer AI manual focus Nikkor lens, the red arrow (3) is the auto coupling device (You can turn the aperture ring to see the Iris diaphragm open and close, corresponding to your setting). The auto aperture stop-down lever (1) in side your lens mount (Camera Body) will trip your aperture selected on your lens to the exacting value during the exposure. Other times, the lens will stay open to the maximum aperture value of your lens (eg. f/1.4 will be display) to present you with the brightest available lens opening (f1.4 in this case) for easy view, focus and composing. |
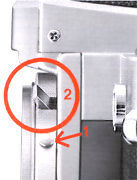
The vast selection of lenses available for use with your Nikon FE includes some which are fitted neither with an automatic diaphragm nor a meter coupling ridge (Non-AI lenses), both of which are essential to full-aperture exposure measurement. The FE works with these lenses, through an alternative method called stop-down exposure measurement. First, the meter coupling lever should be raised (2) and locked up out of the way manually by depressing the coupling lever release button (1); to avoid accidental damage, make sure you do not use excessive force when raising the lever. After setting the lever, mount the lens or lens/accessory combination on the camera, switch on the meter by moving the film-advance Lever to the standoff position, and then set the controls for correct exposure as follows: |
 |
For lenses or accessories having no
automatic diaphragm, nor meter coupling ridge (e.g., bellows units, extension rings,
preset lenses): AUTO: First, set the camera at AUTO. Focus on
the subject and stop down the lens manually until the desired shutter speed is indicated
in the viewfinder.
MANUAL: First, focus on the subject. Adjust either
the shutter-speed dial or the lens aperture ring until the needles in the viewfinder
overlap.
For automatic diaphragm lenses with no coupling ridge AUTO: Hold in the depth-of-field preview lever to stop down the lens diaphragm. Then, adjust the aperture ring until the black meter needle indicates the desired shutter speed. Trip the shutter with the preview lever fully depressed toward the camera body until the completion of the exposure. An alternative way is to use the built-in memory lock function. In this case, after reading the meter in the same method as mentioned above, use the memory lock to freeze the reading (be sure the preview lever is still depressed when locking in the reading), and then free the preview lever. Release the shutter while keeping the memory lock depressed. MANUAL: Select the desired shutter speed, depress and hold the depth-of-field preview Lever, and while keeping it depressed, adjust the aperture ring until the needles in the viewfinder overlap. You may free the preview Lever before releasing the shutter.
For fixed-aperture lenses such as Reflex-Nikkors, photomicrography or astrophotography AUTO: As the lens aperture is fixed, no additional control is necessary. MANUAL: Adjust the shutter-speed dial until the needles in the viewfinder overlap. For additional control of exposure in either mode of operation, use ND filters, or adjust the illumination, or switch to a higher or slower speed film.
| Next | - Other info relating to Nikon FE
Additional supplements: Technical Information relating to Nikon FE(7 parts)
 |
| Back to Nikon FE Main Index Page | |
| Message Board | for your favourite Nikon FE Series SLR camera(s)
| Message Board | for your Nikon Optics in a shared environment
| Message Board | Specifically for Dispose or Looking for Nikon / Nikkor Photographic Equipment
|
Back | to Pictorial
History of Nikon Rangefinder/SLR/Digital cameras
Shared Resources:
MD-11 | MD-12 | 3rd Party Power Winder Only for FM2(n)/FE2/FA
| Focusing Screens | Titanium Shutter | Flash Units -
| SB-15 | SB-10 | SB-16B & Other Options | Databack | Nikkor lens mount (related
info)
Others:- Nikon AF-TTL Speedlights | SB-20 (1986) | SB-22 (1987) | SB-23 | SB-24 (1988) | SB-25 (1991/2) | SB-26 (1994) | SB-27(1997) | SB-28 (1997) | Nikon SB-29(s) (2000) | Nikon SB-30 (2003) | Nikon SB-600 (2004) | Nikon SB-800 (2003) Nikon AF-TTL Speedlight DX-Series: Nikon SB-28DX (1999) | SB-50DX (2001) | SB-80DX (2002)
Nikon
BC-flash Series |
Original
Nikon Speedlight
SB-2
| SB-3 | SB-4
| SB-5
| SB-6 | SB-7E
| SB-8E
| SB-9 | SB-E
| SB-10
SB-11
| SB-12 | SB-14 | SB-140 UV-IR| SB-15 | SB16A | SB-17 | SB-18, SB-19 | SB-21A (SB-29) Macro flash | Flash Accesories | SF-1
Pilot Lamp
Nikon Auto Focus Nikkor lenses:- Main Index Page (under constant construction)
| Nikon F | Nikon F2 | Nikon F3 | Nikon F4 | Nikon F5 | Nikon F6 | Nikkormat / Nikomat | Nikon FM | Nikon FE/ FA | Nikon EM/FG/FG20 | Nikon Digital SLRs | Nikon - Other models |
Nikon Auto Focus Nikkor lenses:- Main
Index Page
Nikon Manual Focus Nikkor lenses:- Fisheye-Nikkor Lenses - Circular | Full Frame |
Ultrawides Lenses - 13mm15mm18mm20mm | Wideangle Lenses - 24mm28mm35mm | Standard Lenses - 45mm 50mm 58mm | Telephoto
Lenses - 85mm105mm135mm180mm & 200mm | Super-Telephoto Lenses - 300mm 400mm 500mm 600mm 800mm 1200mm |
 Index Page |
Special
Application lenses: Micro-Nikkor Lenses - 50mm~55mm -60mm 85mm -105mm 200mm Micro-Zoom 70-180mm Perspective Control (PC) - 28mm 35mm PC-Micro 85mm Dedicated Lenses for Nikon F3AF: AF 80mm f/2.8 | AF 200mm f/3.5 EDIF Depth of Field Control (DC): 105mm 135mm Medical Nikkor: 120mm 200mm Reflex-Nikkor Lenses - 500mm 1000mm 2000mm Others: Noct Nikkor | OP-Nikkor | UV Nikkor 55mm 105mm | Focusing Units | Bellows-Nikkor 105mm 135mm Nikon Series E Lenses: 28mm35mm50mm100mm135mm | E-Series Zoom lenses: 36~72mm75~150mm70~210mm |
MF Zoom-Nikkor Lenses: 25~50mm | 28~45mm | 28~50mm | 28~85mm | 35~70mm | 36~72mm E | 35~85mm | 35~105mm | 35~135mm | 35~200mm | 43~86mm | 50~135mm | 50~300mm | 70~210mm E | 75~150mm E | 80~200mm | 85~250mm | 100~300mm | 180~600mm | 200~400mm | 200~600mm | 360~1200mm | 1200~1700mm
Tele-Converters: TC-1 | TC-2 | TC-200 | TC-201 | TC-300 | TC-301 | TC-14 | TC-14A | TC-14B | TC-14C | TC-14E | TC-16 | TC-16A | TC-20E
Recommended links to understand more technical details
related to the Nikkor F-mount and production Serial Number:
http://rick_oleson.tripod.com/index-153.html by: my
friend, Rick Oleson
http://www.zi.ku.dk/personal/lhhansen/photo/fmount.htm by: Hansen,
Lars Holst
http://www.mir.com.my/rb/photography/hardwares/nikonfmount/lens2.htm
http://www.photosynthesis.co.nz/nikon/serialno.html
W A R N I N G: The New G-SERIES Nikkor lenses have no aperture ring on the lens, they CANNOT ADJUST APERTURES with any of these manual focus Nikon FE series SLR camera models; please ignore some portion of the content contained herein this site where it relates.
|
Back | Main Index Page of Nikkor Resources
|
Back | Main Index Page of Pictorial
History of Nikon SLRs
| Message Board | for your Nikkor optics ("shared" because I do wish some of you to expose to other's perspective as well. Isn't it a sad sate to see photography has to be segmented into different camps from the use of various labels)
about this photographic web site
Home - Photography in Malaysia |
![]()
A contributing effort to Michael C Liu's Classic Nikon Site.
Credit: Chuck Hester for some of his beautiful images used in this site; Ted Wengelaar®, Holland for his continuous flow of input; Lars Holst Hansen, Danish 'Hawkeye' who shares the same passion; Mr Poon from Poon photo for their input; Ms Miss Rissa (Sales Manager) & members of the Technical Service dept. of Shriro Malaysia, local distributor of Nikon cameras in Malaysia & Singapore, in providing so many useful input to make this site possible. Special thanks to Mr MC Lau, who has helped with his images of the MF-12 databack. Michael Tan, Pertama Photo (603-2926505) for lending his original Titanium Shutter Display Unit. Dave Hoyt who has prepared the introductory page and offer some images of his FE2 in this site.. Hiura Shinsaku, Nikomat ML, Japan for his contribution on all the various images; A contributing site to a long lost friend on the Net. Note: Certain content and images appeared in this site were either scanned from official marketing leaflets, brochures published by Nikon and/or contribution from surfers who claimed originality of their own work to publish in this site based on educational merits. The creator of this site will not be responsible for any discrepancies that may arise from such possible dispute except rectifying them after verification."Nikon", "Nikkormat", "Nippon Kokagu KK" & "Nikkor" are registered tradename of Nikon Corporation Inc., Japan. Made witha PowerMac.