Introduction
Since you are clicking into this site, there could be a strong possibility that either
you are looking for a used camera or an existing FM user who wants to get a feel
back about your body. As I said, the FM is a very friendly camera. To effectively
handle the Nikon FM, you should, of course, know how to use this camera. Study these
basic steps until you have mastered them well enough to enjoy it.
1. Install the batteries.
 |
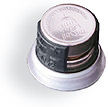 |
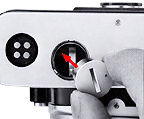
Just mount two fresh button-cell type 1.5V silver-oxide batteries or two 1.5v alkaline cells or one 3v lithium battery (Those button cells carry with a numeral of '76' will work, in case you are not so sure) onto the detachable (A coin will be fine) battery clip in the camera base plate's battery chamber. Make sure the batteries' terminals are aligned correctly with the plus (+) and minus ( - ) indications (polarities) in the clip, then secure the clip with the coin into place again. |
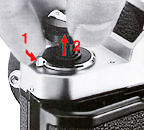
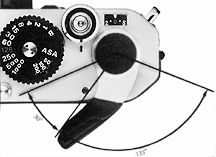
2. Check battery power.
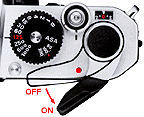 |
After battery installation, of cause it is nice to check if it was correctly done. Don't worry, the camera will still work even if you have install them wrongly, the power are only meant for the metering cell). To confirm that, just move the film advance lever to its 30° standoff position (A red dot normally concealed by the lever, when the camera is not in use, will be uncovered by this action), and to confirm that look through the eyepiece, to see at least one of the LED indicators inside the camera's viewfinder lights up. |
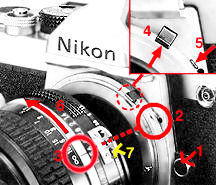 |
3. If you have bought your camera from a shop, chances could be high that it already came with a lens mounted. But if it is not, then you have to mount a lens onto the camera body. Firstly, by making sure you have bought a lens came with a Nikon mount, Nikkor lenses is their trade name for their lenses. To do so when mounting, the meter coupling lever (4) is properly positioned. To mount a lens that has the normal Al facility, just seat the lens in the camera's mount with the lens mounting index (2) aligned with the corresponding index on the camera body (3), then twist the lens counterclockwise (6) until it clicks and locks into place. |
To mount a lens that does not have the Al facility: Lock the lever (4) up out of the way by pushing the coupling lever release (5) and manually raising the lever, then mount the lens. You don't have to do this part as long as your lens are a newer batch of the lot as this procedures are meant to mount a older Nikkor lens that doesn't carry with a ridge (7) on the lens. The lens release button (1) is for un-mount a lens, press it and turn clockwise (Opposite direction from (6)) will release a lens from the mount.
Click here to understand more what is Non-AI, AI, AI-S and AF Nikkors.
4. Open the camera back.
 |
After you have a lens mounted, you have to load a film into the camera. Slide the safety lock (1) to the rear, and lift the film rewind knob (2) until the camera back swings open. The action is dual action so as to prevent opening of the back. |
5. Load the film.
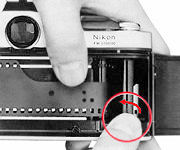 |
Position the cassette in the film chamber, and secure it by depressing the film rewind knob back into place. Pull the film leader out slowly, and insert its end into one of the film take-up spool's three slots. Rotate the spool (towards the film cassette), making sure the film's perforations mesh with the sprockets. Then, close the camera back by applying pressure on it until it snaps into place. |
First, the FM series camera has no auto DX coding recognition feature, meaning you have to set the film speed yourself. Buy and loading the type of film you intend to use by first open the camera back here as illustrated above. BUT caution: After the back is open, you must be extremely careful NOT to touch the exposed shutter blades/curtain especially with the film running across and cover the curtain, the curling film leader when first pull out from the film cartridge also may easily scratch across the thin layer of shutter blades, I have seen too many careful handling resulting in damaged or deformed shutter curtain, this applies on any cameras and not just the FM discussed here. Although the auto DX coding make this a lesser unintended experience. NEVER attempt to use by force if you load the film unsuccessfully on the very first trial, practices makes perfect.
 |
6. Advance the film by stroking the film advance lever,and make two blank exposures by covering the lens with your hand or its front cap; this will dispose of the initial portion of the film exposed during loading and take the exposure counter to frame 0. As you stroke the lever, confirm that the film rewind knob turns in the direction opposite the arrow engraved; this will indicate that the film has been loaded properly and is being advanced. |
7. Before the Auto DX coding, virtually all cameras provide this special holder at the camera back. This is intended for a reminder on the camera back for convenient storage of any relevant information, especially with the film in use inside the camera bodies - IF you are working with multiple bodies and various films in combinations, this could be a handy feature, as the holder is sized at exactly to house a tear-out end flap of a film carton to act as a reminder. for key information of the type of film loaded in the camera, the ASA film speed and the total number of exposures available. This will serve as a useful reminder of the type of film loaded in the camera.
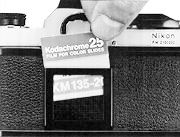 |
Of cause, with the new auto DX film speed coding, many of these inconvenience of wrong films speed setting has reduced to much lower scale. And the memo holder has reduced its significant role. Nevertheless, since all the Nikon prior to the Nikon F301 were manual, user's defined film speed setting, this memo holder does came in handy in many photographic situations. |
8. Set the ASA film speed
Lift the knurled ASA film speed ring,
and turn it until the triangular red index is aligned with the ASA value of the film
loaded in the camera.
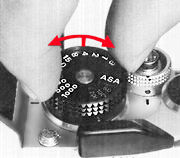 |
As film sensitivity to light (called "film speed") varies with film type, adjustment of the camera's metering circuit is essential to ensure uniform exposures under all conditions (Caution: Wrongly set film speed setting with the corresponding film in use will result in wrong or uneven exposure, NONE of the FE/FM/FA series models provide any auto DX coding). |
Thus, a film-speed setting is provided for this purpose. The Nikon FM comes with a safety features mechanism built in to prevent accidental shifting of the dial during shooting. Because you have to lift the ring before you can change the setting. I assume you are new or not very experienced in these, but all I can tell you, this newer feature incorporated in the FM is very much a joy to use as compared with the earlier Nikkormat models which the ASA setting locates under the lens mount.
9. Now upon completion of all the few steps, hey. You are ready to take a snap with your camera! Just compose the picture and secure focus by looking through the viewfinder.
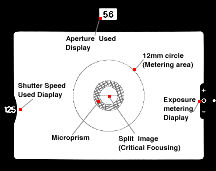 |
To focus with the split-image rangefinder spot, turn the focusing ring of the lens until the two halves of the spot coincide perfectly. To focus with the microprism grid or the matte outfield, turn the ring until the portion of the image appearing in the area appear sharp. |
10. Set shutter speed and/or lens aperture, or vice versa, until the LED indicator for correct exposure lights up. The shutter speed selected by turning the camera's shutter speed dial will appear on the left-hand side of the viewfinder image for your reference; the aperture selected by turning the lens aperture ring will appear on the upper Portion. This step presume that the lens mounted on the camera has the Al facility. If the lens used does not have the Al facility: Press and hold the depth-of-field preview lever, then set shutter speed and/or lens aperture until the LED indicator for correct exposure lights up.
See, as what I told you, it is easy to set up your FM to use. For step number 10, I know it is hard to understand the combination and interrelation between shutter speeds and aperture values. There are two ways in this site to help you understand these better. First is to use the camera manual and next option is to check another article that I prepared here in this photography site.
| Next | Understand some Technicalities (6 Parts) Part 1/7
Index Page | Page 1 | Page 2 | Page 3 | Page 4 | Page 5 | Page 6 | Page 7 | Specification | Main Reference Map
Download a copy
of the Camera Operation
Manual
- PDF
File
(647k)
| Back to
Nikon FM's Index Page
|
| Back
to Nikon
FM Series
Main Index Page
|
Detailing
its Basic
Camera Operations
(Instruction Manual)
Detailing
its Technical
Application of its features
(6 parts)
Full Specification of Nikon FM | Main
Reference
Map
of Nikon FM - HTML | PDF (288k)
Standard
production Nikon FM Series models:-
Nikon FM | Nikon FM2 | Nikon FM2n | Nikon FM10 | Nikon FM3a |
Known
variants:-
Nikon
FM Gold
| Nikon
FM2/T
| Nikon
FM2N Tropical Set
| Nikon
FM2/T Limited Edition
| Nikon
FM2N LAPITA
|
Nion
FM2n Millennium 2000
Shared
Resources: MD-11 | MD-12 | Focusing
Screens
| Titanium
Shutter
| Flash Units -SB-16 | SB-15 | SB-10 or other Options | Databack | Nikkor lens mount (related info)
Instruction
Manual: Nikon FM (HTML | PDF) | Nikon FM-10 (HTML) | Nikon FM2n's
User's Manual
available only in HTML format (6
parts) | Nikon
FM3A
(HTML)
Specifications: Nikon FM, FM-10, FM2, FM2n and FM3A / Main
Reference Map: (HTML) Nikon FM, FM2, FM-10, FM2n (Applicable
to FM2T, FM2 "Year of the Dog"; Millennium 2000") and Nikon FM3A
| Message Board | for
your favourite Nikon
FM Series SLR models
| Message
Board | for your Nikon
Optics in a shared environment
| Message Board | Specifically for Dispose or Looking for Nikon/Nikkor
Photographic Equipment
| Nikon F | Nikon F2 | Nikon F3 | Nikon F4 | Nikon F5 | Nikon F6 | Nikkormat / Nikomat | Nikon FM | Nikon FE/ FA | Nikon EM/FG/FG20 | Nikon Digital SLRs | Nikon - Other models |
Nikon Auto Focus Nikkor lenses:- Main
Index Page
Nikon Manual Focus Nikkor lenses:- Fisheye-Nikkor Lenses - Circular | Full Frame |
Ultrawides Lenses - 13mm15mm18mm20mm | Wideangle Lenses - 24mm28mm35mm | Standard Lenses - 45mm 50mm 58mm | Telephoto
Lenses - 85mm105mm135mm180mm & 200mm | Super-Telephoto Lenses - 300mm 400mm 500mm 600mm 800mm 1200mm |
 Index Page |
Special
Application lenses: Micro-Nikkor Lenses - 50mm~55mm -60mm 85mm -105mm 200mm Micro-Zoom 70-180mm Perspective Control (PC) - 28mm 35mm PC-Micro 85mm Dedicated Lenses for Nikon F3AF: AF 80mm f/2.8 | AF 200mm f/3.5 EDIF Depth of Field Control (DC): 105mm 135mm Medical Nikkor: 120mm 200mm Reflex-Nikkor Lenses - 500mm 1000mm 2000mm Others: Noct Nikkor | OP-Nikkor | UV Nikkor 55mm 105mm | Focusing Units | Bellows-Nikkor 105mm 135mm Nikon Series E Lenses: 28mm35mm50mm100mm135mm | E-Series Zoom lenses: 36~72mm75~150mm70~210mm |
MF Zoom-Nikkor Lenses: 25~50mm | 28~45mm | 28~50mm | 28~85mm | 35~70mm | 36~72mm E | 35~85mm | 35~105mm | 35~135mm | 35~200mm | 43~86mm | 50~135mm | 50~300mm | 70~210mm E | 75~150mm E | 80~200mm | 85~250mm | 100~300mm | 180~600mm | 200~400mm | 200~600mm | 360~1200mm | 1200~1700mm
Tele-Converters: TC-1 | TC-2 | TC-200 | TC-201 | TC-300 | TC-301 | TC-14 | TC-14A | TC-14B | TC-14C | TC-14E | TC-16 | TC-16A | TC-20E
Recommended links to understand more technical details
related to the Nikkor F-mount and production Serial Number:
http://rick_oleson.tripod.com/index-153.html by: my
friend, Rick Oleson
http://www.zi.ku.dk/personal/lhhansen/photo/fmount.htm by: Hansen,
Lars Holst
http://www.mir.com.my/rb/photography/hardwares/nikonfmount/lens2.htm
http://www.photosynthesis.co.nz/nikon/serialno.html
W A R N I N G: The New G-SERIES Nikkor lenses have no aperture ring on the lens, they CANNOT ADJUST APERTURES with any of these manual focus Nikon FE series SLR camera models; please ignore some portion of the content contained herein this site where it relates.
|
Back | Main Index Page of Nikkor Resources
|
Back | Main Index Page of Pictorial
History of Nikon SLRs
| Message Board | for your Nikkor optics ("shared" because I do wish some of you to expose to other's perspective as well. Isn't it a sad sate to see photography has to be segmented into different camps from the use of various labels)
about this photographic web site
Home - Photography in Malaysia |
![]()
Credit: To all the good people who has contributed their own experience, resources or those who are kind enough granting us permission to use their images appeared in this site. Mr. MCLau®, who has helped to rewrite some of the content appeared this site. Chuck Hester® who has been helping me all along with the development of all these Nikon websites;LarsHolst Hansen, 'Hawkeye' who shares the same passion I have; Ms Rissa, Sales manager from Nikon Corporation Malaysia for granting permission to use some of the official content; TedWengelaar,Holland who has helped to provide many useful input relating to older Nikkor lenses; Some of the references on production serial numbers used in this site were extracted from Roland Vink's website; HiuraShinsaku from Nikomat Club Japan. t is also a site to remember a long lost friend on the Net. Note:certain content and images appeared in this site were either scanned from official marketing leaflets, brochures, sales manuals or publications published by Nikon over the years and/or contribution from surfers who claimed originality of their work for educational purposes. The creator of the site will not be responsible for may discrepancies arise from such dispute except rectifying them after verification."Nikon", "Nikkormat", "Nippon Kokagu KK" & "Nikkor" are registered tradename of Nikon Corporation Inc., Japan. Site made with an Apple IMac.