Repro-copying,
slide-copying and photomicrography
Some exposure compensation may be necessary depending on the type of film and the
subject, or the original slide. The numbers in the table below show the exposure
compensations in shutter-speed steps. Readjust the shutter speed according to the
numbers indicated or reset the film speed. Three marks on the film-speed dial are
equivalent to one step.
|
Type of film / Original |
Repro-copying & slide-copying |
Photomicrography |
||
|
B&W or color photo |
Letters or figures on light background |
Letters or figures on dark background |
||
|
Panchromatic film for general use |
No compensation necessary |
+1-1/ 2 steps |
- 1/2 step |
+ 1 step |
Example 1. If the automatic shutter-speed setting is 1/125 sec. and the table indicates a one-step increase reset the shutter-speed dial at 1/60 sec.
Example 2. If the automatic shutter-speed setting is 1/125 sec. and the table indicates a one-step increase move the camera until the black needle of the shutter" speed scale swings to 1/60 sec. Depress the memory-lock lever to the left, and the exposure reading will be frozen while the camera is moved back for shooting.
Example 3. If a film of ASA 100 rating is loaded in the camera and the table indicates a one-step increase, reset the film-speed dial so that the red dot appears opposite 50.
DEPTH OF FIELD
Since the ELW is a depth of field priority AE camera, you have to understand the logic behind all those numbers engraved on the aperture ring, or those numerals display in the viewfinder. Depth of field refers to a zone within which blur (or lack of definition) will be negligible and everything can be accepted as being in sharp focus. Depth of field extends a greater distance behind the subject in focus than in front. It depends on two factorsreproduction ratio and aperture. The smaller the aperture and the greater the reproduction ratio, the greater the depth of field. By carefully considering the desired perspective and reproduction ratio, as well as available f-stops, full control of the depth of field is achievable.
Relative articles in this site:
Depth of Field
Shutter Speed and Aperture
Depth-of-field scale
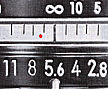
The depth of field can be read from the color-coded scale engraved on the lens. The pairs of colored lines correspond to f/numbers of the same color. To find the depth of field at a particular aperture, first focus on the subject. Then check the numbers on the distance scale opposite the colored lines which correspond to the color of aperture to find the depth of field at that aperture.
For example, f/16 on the aperture ring of the 50 mm f/1.4 lens is blue. With the lens prefocused at 17 feet (5 m) the numbers on the distance scale opposite the blue lines show that the depth of field extends from 9 feet to infinity (oo).
Remember that smaller apertures, although rendering a greater depth of field, require slower shutter speeds. Consider both factors carefully before shooting, and always focus accurately.
 |
SELF-TIMER |
* Do not operate the self-timer when making a time exposure.
The exposure meter measures the brightness of the subject immediately before the shutter is released. When the shutter is released with the viewfinder eyepiece uncovered, light may enter through it, and the correct exposure may not be obtained. Therefore, when the self-timer is being used with automatic exposure control, it is recommended that the eyepiece be covered. When the shutter is released while standing in front of the camera, the exposure meter measures only the portion of one's body in front of the camera. Be careful to avoid such erroneous exposures.
It is not necessary to give consideration to the above matters when taking pictures at manual control. First, confirm the proper shutter speed with the camera set at automatic, then set the shutter speed manually, then trip the shutter.
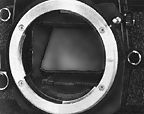
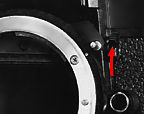
MIRROR LOCK
One of the many attractive feature of a Nikkormat is the mirror lock up feature. It is useful for certain photographic applications or even used with some special lens types. Firstly, it is important to notice that the reflex mirror must be locked in the up position when the battery is replaced, or during microscopic photography, where even the minutest shake must be prevented. The mirror must also be locked when using the Fisheye-Nikkor 6 mm f/5.6 or the OP Fisheye-Nikkor 10 mm f/5.6 lenses since their rear elements protrude into the camera body and interfere with mirror movement. To lock the mirror, turn the milled mirror-lock lever upward. The mirror will remain locked in the up position until the lever is returned to its original position.
Caution: When releasing the shutter with the mirror in the locked up position, use the self-timer instead of the shutter release button. This will give adequate time for the lens diaphragm to respond. Failure to observe this precaution may result in incorrect exposure, although there is no danger of camera damage.
Infrared Photography
In infrared photography, the plane of focus is slightly farther than the one produced by visible light and seen by the naked eye through the view-finder. To compensate for the shift in focus, Nikkor lenses have a red dot or line on the lens barrel near the depth-of-field index scale.
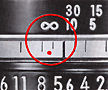
After focusing the image sharply, turn the focusing ring to the left until the red dot lines up with the prefocused distance.
In the example below, a 50 mm f/1.4 lens has been focused at infinity (oo). The focusing ring is turned to the left so that the mark (oo) appears in line with the red dot. When lenses having a focal length of 50 mm or less are stopped down to f/8 or smaller, no adjustment is necessary. For the lenses without red dot (e.g. ED lenses and Reflex Nikkor lenses - ED lenses are highly corrected lenses for chromatic abberation, while the optical principle of reflex lenses is folding the light path and exhibit no such abberation), no adjustment is necessary.
FLASH SYNCHRONIZATION
The Nikkormat ELW is designed to synchronize with various types of flashbulbs at almost all shutter speeds and with the speedlights at speeds up to 1/125 sec.
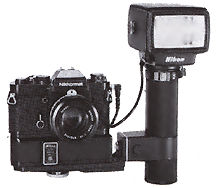
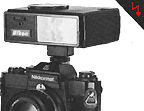
Either a bulb or speedlight flash unit slides over the accessory shoe on top of the pentaprism housing. For units with a hot shoe, the accessory shoe has a hot-shoe contact which eliminates the need for a synch cord. For flash units without a hot shoe, use a synch cord and connect the synch terminal on the side of the camera with the synch socket on the flash unit. The synch terminal on the camera is threaded for positive connection. To prevent an accidental electric shock, the accessory shoe turns on only when the flash unit is in place.
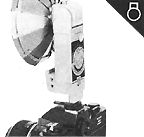
During its era, there were Nikon speedlight units SB-3 and SB-4 which can be directly attached to the Nikkormat ELW. For mounting other older Nikon speedlight unit SB-2 or flash unit BC-7, use of the flash unit coupler AS-2 is necessary. To use the Nikon Speedlight SB-5 (Grip type), connect the synch cord SC-5 attached with the SB-5 to the synch terminal of the camera. For details, refer to the instruction manual provided with each flash unit. Hey, how about the newer or even third party compact flash unit like a Vivitar or Sunpak ? No problem. But since the ELW does not offer a TTL flash metering feature, there is no necessity to invest into a TTL flash. Well, a older SB-10 or a time-honoured Vivitar 283 should be good enough, these units mentioned here should be cheap since they are used (Unless power output is your priority and hand handle flash like Metz or Nikon's own designed flash can be considered).
Remember that the camera's auto exposure control works only with constant light sources such as sunlight or photo floods and not with an instantaneous source such as a flashbulb or an electronic flash.
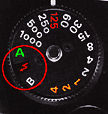
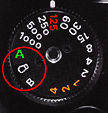
Setting the synch selector
This is a distinctive difference in control flash/bulb when you compared it with a modern MF camera like a FE or the FE2. Because it has two settings such application. I would suggest you always set the dial at the flash icon for use with electronic/manaul flash instead of the bulb setting. To set the camera for flashbulb, lift up the milled synch selector ring around the shutter-speed dial and turn it until the bulb symbol appears in the selector window. For speedlight, follow the same procedure until the lightning-bolt symbol appears. The table below shows which shutter speeds are acceptable with different types of flashbulbs and speed lights.
|
The use of various flash bulb (Including X) and proper sync speed |
|||||||||||||
|
Flashbulb/Shutter Speeds |
1/1000 |
1/500 |
1/250 |
1/125 |
1/60 |
1/30 |
1/15 |
1/8 |
1/4 |
1/2 |
1 |
B |
|
|
M |
|
|
|
|
|
|
|
|
|
|
|
|
|
|
FP |
|
|
|
|
|
|
|
|
|
|
|
|
|
|
MF |
|
|
|
|
|
|
|
|
|
|
|
|
|
|
X (Speedlight) |
|
|
|
|
|
|
|
|
|
|
|
|
|
| Synchronisation | Cannot be used |
Caution: Flash units without a hot shoe may fire accidentally when being slipped into place or when a flashbulb is inserted. Although not recommended, accidental firing may be prevented by covering the hot-shoe contact on the camera body with electrical tape.
| Previous | Exposure Control with EL-W and various application (7/8)
| Next | Some basic info relates to AW-1 Winder (8/8)
Back to Main Index Page of Nikkormat EL-W
| Back | to Main Index Page of Nikkormats EL Series
| Back | to Main Index Page of Nikkormats
History & Background of Nikkormat Cameras
"Nikomat" Picture Library of Japanese local version
Outline the major key features and differences of various models
The Camera Bodies | FT | FS | FTn | EL | FT2 | ELW | FT3 | EL2
| Main Reference
Map
|
HTML Format: FT | FS | FTn | EL | FT2 | ELW | FT3 | EL2 | AW-1 Motor Winder
PDF Format: FT
| FS | FTn | EL | FT2 | ELW | FT3 | EL2 | AW-1 Motor Winder
| Specifications |
FT
| FS | FTn | EL | FT2 | ELW | FT3 | EL2
| Message Board | for
your favourite Nikkormats
| Message Board | for your Nikon Optics
in a shared environment
| Message Board | Specifically for Dispose or Looking for Nikon/Nikkor Photographic
Equipment
 |
The Eyes of Nikon:- |
Fisheye-Nikkor Lenses - Circular | Full Frame | Ultrawides Lenses - 13mm15mm18mm20mm | Wideangle Lenses - 24mm28mm35mm |
Standard Lenses - 45mm 50mm 58mm | Telephoto Lenses - 85mm105mm135mm180mm & 200mm |
Super-Telephoto Lenses - 300mm 400mm 500mm 600mm 800mm 1200mm |
Special Application lenses:
Micro-Nikkor Lenses - 50mm~55mm -60mm 85mm -105mm 200mm Micro-Zoom 70-180mm
Perspective Control (PC) - 28mm 35mm PC-Micro 85mm
Dedicated Lenses for Nikon F3AF: AF 80mm f/2.8 | AF 200mm f/3.5 EDIF
Depth of Field Control (DC): 105mm 135mm
Medical Nikkor: 120mm 200mm
Reflex-Nikkor Lenses - 500mm 1000mm 2000mm
Others: Noct Nikkor | OP-Nikkor | UV Nikkor 55mm 105mm | Focusing Units | Bellows-Nikkor 105mm 135mm
Nikon Series E Lenses: 28mm35mm50mm100mm135mm | E-Series Zoom lenses: 36~72mm75~150mm70~210mm
MF Zoom-Nikkor Lenses: 25~50mm | 28~45mm | 28~50mm | 28~85mm | 35~70mm | 36~72mm E | 35~85mm | 35~105mm | 35~135mm |
35~200mm | 43~86mm | 50~135mm | 50~300mm | 70~210mm E | 75~150mm E | 80~200mm | 85~250mm |
100~300mm | 180~600mm | 200~400mm | 200~600mm | 360~1200mm | 1200~1700mm
Tele-Converters: TC-1 | TC-2 | TC-200 | TC-201 | TC-300 | TC-301 | TC-14 | TC-14A | TC-14B | TC-14C | TC-14E | TC-16 | TC-16A | TC-20E
![]()
Nikon F
| Nikon F2 |
Nikon
F3
| Nikon F4 |
Nikon
F5
| Nikon F6 |
Nikkormat / Nikomat |
Nikon FM
| Nikon FE/ FA | Nikon EM/FG/FG20 | Nikon Digital SLRs | Nikon - Other models
MIR Supports for Photographic Community: Various Message Boards/Community
Forums
Nikon
F-series|
Nikon
F2-series|
Nikon
F3-series|
Nikon F4-series| Nikon
F5-series|Nikkormat/Nikomat-series
Nikon FM-series|Nikon
FE-series|Nikon
FA|Nikon
Digital
SLR
series|Various
Nikon
Models|Nikkor
Optic
-shared
Others:- Free Trade Zone - Photography| Free Trade Zone - Business Community |Free To Zouk - Photographic Community
Apple's Mac Public Community Message Board | Windows based PC &
Apple/Mac
Public Community Trade Exchange Centre
Recommended links to understand
more technical details related to the Nikkor F-mount and production Serial Number:
http://rick_oleson.tripod.com/index-153.html by: my friend, Rick Oleson
http://www.zi.ku.dk/personal/lhhansen/photo/fmount.htm by: Hansen, Lars Holst
http://www.mir.com.my/rb/photography/hardwares/nikonfmount/lens2.htm
http://www.photosynthesis.co.nz/nikon/serialno.html
About
this photographic
site.
Home - Photography
In Malaysia
![]()
Copyright
© 1998.
HIURA Shinsaku ® ; Nikomat ML, Japan,
in collaboration with leofoo ®. MIR Web Development Team.
* Credit: A
Great thanks to Mr Denis Pleic for his volunteering
effort to reedit content and and patching some grammatical mistakes found in this
section of the PIM site. Miss
Rissa (Marketing) & Edward
(Techical) of Shriro Malaysia, distributor of Nikon cameras in Malaysia, in providing
so many useful inputs to make this site possible. Mr Hong,
Ipoh for lending me his FT2 to take some of the images used in this site. This site
is created for his eldest son, Yuen who has picked up his father's hobby and
the FT-2. My friend, John Walls from Florida, US for his images of the FTn
body and the Zoom Nikkor
43-86mm.
[Left Brain][Right brain][Home-MIR] [Invention][Art & Design][Clubs]
[Portfolios][On assignments] [Trading room][Knowledge & Resources] [Free-trade-zone][Thoughts & opinions][Links]