 |
Just in case you have bought a used MD-11 or found a unit from your daddy's old store room. Don't worry, since the motor drive still can fit in your current FM2n, here is some operational procedures that can help you. Courtesy of Shriro Malaysia, who happens to keep an old manual, under the store room.... |
Preparations for Motor
Drive Operation
 |
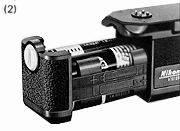 |
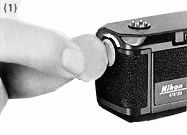
1. Load the MD-11 with the required batteries (1), (2) The MD-11 is powered by eight 1.5V penlight batteries. To load the batteries, first remove the unit's built-in battery clip by turning the coin-slotted locking screw counterclockwise with a coin or something similar until the clip comes loose. Refer to the diagrams provided in the clip, and seat the batteries accordingly. After ensuring that the terminals of the batteries (both + and -) are properly oriented, put the battery clip back into place. Then secure the assembly by retightening the locking screw. |
 |
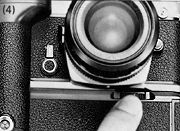 |
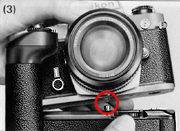
2. Attach the motor drive to the camera (3), (4) |
 |
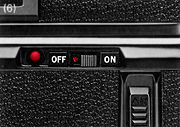 |
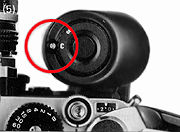
3. Set the camera to motor-drive operation (5), (6) |
 |
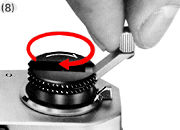 |
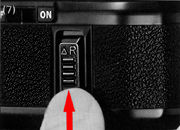
4. Film rewind (7) & (8)
When the roll of film in the camera has been exposed, the MD-11's motor will automatically stop, releasing film tension, with the pilot lamp remaining lit (It flicker once per exposure, stay lit when a roll is finished). Turn the power switch off to prevent unnecessary battery drain. Then, push the rewind slide on the motor drive up. Film rewind is manual and can done even with the MD-11 attached to any of the bodies of FM, FE, FM2, FE2, FA, FM2T and the current FM2n.
WARNING: The MD11 has no auto power swich-off circuitry as with the MD-12 (That is what the main difference between MD11 and MD12, you have to turn the power to 'off' to avoid draining of the battery from your camera; secondly, the film advance mechanism on the MD-11 is slightly different from the MD-12, on the 's' (Single) mode, the film will only advancing after you have lift your finger from the shutter release button on the grip. While the MD-12 will immediately advance the film upon tripping the shutter and is ready for the next exposure. Other that, it is minor (Like the delay circuit connecting to the LED pilot lamp behind the MD-12).
When your motor drive doesn't wind, don't panic and rush your MD for repair service. First, check the the shutter release pin which it must be in a retracted position when attaching the FM to the MD-11. Detach the MD-11 first, just mount the drive closely with the four electrical contact pin in contact with the metal surface at the base of the camera and this will activate the motor for a while and the shutter release pin will retract again if protruded earlier. - Tip from Mr. Yong of Shriro -
* Credit: Shriro Malaysia, distributor of Nikon optical products for providing this manual. The technical team members in Shriro. Mr. Poon of Foto Poon in Ipoh for his expertise in the MD-11.
| Back | to Index Page of MD-11 | MD-12
| Back | to Main Index Page Shared Resources
Operation
& Control | Accessories
3rd
Party Power Winder Only for FM2(n)/FE2/FA
Specification: PDF(121k) | HTML
Operation manual (PDF Format:
202k)
| Back | to Main Index Page Shared Resources (Screens, Databacks and general accessories)
| Message Board | for
your favourite Nikon
FE series models
| Message Board | for
your favourite Nikon
FM series models
| Message Board | for
your favourite Nikon
FA series models
| Message Board | for your Nikon Optics
in a shared environment
| Message Board | Specifically for Dispose or Looking for Nikon / Nikkor
Photographic Equipment
Shared
Resources: MD-11 | MD-12 | 3rd Party Power Winder Only for FM2(n)/FE2/FA
| Focusing Screens | Titanium Shutter | Flash Units -
| SB-15 | SB-10 | SB-16B & Other Options | Databack | Nikkor lens mount (related
info)
Others:- Nikon AF-TTL Speedlights | SB-20 (1986) | SB-22 (1987) | SB-23 | SB-24 (1988) | SB-25 (1991/2) | SB-26 (1994) | SB-27(1997) | SB-28 (1997) | Nikon SB-29(s) (2000) | Nikon SB-30 (2003) | Nikon SB-600 (2004) | Nikon SB-800 (2003) Nikon AF-TTL Speedlight DX-Series: Nikon SB-28DX (1999) | SB-50DX (2001) | SB-80DX (2002)
Nikon
BC-flash Series |
Original
Nikon Speedlight
SB-2
| SB-3
| SB-4
| SB-5
| SB-6
| SB-7E
| SB-8E
| SB-9
| SB-E
| SB-10
SB-11
| SB-12 | SB-14 | SB-140 UV-IR| SB-15 | SB16A | SB-17 | SB-18, SB-19 | SB-21A (SB-29) Macro flash | Flash Accesories | SF-1
Pilot Lamp
| Nikon F | Nikon F2 | Nikon F3 | Nikon F4 | Nikon F5 | Nikon F6 | Nikkormat / Nikomat | Nikon FM | Nikon FE/ FA | Nikon EM/FG/FG20 | Nikon Digital SLRs | Nikon - Other models |
Nikon Auto Focus Nikkor lenses:- Main
Index Page
Nikon Manual Focus Nikkor lenses:- Fisheye-Nikkor Lenses - Circular | Full Frame |
Ultrawides Lenses - 13mm15mm18mm20mm | Wideangle Lenses - 24mm28mm35mm | Standard Lenses - 45mm 50mm 58mm | Telephoto
Lenses - 85mm105mm135mm180mm & 200mm | Super-Telephoto Lenses - 300mm 400mm 500mm 600mm 800mm 1200mm |
 Index Page |
Special
Application lenses: Micro-Nikkor Lenses - 50mm~55mm -60mm 85mm -105mm 200mm Micro-Zoom 70-180mm Perspective Control (PC) - 28mm 35mm PC-Micro 85mm Dedicated Lenses for Nikon F3AF: AF 80mm f/2.8 | AF 200mm f/3.5 EDIF Depth of Field Control (DC): 105mm 135mm Medical Nikkor: 120mm 200mm Reflex-Nikkor Lenses - 500mm 1000mm 2000mm Others: Noct Nikkor | OP-Nikkor | UV Nikkor 55mm 105mm | Focusing Units | Bellows-Nikkor 105mm 135mm Nikon Series E Lenses: 28mm35mm50mm100mm135mm | E-Series Zoom lenses: 36~72mm75~150mm70~210mm |
MF Zoom-Nikkor Lenses: 25~50mm | 28~45mm | 28~50mm | 28~85mm | 35~70mm | 36~72mm E | 35~85mm | 35~105mm | 35~135mm | 35~200mm | 43~86mm | 50~135mm | 50~300mm | 70~210mm E | 75~150mm E | 80~200mm | 85~250mm | 100~300mm | 180~600mm | 200~400mm | 200~600mm | 360~1200mm | 1200~1700mm
Tele-Converters: TC-1 | TC-2 | TC-200 | TC-201 | TC-300 | TC-301 | TC-14 | TC-14A | TC-14B | TC-14C | TC-14E | TC-16 | TC-16A | TC-20E
Recommended links to understand more technical details
related to the Nikkor F-mount and production Serial Number:
http://rick_oleson.tripod.com/index-153.html by: my
friend, Rick Oleson
http://www.zi.ku.dk/personal/lhhansen/photo/fmount.htm by: Hansen,
Lars Holst
http://www.mir.com.my/rb/photography/hardwares/nikonfmount/lens2.htm
http://www.photosynthesis.co.nz/nikon/serialno.html
W A R N I N G: The New G-SERIES Nikkor lenses have no aperture ring on the lens, they CANNOT ADJUST APERTURES with any of these manual focus Nikon FE series SLR camera models; please ignore some portion of the content contained herein this site where it relates.
|
Back | Main Index Page of Nikkor Resources
|
Back | Main Index Page of Pictorial
History of Nikon SLRs
| Message Board | for your Nikkor optics ("shared" because I do wish some of you to expose to other's perspective as well. Isn't it a sad sate to see photography has to be segmented into different camps from the use of various labels)
about this photographic web site
Home - Photography in Malaysia |
![]()
A contributing effort to Michael C Liu's Classic Nikon Site.
Credit: Chuck Hester for some of his beautiful images used in this site; Ted Wengelaar®, Holland for his continuous flow of input; Lars Holst Hansen, Danish 'Hawkeye' who shares the same passion; Mr Poon from Poon photo for their input; Ms Miss Rissa (Sales Manager) & members of the Technical Service dept. of Shriro Malaysia, local distributor of Nikon cameras in Malaysia & Singapore, in providing so many useful input to make this site possible. Special thanks to Mr MC Lau, who has helped with his images of the MF-12 databack. Michael Tan, Pertama Photo (603-2926505) for lending his original Titanium Shutter Display Unit. Dave Hoyt who has prepared the introductory page and offer some images of his FE2 in this site.. Hiura Shinsaku, Nikomat ML, Japan for his contribution on all the various images; A contributing site to a long lost friend on the Net. Note: Certain content and images appeared in this site were either scanned from official marketing leaflets, brochures published by Nikon and/or contribution from surfers who claimed originality of their own work to publish in this site based on educational merits. The creator of this site will not be responsible for any discrepancies that may arise from such possible dispute except rectifying them after verification."Nikon", "Nikkormat", "Nippon Kokagu KK" & "Nikkor" are registered tradename of Nikon Corporation Inc., Japan. Made witha PowerMac.