 |
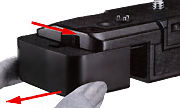
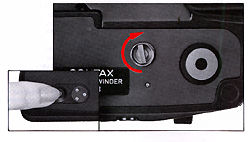
While pressing the battery compartment cover release knob in the direction of the arrow, draw out the battery compartment cover. |
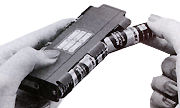
Insert 6 batteries into the battery case correctly in accordance with the polarity diagram. The winder will not function if the batteries are inserted incorrectly.
 |
 |
 |
Contax RTW-W3 Power WINDER |
 |
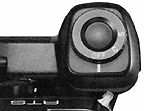
Insert the loaded battery case into the battery compartment, positioning the polarity diagram on the bottom side and the projecting tip of the battery case headfirst. When installing the RTW Ni-Cd Pack, insert it with the inscription bearing side facing downward and the projecting end going in head first. |
 |
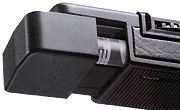 |
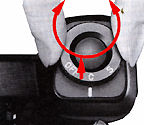
As shown in the illustration, slide the battery compartment cover onto the groove and slide it in until it locks into place. |
<Functional
Check>
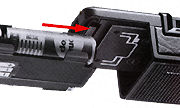
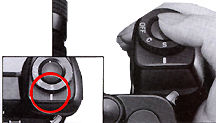
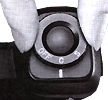
Lift the selector and turn it to the "S" or "C" setting, using
the white index mark. If the film transport drive coupler rotates when the functional
check button is pressed, it means that the winder is functioning properly and batteries
are good.
 |
When the batteries weaken, the film advance function will slow down (film advance speed decreases). When this happens, replace with fresh batteries. The functional check lamp will give a momentary flash when the finger is released from the functional check button. |
<Safe Handling and Battery Precautions>
When changing batteries, replace the entire set of six batteries. A mixture of old and fresh batteries will not produce an adequate output.
In subzero temperatures batteries will temporarily fail to operate at their normal capacity. Continued use of the batteries in such a condition is apt to result in curtailed driving power and in impairment of a photography session. When shooting in extreme cold weather areas, it is recommended that an optionally available external power pack, the RTW Power Pack, be used to keep the winder and camera batteries warm for delivering a powerful charge. The use of the RTW Ni Cd Pack, with superb performance characteristics under cold weather conditions, is also recommended. Moreover, batteries which have been temporarily weakened because of cold temperature exposure are still usable because they will spring back to their normal capacity upon being restored to normal temperatures.
When the winder will not be used for an extended period, always remember to empty the batteries from the battery case. This will help prevent damaging of electrical contacts due to battery leakage.
Keep the battery contacts free from perspiration and oily stains to ensure good electrical contact. Always wipe the contacts with a dry cloth before putting the batteries into service.
When using the RTW Ni-Cd Pack use the optionally available RTW Charging Adapter or the Ni Cd battery charger CX-1 (100 V), CX-2 (120 v), or CX-3 (220 v) to charge the unit before putting it into service.
<Mounting the Winder W-3>
The Real Time Winder W-3 is used by attaching it directly to the camera base. Attach the winder by aligning the camera-mount screw with the tripod socket on the camera base (mating the winder's camera mount guide socket with the camera's winder-mount guide studs at the same time) and screw the unit securely into the camera tripod socket. When attaching the winder, be sure to have the selector set at the "OFF" position. If the unit is attached with the selector setting at any other position, with the camera's film advance lever uncocked, it will cause the winder to activate.
<Mode Selector>
"OFF" Setting of the selector in this position cuts off the winder's power circuit. Always remember to set the selector in this position when not photographing, when attaching the winder to the camera, or when connecting it to any other Contax system accessories.
 |
"C" <Continuous Sequence> Pressing and holding down the shutter release button on the winder or the camera allows you to take sequence shots. Relieving of finger pressure from the button automatically stops the winder upon advancing the film. Under optimum conditions, the winder is capable of operating at 3 fps (from 1/2000 sec to 1/60 see), and at slower shutter speeds the winder initiates film advancing upon completion of the shutter operation. |
"S" <Single Frame Shooting> This position enables you to take single frame shots by pressing down the shutter release button on the winder or the camera. When the finger is released from the button, the winder stops after having advanced the film for the next exposure.
Be sure to set the selector on click stop positions only.
<Automatic Winding> Film loading is accomplished in the same manner as when the camera is used independently of the winder.
 |
However, since the winding on of the film is executed by pressing the shutter release button on either the winder or the camera, it is not necessary to use the film advance lever for this purpose. In this instance, the selector on the winder is set at "S" and, providing the camera is in uncocked position, the winder causes the film to be advanced one frame. |
When the film is wound on with the selector set on "C", guard against winding on more film than is necessary.
<Manual Winding> Film loading is accomplished in the same manner as when the camera is being used independently, using the film advance lever and shutter release button alternately to wind on the film. In this instance, be sure the selector is in the "OFF" position.
 |
Exposures are made by pressing the shutter release button on the winder, with the "C" setting giving you continuous sequence capability, shooting up to three frames a second. The use of the camera's shutter release button gives you the same capabilities. Set the selector to either "C" or "S", depending upon your photographic objective. If the film has not been advanced, the winder will activate giving a single frame film advance. |
| Previous | NEXT | Shooting pictures, vertical shooting, Film rewind, remote control, system accessories, technical specifications 2/3
| Back | to Index Page of PMD/RTW
| Back | to Index Page of Contax
RTS
| Back | to Index Page of Contax
RTS II Quartz
| Back | to Index Page of Contax
RTS III
| Back | to Main Index Page of
Contax RTS series models
Instruction
Manuals:
Contax
PMD W-6
| Contax RTW W-3
Other Contax Accessories: Filters | Eye-Cups / Diopter lens / Right Angle Finder / Magnifier| Lens Caps/Lens Rear Caps / Body Caps / Lens Pouches | Soft lens Shades/Metal Lens Hoods/Adapter Ring/Gelatin Filter Holder set | Focusing Screens
| Back | to Index Page of Accessories
| Back | to Index Page of Contax
RTS
| Back | to Index Page of Contax
RTS II Quartz
| Back | to Index Page of Contax
RTS III
| Back | to Main Index Page of
Contax RTS series models
Camera
Models: | Contax RTS |
RTS
II
| RTS III |
Shared
Resources:|
Motor
Drive-
PMD
W6| Winder - RTW-W3 | Screens |
Flash | Macro | Remote | Databack | Accessories | Zeiss T* Optic | Instruction Manuals: Contax RTS HTML | PDF | Contax RTS II Quartz
HTML | PDF | Contax RTS III (3
parts PDF
by mike@butkus.org, M. Butkus, NJ. Part A | Part B | Part C |
OFF TOPIC:- Personal Note
| Message Board | for your favorite Contax RTS Series SLR Models
| Message Board | for your Contax optics
in a shared environment
| Message Board | Specifically for Dispose or Looking for Contax Photographic
Equipment
| Main Reference
Map: RTS - HTML | PDF (206k) RTS II - HTML | PDF(308k) RTS III - HTML | PDF |
Specification: RTS - HTML | PDF(159k) RTS II - HTML | PDF(66k) RTS III - HTML | PDF |
1975: RTS 1979: 139Q 1980: 137MD 1982: 137MA 1982: RTS II |
1985: 159MM 1987: 167MT 1990: RTS III 1992: S2 1992: S2b |
1992: ST 1994: RX 1996: AX 1998: Aria 2000~ |
| List of Carl Zeiss T* lenses for Contax SLR cameras | ||||
About this
photographic
site.
| Home - Photography in Malaysia |
![]()
Credit: Miss Kristina Hauzar-Proctor of www.henrys.com for the images of Contax RTW-W3; Mr. Milan from Pacific Rim Camera <staff@pacificrimcamera.com> for his contribution of the Contax 250 Bulk film back;Mr. "dearaujo" <dearaujo1@mediaone.net> for his images of the Contax RTS and RTW; Mr. Pshea <pshea@nyc.rr.com> for this image of the RTW; MClau, joint maintainer of the Contax RTS MB. Mr. Bodo Bause <bodobause@yahoo.de> for his image appeared in this site. Some of the content are extracts from: Cees De Groot, who maintains a Contax FAQ site and Tim Roger website on Contax SLR cameras, A few of the images on Zeiss lenses were downloaded from Contax US website. My buddy, Yeak & Rizal Yahya, for their cool programming with Contax RTS's Message Board, Note:certain contents and images appeared in this site were either scanned from official marketing leaflets, brochures, sales manuals or publications published by Kyocera over the years and/or contributions from surfers who claimed originality of their own work solely for educational purposes. The creator of the site will not be responsible for any discrepancies that may arise from such possible disputes except rectifying them after verification."Kyocera", "Yashica", "Contax" & "Carl Zeiss T*" are registered trade names of Kyocera Corporation Inc., Japan. A site made with an Apple IMac, dedicated to all fans of Contax cameras and Zeiss Optics.