Basic Camera Operation
As long as the shutter control dial is kept at the 'AUTO' setting, fully automatic
exposure should be assured under most light conditions, merely through preselection
of the lens aperture.
If you happened to be reading through these pages and most likely that I can assume
you must have bought this camera used or trying to do a reorientation while missing
the camera manual. If you are new to this body, it is also better to acquaint yourself
more with the basic procedure of operation before attempting to take your first series
of photographs. You can either follow the pages that continued here on your computer
monitor or print them out in hard copies for reference or whichever way you deem
fit or convenient to you.
To begin with, the RTS is a SLR (Single Lens Reflex) camera which carries a big advantage
over the rangefinder type because it is hugely lens based. There are two principle
reasons why 35mm single lens reflex cameras are said to be lens-based. First, they
take pictures "as you see them." as what appear in the viewfinder perceive
the image presented by the lens in used. Second, look through the viewfinder of an
SLR camera and you'll see that the area you focus on looks sharp while all other
areas appear blurred.
Another advantage of the SLR system is the elimination of problem of parallax error
which are a common problem associated with rangefinder-type cameras. Because the
viewfinder is separate from the lens in a rangefinder camera it is possible, especially
in close focusing, for there to be a difference between the lens' image and that
of the viewfinder. Because of the nature of the SLR system, focusing is extremely
accurate no matter what focal length lens is mounted on the camera. So there is a
big possibility that you might be buying more than one lens - it is just doesn't
make any sense other than financial constraints because you might as well invest
into a one lens camera like a P&S (compact Point and Shoot) camera.
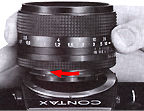 |
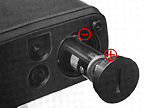
Thus, it is very important here that you must learn how to change and mount a lens with your Contax RTS camera body to take full advantage of a SLR camera system. After removing the body cap and the lens rear cap, set the lens properly in the mount by matching the red dot on the lens barrel with that on the camera body. |
Then, give the lens a right turn until it click stops into place. To prevent hitches in focusing and exposure control, always make sure the lens is locked properly in its mount.
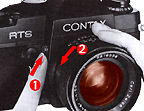 |
Lens Interchanging To remove the lens from its mount,twist it to the left while keeping the lens release button depressed. Before removing, make it a rule to place the lens cap over the lens to prevent inadvertent scratching or smearing of the lens surface. After removing the lens from its mount, cover the rear end with the lens rear cap. |
 |
Things to note: Avoid direct sunlight when interchanging lenses, particularly in case the camera is loaded with film. Set the body cap in the lens mount in case the camera is to be left without its lens. |
Installing batteries
Caution: The shutter system and the exposure control of your CONTAX RTS will not function unless the battery is properly installed.
 |
 |
If the camera fails to react or function after installing the battery. Before rushing for a camera service, just open the lid and check one more time and make sure the polarity of the battery cell are correctly placed. Also check the contact point and see if there is any corrosive deposit, you can first try to remove them by using a rubber eraser to rub. General rule is: Never hold battery(ies) at both ends of the contact. |
Correct choices on power cells:
6V silver oxide or alkaline battery (Eveready 544, Ucar 544, Mallory PX28, Alkaline
Eveready 537 or equivalent).
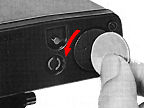
1. Open the battery compartment cover by turning it with the edge of a coin.
2. Install the battery with its minus (-) end facing inside, and close the battery
compartment cover.
Note: When the battery power declines below the required
voltage level, the shutter will fail to operate. Therefore, make it a rule to check
the battery power (1) occasionally before shooting and (2) after replacing the battery.
 |
 |
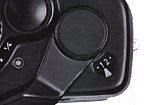
To check the battery power, press the battery checker button. If the LED battery checker display comes on, sufficient power is indicated. In the event if fails to come on, replace the battery. |
When
the battery power drains to a low level, the LED battery checker display may come
on momentarily when the battery checker button is depressed. In such a case, replace
the battery.
Film Loading
Avoid direct sunlight when loading the film. If you cannot
find a shade, use your body against the direction of the sunlight and provide a shade
when removing or more importantly, changing or loading film.
 |
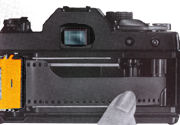
1. After sliding up the rubber eyecup, open the back cover by pulling out the film rewind knob. As soon as the back cover is opened, the exposure counter will reset to 'S' (start position). |
2. Place the film cassette i n the film cassette chamber and push the film rewind knob back to its original position. Use a standard 35mm cassette film of 12, 20 or 36 exposure load.
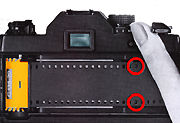
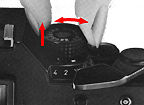
3. Clip the film tip on the take-up spool as illustrated. Avoid inserting the film tip farther than is necessary.
 |
4. After making sure that the shutter control dial is set at a position other than the 'AUTO' setting, advance the film until the sprocket teeth properly catch the perforations along both edges of the film. Then, close and press the back cover until it locks into place. Fold out the film rewind crank-handle and turn it in the direction of the arrow to take up the film slack. |
 |
|
 |
 |
5. When folded, the crank-handle will rotate freely; therefore, make sure it is returned into the compartment above the 'AUTO' setting. 6. Press the magnetic release and advance the film, alternately, until the exposure counter registers the figure '1'. If the white line on the film rewind knob rotates when the film advance lever is manipulated, it means the film is advancing properly. |
Caution: Avoid keeping the LED display pushbutton depressed when advancing the film. Particularly in case the Real Time Winder is in use, make it a rule to keep your finger off the LED display pushbutton when making exposure. |
|
|
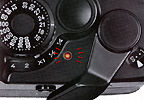
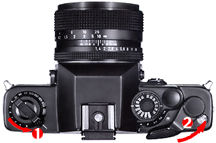
Setting the Film Speed
After the film has been loaded properly, set the film speed dial according to the
speed rating of the film in use. Setting the correct film speed in accordance to
the film type is very important. Because a wrong setting could resulted in either
under or over exposure in the image taken. Unlike many modern SLR camera that has
automatic DX coded film feature, Contax RTS and RTS II are still essentially a manual
input SLR camera that requires the photographer to set the correct film speed. It
is not a very complicated process, handle it once and you should be able to master
it. The RTS series has their ASA film speed dial located at the most prominent place
at top control panel of right hand side of the camera.
![]()
![]()
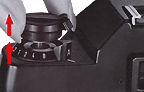
ASA/DIN Film Speed Rating
The ASA or DIN film speed rating specified on the outer box or in the instruction
sheet which comes with the film indicates the degree of light sensitivity of the
film emulsion.
 |
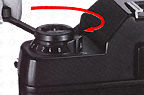
To set the film speed, lift and turn the collar around the film speed dial and align the index with the figure corresponding to the ASA or DIN rating of the film in use. |
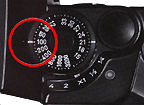 |
Always see to it that the index is set properly in the click stop position. If set improperly, the accuracy of the exposure control will be affected.
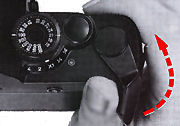 |
The film can be advanced by one frame by giving the film advance lever one sweeping stroke or several short strokes. In either case, make sure that the lever is manipulated until it fails to move any further. Manipulation of the film advance lever to advance the film automatically registers count of exposure on the exposure counter. |
Note: The magnetic release will fail to function if the film wind is incomplete. ln case it fails to operate,manipulate the film advance lever once again to complete the film wind.
How to check the film advance.
 |
There is no other way to confirm the film has been loaded and take up by the spool. Generally, you can use two ways to determine if the process has been completed If, in the course of film winding (2),the white line on the film rewind knob rotates (1) accordingly, it is an indication that the film is advancing properly. Secondly, you would feel there is a slight resistance as compared with an film advance that does not has the film properly taken up inside the camera. |
| Previous | Next | Inside the viewfinder and AE exposure Operation.
Beyond the User's Manual, addressing other Issues : 4 Parts
Scanned early Contax's system accessories files in PDF format: Motor Drive | Winder | Macro | Databack/Remote | Flash | Early Lenses 1 & 2 | Accessories
Other Contax Accessories: Filters | Eye-Cups / Diopter lens / Right Angle Finder / Magnifier| Lens Caps/Lens Rear Caps / Body Caps / Lens Pouches | Soft lens Shades/Metal Lens Hoods/Adapter Ring/Gelatin Filter Holder set | Focusing Screens
| Back | to Index Page of Contax
RTS
| Back | to Index Page of Contax
RTS II Quartz
| Back | to Index Page of Contax
RTS III
| Back | to Main Index Page of
Contax RTS series models
Camera
Models: | Contax RTS |
RTS
II
| RTS III |
Shared
Resources:|
Motor
Drive-
PMD
W6| Winder - RTW-W3 | Screens |
Flash | Macro | Remote | Databack | Accessories | Zeiss T* Optic | Instruction Manuals: Contax RTS HTML | PDF | Contax RTS II Quartz
HTML | PDF | Contax RTS III (3
parts PDF
by mike@butkus.org, M. Butkus, NJ. Part A | Part B | Part C |
OFF TOPIC:-
Personal Note
| Main Reference
Map: RTS - HTML | PDF (206k) RTS II - HTML | PDF(308k) RTS III - HTML | PDF |
Specification: RTS - HTML | PDF(159k) RTS II - HTML | PDF(66k) RTS III - HTML | PDF |
1975: RTS 1979: 139Q 1980: 137MD 1982: 137MA 1982: RTS II |
1985: 159MM 1987: 167MT 1990: RTS III 1992: S2 1992: S2b |
1992: ST 1994: RX 1996: AX 1998: Aria 2000~ |
| List of Carl Zeiss T* lenses for Contax SLR cameras | ||||
|
Message Board | for your favorite Contax
RTS Series SLR camera Models
| Message Board | for your favorite optics
Caller for help: I am not entirely too happy with the content and images used here thus far, but since I have my limitation and if you think you can contribute your part as a Contax user to make this site better, mail them to me. Appropriate credit will be given for such effort.
| Home - Photography in Malaysia |
![]()
Credit: MClau, joint maintainer of the Contax RTS MB. Some of the content are extracts from: Cees De Groot, who maintains a Contax FAQ site and Tim Roger website on Contax SLR cameras, A few of the images on Zeiss lenses were downloaded from Contax US website. My buddy, Yeak & Rizal Yahya, for their cool programming with Contax RTS's Message Board, Note:certain contents and images appeared in this site were either scanned from official marketing leaflets, brochures, sales manuals or publications published by Kyocera over the years and/or contributions from surfers who claimed originality of their own work solely for educational purposes. The creator of the site will not be responsible for any discrepancies that may arise from such possible disputes except rectifying them after verification."Kyocera", "Yashica", "Contax" & "Carl Zeiss T*" are registered trade names of Kyocera Corporation Inc., Japan. A site made with an Apple IMac, dedicated to all fans of Contax cameras and Zeiss Optics.