Flash Photography
The Contax RTS features an X sync terminal. However, the popular TTL OTF flash exposure
control system pioneered by Olympus OM-2n
was not used in any of the RTS model until the RTS II
in 1982. By then, such flash control method has already became a mainstream technology
employed in most SLR cameras. Thus, if you happen to work a lot in flash photography,
you should consider later models. (The RTS III, introduced in 1990 was easily one
of the best camera for the job with its innovative preflash metering). Anyway, the
original RTS was introduced almost a quarter century ago, and I think it is kinda
unfair to compare the two camera models.
 |
Correct Exposure Setting in Flash Exposure |
Example with GN 20 electronic flash unit. When shooting a subject at a distance of 5 meters by using an ASA100 film and an electronic flash unit with a guide number of 20(ASA100 in meters), the correct aperture will be: 20 (GN) . 5 (Distance in meters) = 4 (F4)
To set up the RTS for flash photography:
 |
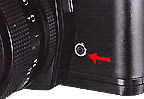 |
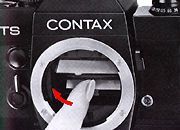
1. Mount the electronic flash unit on the accessory shoe. |
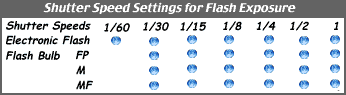 |
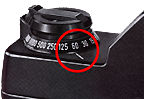
3. Adjust the shutter control dial to a setting providing perfect flash synchronization. (Refer to the following table for proper shutter speed setting.) |
 |
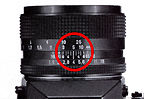 |
4. Secure focus, set the lens aperture and trip the shutter. After securing focus, read the subject distance off the distance scale and set the lens aperture according to the flash-to-subject distance . |
* The basic procedure remains the same whether you use an electronic flash unit or a flash gun.
 |
Interchangeable Camera Back | Various Options in Film Backs | |
Infrared Ray Photography
 |
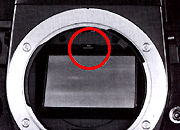
In case of infrared ray photography, focus compensation must be made after securing focus in the normal manner by sighting your subject through the viewfinder, For focus compensation in infrared ray photography, use the R index on the lens barrel. After focusing in the normal manner, turn the focusing ring and align the subject distance with this R index |
* In case of infrared ray photography, always use a red filter.
* For proper exposure setting, read the instruction sheet which comes with the infrared ray film carefully.
Multiple Exposures
The photographic technique under which exposure of the same or different subject is made more than once on the same frame is called intentional multiple exposure. Although multiple exposure operation in the RTS (In general, most SLR cameras before the Canon A-1 (1977-78) and the Nikon FM(1977) which has a separate, one touch multiple exposure lever to operate. The RTS here also lacked such a dedicated lever or button. I cannot regard it is a comfortable or convenient operation in the RTS as compared, but it still has the provision for such request.
 |
1. Trip the shutter and make the first exposure. |
3. Press the magnetic release and make the second exposure. Repeat the same procedure if exposure is to be made more than twice on the same frame. Because, each time the film advance lever is given a full wind,the exposure counter will advance by one setting, keep track of the number of exposures made on the same frame.
For intentional multiple exposure, it is
advisable to choose a dark background first and to superimpose a subject with a brighter
background. Multiple exposure of subjects against an equally bright background will
not come out too well.
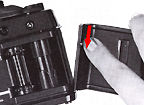
Interchangeable Focusing
Screens | More information on this topic |
UPDATE:-
Hello, First, thank you for an amazing site! I feel that your page on Contax focusing
screens could be improved a bit. Are you aware that the RTS II screens do not fit
the original RTS? The screens for the original RTS are a bit smaller and the tab
is located in a different place. Searching the net it's very difficult to find information
on which screens fit the original RTS and based on KEH's pages the correct answer
seems to be screens without a prefix like #1 = microprism or #3 = split-image 45
degree while the numbering is the same as the RTS II FS-series screens. It would
be great if you could add this info to your page and maybe prevent others making
the mistake of getting a RTS II screen for the RTS. A separate row for the RTS in
the quick reference table would be very nice.
Best Regards, Petri Rahikkala <petri_rahikkala@hotmail.com>
 |
 |
Contax RTS was one of the rare few models available in the seventies that has focusing screen interchangeability. Before interchanging the focusing screen, read the instructions supplied with each screen. Avoid touching the screen surface directly with your finger tip. Use a pair of tweezers. |
Also, take care not to touch the surface
of the deflection mirror.
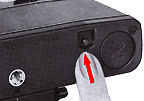
1. After removing the lens from its mount, pull the focusing screen release lug
forward. By doing so, the focusing screen frame will come loose, enabling you to
remove the screen with the aid of a pair of tweezers.
2. By using a pair of tweezers, catch hold of the lobe on one edge of the
focusing screen to be used instead of the standard screen, and place it right side
up in the screen frame. Then, gentry push up the frame until it locks into position.
 |
 |
 |
 |
Caution: Do not wipe the screen surface with cloth or tissue paper. In case dust, grit or lint has accumulated in the viewfinder, blow it away by using a blower brush, after removing the screen.
When the camera lens is focused on a certain subject, objects in the foreground and background will appear acceptably sharp in the picture. The range over which the foreground and background objects are reproduced acceptably sharp is called the depth of field. There is a separate related article in this PIM site if you have sometime to digest. If you don't have the time, just consume the summary below:
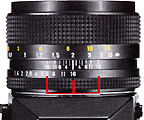 |
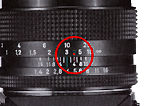
The depth of field can be determined either visually by pushing in the depth-of-field preview button or by reading off the depth-of-field scale on the lens barrel. When using the scale, secure focus and read off the range indicated by the identical figures on both sides of the index corresponding to the f-stop in use. |
The depth of field is more extensive as you stop down the lens, as you focus on a more distant subject, and in the background rather than in the foreground.
General Care and Maintenance:
Do not leave your camera in the trunk
or glove compartment of your car or expose it to excessive heat. The battery as well
as the camera mechanism may become adversely affected by the heat, sometimes making
it impossible to obtain correct exposure.
When
exposed accidentally to excessive heat, leave the camera to cool to normal ambient
temperature.
The
most common causes of malfunction are exposure to humidity, salty sea breeze and
subjecting the camera to knocks and jolts. To obtain faithful service, take good
care of your camera and avoid rough handling.
To
clean the surfaces of the focusing screen, deflection mirror and lens, always use
a blower brush. Do not touch these surfaces directly with your fingers. To wipe off
smears on the mirror and lens surface, use a soft, lint less cloth. Take utmost precautions
when cleaning the viewing screen surface.
Keep
the shutter in released state when your camera is not i n use. If possible, take
out the battery from the battery compartment.
Do
not subject your camera to sudden changes in temperature. It may cause the electrical
contacts to corrode and may bring about poor electrical contact.
When
installing the battery, make it a rule to wipe both ends clean. Oily smears on the
contact surface may cause poor electrical contact.
When
the camera is to be left unused for any great length of time, take out the battery
from its compartment.
Things to look
out when trying to buy it used:
Since other operation is electronic, you may use the mechanism to start first.
The shutter curtain. Check with the shutter cock or in release position. Point
against a strong light source, slowly do a film advance operation and see if the
shutter curtain exhibits any light leakage, deformed or loosen shutter curtain but
more importantly, do a visual inspection and see any fungus or deposition formed.
You can use the mirror lock up lever to flip the mirror in a upward position to check
the inner part of the shutter curtain as well. Next on top of the check list is inside
the battery compartment, check if there is any sign of previous battery leakage
like corrosive contacts on the polarity. You should avoid the camera. Always put
a battery inside and test various operation function normally, if there is a delay
action on the reflex mirror, remove the lens and see if it is only the melted sponge
that has caused the mirror to stick when flip up (That is not a main concern, it
can be easily replaced). If cosmetic is a consideration, the artificial leather used
on the camera body, though comfortable to hold but in certain cases, may not be that
tough as claimed. However, since underneath the leather is a strong metal casing,
it should not affect basic camera operation, but if such cases persist, compromised
with reasonably pricing. But generally, other than sentimental or collective reason,
you should not pay a too much of a premium over this model. If you have some
extra room financially, consider the second model, easily a vastly improved model.
| Previous | Next | Main Reference
Map or Specifications
Beyond the
User's Manual, addressing other Issues : 4 Parts
Scanned
early Contax's system accessories files in PDF format: Motor Drive | Winder | Macro | Databack/Remote | Flash | Early Lenses
1 & 2 | Accessories
Other Contax Accessories: Filters | Eye-Cups / Diopter lens / Right Angle Finder / Magnifier| Lens Caps/Lens Rear Caps / Body Caps / Lens Pouches | Soft lens Shades/Metal Lens Hoods/Adapter Ring/Gelatin Filter Holder set | Focusing Screens
| Back | to Index Page of Contax
RTS
| Back | to Index Page of Contax
RTS II Quartz
| Back | to Index Page of Contax
RTS III
| Back | to Main Index Page of
Contax RTS series models
Camera
Models: | Contax RTS |
RTS
II
| RTS III |
Shared
Resources:|
Motor
Drive-
PMD
W6| Winder - RTW-W3 | Screens |
Flash | Macro | Remote | Databack | Accessories | Zeiss T* Optic | Instruction Manuals: Contax RTS HTML | PDF | Contax RTS II Quartz
HTML | PDF | Contax RTS III (3
parts PDF
by mike@butkus.org, M. Butkus, NJ. Part A | Part B | Part C |
OFF TOPIC:-
Personal Note
| Main Reference
Map: RTS - HTML | PDF (206k) RTS II - HTML | PDF(308k) RTS III - HTML | PDF |
Specification: RTS - HTML | PDF(159k) RTS II - HTML | PDF(66k) RTS III - HTML | PDF |
1975: RTS 1979: 139Q 1980: 137MD 1982: 137MA 1982: RTS II |
1985: 159MM 1987: 167MT 1990: RTS III 1992: S2 1992: S2b |
1992: ST 1994: RX 1996: AX 1998: Aria 2000~ |
| List of Carl Zeiss T* lenses for Contax SLR cameras | ||||
|
Message Board | for your favorite Contax
RTS Series SLR camera Models
| Message Board | for your favorite optics
Caller for help: I am not entirely too happy with the content and images used here thus far, but since I have my limitation and if you think you can contribute your part as a Contax user to make this site better, mail them to me. Appropriate credit will be given for such effort.
| Home - Photography in Malaysia |
![]()
Credit: MClau, joint maintainer of the Contax RTS MB. Some of the content are extracts from: Cees De Groot, who maintains a Contax FAQ site and Tim Roger website on Contax SLR cameras, A few of the images on Zeiss lenses were downloaded from Contax US website. My buddy, Yeak & Rizal Yahya, for their cool programming with Contax RTS's Message Board, Note:certain contents and images appeared in this site were either scanned from official marketing leaflets, brochures, sales manuals or publications published by Kyocera over the years and/or contributions from surfers who claimed originality of their own work solely for educational purposes. The creator of the site will not be responsible for any discrepancies that may arise from such possible disputes except rectifying them after verification."Kyocera", "Yashica", "Contax" & "Carl Zeiss T*" are registered trade names of Kyocera Corporation Inc., Japan. A site made with an Apple IMac, dedicated to all fans of Contax cameras and Zeiss Optics.